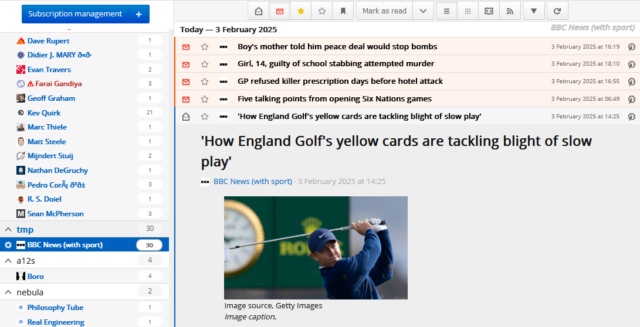
Their inclusion of non-news content such as plugs for iPlayer and their apps,
Their repeating of identical news stories with marginally-different GUIDs, and
All of the sports news, which I don’t care about one jot.
Well, it turns out that some people want #3: the sport. But still don’t want the other two.
Some people actually want to read this crap, apparently.
I shan’t be subscribing to this RSS feed, and I can’t promise I’ll fix it if it gets broken. But if “without the crap, but with the sports” is the way you like your BBC News RSS feed,
I’ve got you covered:
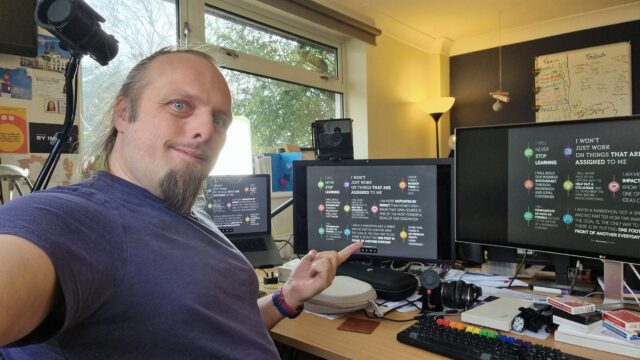
Today was my first day back at work after three months of paid leave1. I’d meant to write about the overall experience of my sabbatical and the things I gained
from it before I returned, but I’m glad I didn’t because one of the lessons only crystallised this morning.
This is about the point on the way back from the school run at which I pull out my phone and see what’s happening in the world or at work. But not today.
My typical work schedule sees me wake up some time before 06:30 so I can check my notifications, formulate my to-do list for the day, and so on, before the kids get up. Then I can focus
on getting them full of breakfast, dressed, and to school, and when I come back to my desk I’ve already got my day planned-out. It’s always felt like a good way to bookend my day, and
it leans into my “early bird” propensities2.
Over the last few years, I’ve made a habit of pulling out my phone and checking for any new work Slack conversations while on the way back after dropping the kids at school. By this
point it’s about 08:45 which is approximately the time of day that all of my immediate teammates – who span five timezones – have all checked-in. This, of course, required that I was
signed in to work Slack on my personal phone, but I’d come to legitimise this bit of undisciplined work/life-balance interaction by virtue of the fact that, for example, walking the dog
home from the school run was “downtime” anyway. What harm could it do to start doing “work” things ten minutes early?
Here. Here is where work happens (or, y’know, anywhere I take my work laptop to… but the crucial thing is that work has a time and a place, and it doesn’t include “while walking the
dog home after dropping the kids at school”).
But walking the dog isn’t “downtime”. It’s personal time. When I’m looking at your phone and thinking about work I’m actively choosing not to be looking at the
beautiful countryside that I’m fortunate enough to be able to enjoy each morning, and not to be thinking about… whatever I might like to be thinking about! By blurring my
work/life-balance I’m curtailing my own freedom, and that’s bad for both my work and personal lives!
My colleague Kyle recently returned from six months of parental leave and shared some wisdom with me, which I’ll
attempt to paraphrase here:
It takes some time at a new job before you learn all of the optimisations you might benefit from making to your life. This particular workflow. That particular notetaking strategy. By
the time you’ve come up with the best answers for you, there’s too much inertia to overcome for you to meaningfully enact personal change.
Coming back from an extended period of leave provides the opportunity to “reboot” the way you work. You’re still informed by all of your previous experience, but you’re newly blessed
with a clean slate within which to implement new frameworks.
He’s right. I’ve experienced this phenomenon when changing roles within an organisation, but there’s an even stronger opportunity, without parallel, to “reboot” your way of
working when returning from a sabbatical. I’ve got several things I’d like to try on this second chapter at Automattic. But the first one is that I’m not connecting my personal phone to
my work Slack account.
2 Mysteriously, and without warning, at about the age of 30 I switched from being a “night
owl” to being an “early bird”, becoming a fun piece of anecdotal evidence against the idea that a person’s preference is genetic or otherwise locked-in at or soon after
birth. As I’ve put it since: “I’ve become one of those chirpy, energetic ‘morning people’ that I used to hate so much when I was younger.”.
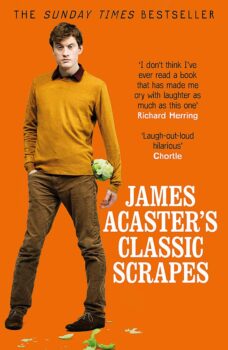
On the flight over to Trinidad I finished reading James Acaster’s Classic
Scrapes by James Acaster, which I received as part of our family’s traditional Christmas Eve book exchange. I’m a big fan of his
stand-up work (and I maintain that his 2018 serialised show Repertoire is among of the most artfully-crafted pieces of live comedy ever written) and clearly JTA recalled this fact when giving me this book.
Many of the stories in Classic Scrapes have featured in his work before, in various forms, and I found myself occasionally recognising one and wondering if I’d accidentally
skipped back a chapter. It helps a lot to read them in Acaster’s “voice” – imagining his delivery – because they’re clearly written to be enjoyed in that way. In the first few chapters
the book struggled to “grab” me, and it wasn’t until I started hearing it as if I were listening in to James’s internal monologue that it gave me my first laugh-out-loud moment.
After that, though, it got easier to enjoy each and every tall tale told. Acaster’s masterful callback humour ties together anecdotes about giant letter Ws, repeated car crashes, and
the failures of his band (and, I suppose, almost everything else in his life, at some point or another), across different chapters, which is fun and refreshing and adds a new dimension
to each that wouldn’t be experienced in isolation.
A further ongoing concept seems to be a certain idolisation of Dave Gorman, whose Are You Dave Gorman? and Googlewhack
storytelling style was clearly an inspiration. In these, of course, a series of (mis)adventures with a common theme or mission becomes a vehicle for a personal arc within which the
absurdity of the situations described is made accessible and believable. But with James Acaster’s self-deprecating style, this is delivered as a negative self-portrayal: somebody who
doesn’t live up to their idea of their own hero, and becomes a parody of themselves for trying. It’s fun, but perhaps not for everybody (I tried to explain to Ruth why I’d laughed out loud at something but then needed to explain to her who Dave Gorman is and why that matters.)
I just finished reading Kate Manne‘s Entitled. I can’t remember where I first heard about it or why I opted to buy a copy, but it had been sitting in my to-read pile
for a while and so I picked it up last month to read over the festive period.
The book takes a pop-sci dive into research around male entitlement and the near-universal influence of patriarchal ideology. It’s an often bleak and sometimes uncomfortable read: Kate
Manne draws a line connecting the most egregious and widely-reported abuses of power by men to much-more-commonplace “everyday” offences, many of which are routinely overlooked or
dismissed. The examples she provides are a sad reminder of quite how deeply-embedded into our collective subconscious (regardless of our genders) are our ideas of gender roles and
expectations.
It’s feels somewhat chastening to see oneself in some of those examples, whether by my own assumed entitlement or merely by complicity with problematic social norms. We’ve doubtless all
done it, at some point or another, though, and we don’t make progress towards a better world by feeling sorry for ourselves. By half way through the book I was looking for action points
that never came; instead, the author (eventually) lays out what she’s doing and leaves the reader to make their own decisions.
The vast majority of the book is pretty bleak, and it takes until the final chapter before it reaches anything approximating hope (although the author refrains from classifying it as
such), using Manne’s then-imminent parenthood as a vehicle. She finishes by talking about the lessons she hopes to impart to her daughter about how to thrive in this world, which seems
less-optimistic than discussing, perhaps, how to improve the world for everybody, but is still the closest thing it delivers to answering “what can we do about this?”.
But I suppose that’s the message in this book: male entitlement is a product of our endemic patriarchy and, try as we might, it’s not going away any time soon. Instead, we should be
picking our battles: producing a generation of women and girls who are better-equipped to understand and demand their moral rights and of men and boys who try to work against, rather
than exploit, the unfair advantages they’re afforded at the expense of other genders.
That I’d hoped to come to the end of the book with a more feel-good outlook betrays the fact that I’d like there to be some kind of magical quick fix to a problem that I’ve
certainly helped perpetuate. There isn’t, and that’s a let down after the book’s uncomfortable ride (not a let down on the part of the book, of course: a let down on the part of the
world). The sadness that comes from reading it is magnified by the fact that since its publication in 2020, many parts of the Western world and especially Manne’s own USA have gotten
worse, not better, at tackling the issue of male entitlement.
But wishful thinking doesn’t dismantle the patriarchy, and I was pleased to get to the back cover with a slightly sharper focus on the small areas in which I might be able to help fight
for a better future. A good read, so long as you can tolerate the discomfort that may come from casting a critical lens over a society that you’ve been part of (arguably it could be
even-more-important if you can’t tolerate such a discomfort, but that’s another story).
(In 2025 I’m going to try blogging about the books I read, in addition to whatever else I write about. Expect an eclectic mix of fiction and non-fiction, probably with a few lapses
where I forget to write about something until well after I’m deep into what follows it and then forget to say anything about it ever.)
Yesterday, I fulfilled the primary Three Rings objective I set for myself when I kicked off my sabbatical
twelve weeks ago and migrated the entire application to a new hosting provider (making a stack of related improvements along the way).
Months prior, I was comparing different providers and their relative merits, making sure that our (quirky and specific) needs could be met. Weeks beforehand, I was running a “dry run”
every four or five days, streamlining the process of moving the ~450GB1
of live data while minimising downtime. Days before the event felt like the countdown for a rocket launch, with final preparations underway: reducing DNS time-to-lives, ensuring users
knew about our downtime window, and generally fitting in a little time to panic.
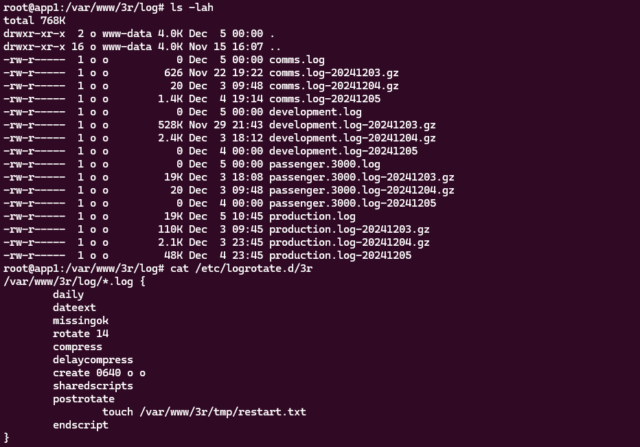
I made reference on International Volunteer Day to how we needed to configure logrotate. When you’re building architecture for a system as gnarly as Three Rings, there’s
about a billion tools that need such careful tweaking2.
The whole operation was amazingly successful. We’d announced an at-risk period of up to six hours and I was anticipating it taking three… but the whole thing was completed within
a downtime window of just two and a half hours. And I fully credit all of the preparation time. It turns out that “measure twice, cut once” is a sensible strategy3.
It’s challenging to pull off a “big”, intensive operation like this in an entirely voluntary operation. I’m not saying I couldn’t have done it were I not on sabbatical, but
it’d certainly have been harder and riskier.
1Three Rings‘ user data is represented by a little under 70GB of MariaDB
databases plus about 380GB of organisational storage: volunteer photos, files, email attachments, and the like. Certainly not massive by comparison to, say, social media sites, search
engines, and larger eCommerce platforms… but large enough that moving it takes a little planning!
2 Okay, a billion tools to configure? That’s an exaggeration. Especially
now: since the architectural changes I’ve put in place this week, for example, production app server builds of Three Rings no require a custom-compiled build of Nginx (yes,
this really was something we used to need).
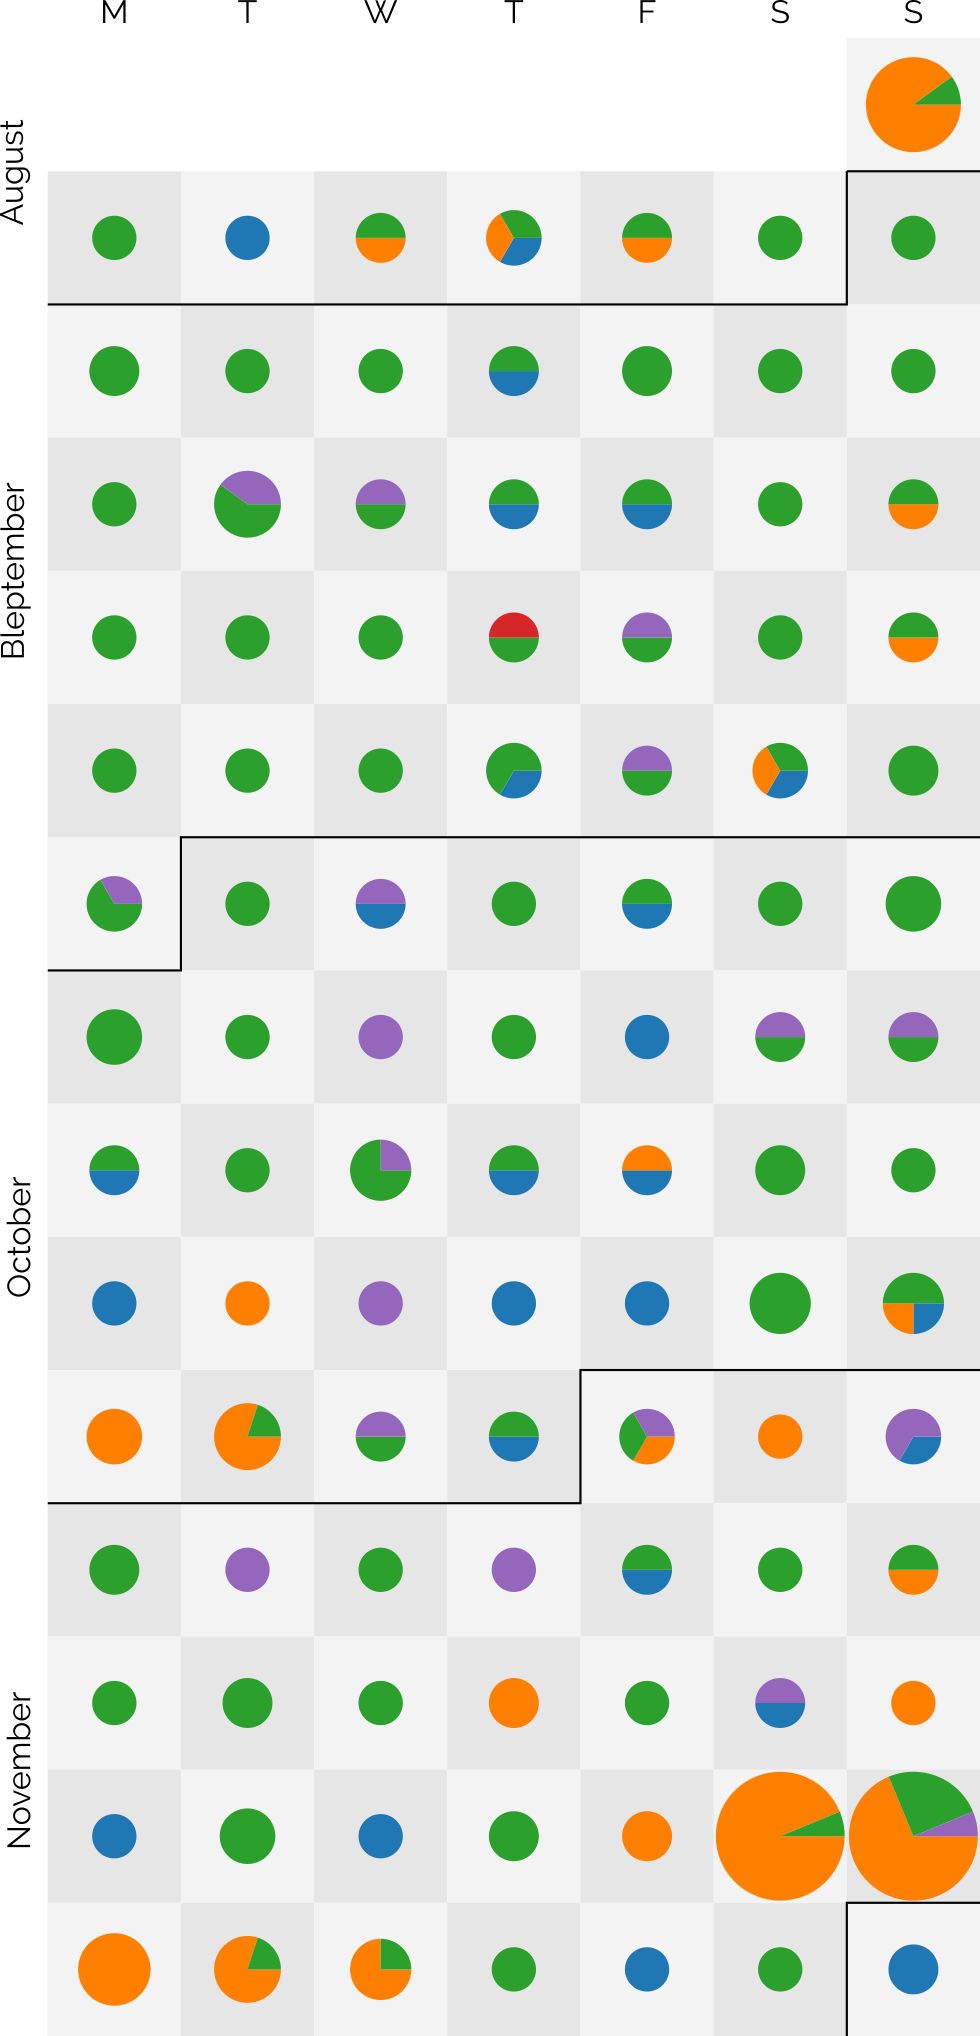
The dots are sized based on the number of posts and broken-down by post kind: articles are blue, notes are green, checkins are orange, reposts are purple, and replies are red3.
I didn’t set out with the aim of getting to a hundred4, as I might well
manage tomorrow, but after a while I began to think it a real possibility. In particular, when a few different factors came together:
Travel’s given me more opportunity for geocaching (and, this last week, geohashing), as reflected in my copious checkin logs for that period.
Earlier this year, inspired by Clayton Errington, I came up with a process to streamline my mobile blogging
“flow”5. I now use a custom
Progressive Web App to provide a better interface for quickly posting on-the-move to one or both of this blog and my personal Mastodon account,
which I tested heavily during Bleptember.
Previous long streaks have sometimes been aided by pre-writing posts in bulk and then scheduling them to come out one-a-day6.
I mostly don’t do that any more: when a post is “ready”, it gets published.
I didn’t want to make a “this is my 100th day of consecutive blogging” on the 100th day. That attaches too much weight to the nice round number. But I wanted to post to
acknowledge that I’m going to make it to 100 days of consecutive blogging… so long as I can think of something worth saying tomorrow. I guess we’ll all have to wait and see.
Footnotes
1 Given that I’ve been blogging for over 26 years, that I’m still finding noteworthy
blogging “firsts” is pretty cool, I think
2 My previous record “streak” was only 37 days, so there’s quite a leap there.
3 A massive 219 posts are represented over the last 99 days: that’s an average of over 2 a
day!
On a number of occasions over the first two decades of this century I’ve attempted to write a particular short story with a science fiction/alternate history feel. Now, I’ve given up on
it, and that’s… fine.
Fiction
The story’s taken several forms over the years, but the theme’s always been the same: a crazy narrative spun by an isolated society turns out, incredibly, to be true. But ultimately the
people who discover that fact choose to keep it a secret because the flawed lie they live in is preferable to the instability and chaos that they fear could result. It taps into ideas
about conspiracy theories, hidden worlds, and the choices we make when we have to choose between living authentically or living comfortably.
Guess this Obsidian note is off to the “Never” folder, now.
In its most-concrete form, the story covered the political aftermath of the capture by the DPRK of a fishing boat that (allegedly) drifted into North Korean waters1. The North Korea of the story represents the country at its most
isolationist and mysterious, and the captured trawler crew are surprised to experience at Pyongyang a socialist utopia supported by futuristic technology. It turns out that North
Korea’s in-universe propaganda is true: they really are an advanced self-reliant nation whose message of peace is being distorted by Western imperialist leaders. Insofar as the truth is
known in the West, it’s suppressed for fear that the Korean model represents a democratic, post-scarcity future that threatens to undermine the power of the oligarchs of the world.
When the boat and those aboard it are repatriated with the assumption that they will act as ambassadors to the outside world, the crew are subjected to interrogations and cajoling by
their home nations. They mustn’t talk about what they saw North of the 38th parallel, they’re told, with threats of imprisonment and violence if they do and financial inducements
offered for their compliance. But in the end, the most-effective message for getting the wayward fisherfolk on side is their realisation that the world isn’t ready for the truth. In a
dialogue between the imprisoned seafarers, they agree that they should take the bribes and return quietly to their families, not for their own sake but because they believe that telling
their story would lead to a terrible war between two equally-matched parties: a small nation armed with futuristic sci-fi weapons, on one side, and the might of the nuclear superpowers
of the rest of the world.
As a final twist, it’s revealed that the captain of the vessel was actually a spy, aware of the truth the entire time, who allowed the boat to go off-course with an aim of gathering
information on the North Korean situation. The story finishes with the captain, having been instrumental in persuading their crew not to share what they saw, wavering in their
confidence, and possibly being implied to be the author of the story.
Re-reading my notes and drafted content, I’ve got to admit that it’s got a certain feel of… Dr.
Strangelove discovers Wakanda? Or maybe more like the Pueblo incident set in the world of They Live.2
It might’ve been fun to finish, someday, but now it’s not.
Sadder
That nod to Dr. Strangelove is apt, because my aim was to write something which looked farcically at the nature of political competition on a global scale, in a world in
which the zaniest possible conspiracy theory turned out to be true. Strangelove used the existence of a Project Sundial-style doomsday device as the surprise truth; I was using the idea that DPRK propaganda might actually be more-honest than
the narratives of its rivals3.
“Gee, I wish we had one of them doomsday machines,” was funnier when nuclear annihilation was the only existential threat we
were routinely talking about. Nowadays saying it sounds like it carries a bit of Farnsworth’s dejected “I don’t
want to live on this planet anymore” energy.
In my off-and-on-again long-running effort to pen the story, I last made any real effort back in around 2015-2016. Since then, the entire concept hasn’t been funny any more. Today, the
story would be less farce than lampoonery, and not in a good way.
When I first envisaged the concept of the story, researching conspiracy theories meant laughing at Flat Earthers and picking holes in the arguments of the proponents of a “moon landing
hoax”. For the most part, conspiracy theories seemed ridiculous, but not dangerous4.
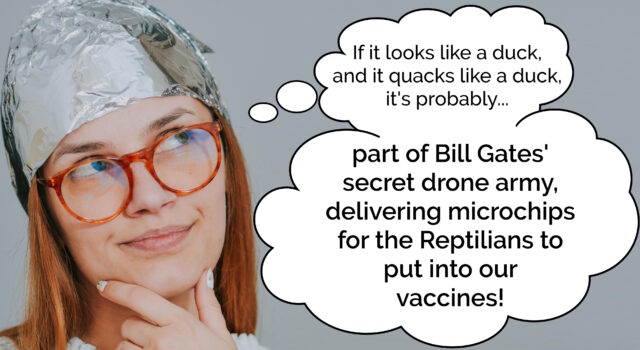
But somewhere along the way from then to now, conspiracy theories started becoming more… mainstream?
Don’tcha miss when conspiracy theorists were mostly harmless idiots?
It turns out that my comedy villain – the leader of the “free” world who leverages enormous power to lie to and manipulate everybody – isn’t a laughing matter any more.
Perhaps I should try my hand at writing bleak, dystopian fiction instead.
Footnotes
1 Like this incident in 2009, perhaps, although there
are lots of similar examples before and since.
2 In my notes somewhere I’ve got a concept that I never explored for the story which was
that North Korea is under the control of a benevolent alien species trying to uplift humanity, while much of the rest of the developed world is under the influence of a malicious
alien species who’re using their position to push humans to terraform Earth into something more-suited to their needs. So maybe like The Forge of God but with a climate change message? I never really
worked on this idea though because it felt like I was weaving too many concepts into one tiny narrative.
4 Obviously I know there are exceptions and I’m speaking from a position of privilege. For
a long while, for example, conspiracy theories relating to holocaust denialism have caused real harm to people. And of course there’s for a long while been actual damage caused by
folks who (loudly) subscribe to false beliefs about HIV, or 9/11, or Sandy Hook, and countless others.
5 This is the kind of conspiracy theory that should be funny: idiot who bitches
about claimed birthplace of president annoys that president enough that he times a battle with a wanted terrorist, so that the terrorist’s death will coincide with the timeslot of the
idiot’s TV programme. But somehow, the way that politics has gone lately, especially in the USA, means that it’s not funny any more. Easily-disprovable conspiracy theories
were amusing when they were the territory of crazy fringe groups; once they get tens of thousands of (armed, militant) believers, they go from being an amusement to being a dangerous
cult.
Here in my hotel room, high above Barcelona, I woke up. It was still dark outside, so I looked to my phone – sitting in its charging cradle – as a bedside clock. It told me that the
time was 02:30 (01:30 back home), and that the sun would rise at 07:17.
But how long would it be, until then?
Daylight savings time is harmonised across Europe by EU Directive 2000/84/EC1, but for all the good this harmonisation achieves it does not
perfectly remove every ambiguity from questions like this. That it’s 02:30 doesn’t by itself tell me whether or not tonight’s daylight savings change has been applied!
It could be 00:30 UTC, and still half an hour until the clocks go back, or it could be 01:30 UTC, and the clocks went back half an hour ago. I exist in the “hour of uncertainty”, a
brief period that happens once every year2. Right now, I don’t know what time it is.
I remember when it first started to become commonplace to expect digital devices to change their clocks twice a year on your behalf. You’d boot your PC on a morning and it’d pop up a
dialog box to let you know what it had done: a helpful affordance that existed primarily, I assume, to discourage you from making the exact same change yourself, duplicating the effort
and multiplying the problem. Once, I stayed up late on last Saturday in March to see what happened if the computer was running at the time, and sure enough, the helpful popup
appeared as the clocks leapt forward, skipping over sixty minutes in an instant, keeping them like leftovers to be gorged upon later.
Computers don’t do that for us anymore. They still change their clocks, but they do it silently, thanklessly, while we sleep, and we generally don’t give it a second thought.
That helpful dialog that computers used to have had a secondary purpose. Maybe we should bring it back. Not as a popup – heaven knows we’ve got enough of those – but just a subtle
subtext at the bottom of the clock screens on our phones. “Daylight savings: clock will change in 30 minutes” or “Daylight savings: clock changed 30 minutes ago”. Such a message could
appear for, say, six hours or so before and after our strange biannual ritual, and we might find ourselves more-aware as a result.
Of course, I suppose I could have added UTC to my world clock. Collapsed the waveform. Dispelled the ambiguity. Or just allowed myself to doze off and let the unsleeping computers do
their thing while I rested. But instead I typed this, watching as the clock reached 02:59 and then to 02:00. I’d started writing during summertime; I’d finished after it ended, a few
minutes… earlier?
You might reasonably have assumed I’d have already enjoyed pickled onion crisps. After all, I not only enjoy actual pickled onions but also the far more “acquired taste” of
pickled eggs, shown.
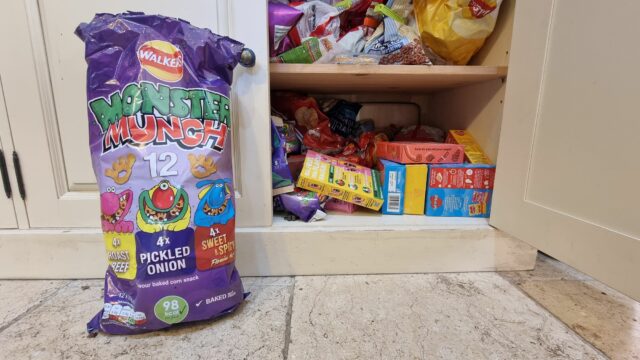
There’s a need for somebody… anybody… to eat Pickled Onion Monster Munch in our household, because we have a bit of an oversupply. In order to reliably get both of the
other flavours that people like (Roast Beef and Flamin’ Hot, respectively), we end up buying multipacks that also contain Pickled Onion flavour, and these unwanted extras pile
up in the snack cupboard until we happen to have a houseguest that we can palm them off onto.
Yes, I’m aware that there are multipacks of individual flavours, but none of our local supermarkets seem to stock multipacks of Flamin’ Hot, which is objectively the best flavour of
Monster Munch and anybody who claims otherwise is wrong.
My entire life, I’ve claimed not to like pickled onion flavour crisps. As a kid, I would only eat salt & vinegar and ready salted flavours, eventually expanding my palate into “meaty”
flavours like chicken and roast beef (although never, absolutely never, prawn cocktail). Later, I’d come to also enjoy cheese & onion and variants thereof, and it’s from this
that I realise that I’m probably being somewhat irrational.
Because if you think about it: if you want to make a “pickled onion” flavour crisp, what flavouring ingredients would you use? It turns out that most crisp manufacturers use a
particular mixture of (a) the ingredient that makes salt & vinegar crisps taste “vinegary” and (b) the ingredient that makes cheese & onion crisps taste “onioney”. So in summary:
I like pickled onions.
I like salt & vinegar crisps, which include an ingredient to make them taste vinegary.
I like cheese & onion crisps, which include an ingredient to make them taste onioney.
Therefore, I ought to like pickled onion crisps, which use two ingredients I like to try to emulate a food I like.
I should like this. Right?
Maybe that deliberate and conscious thought process is all I need? Maybe that’s it, and just having gone through the reasoning, I will now like pickled onion crisps!
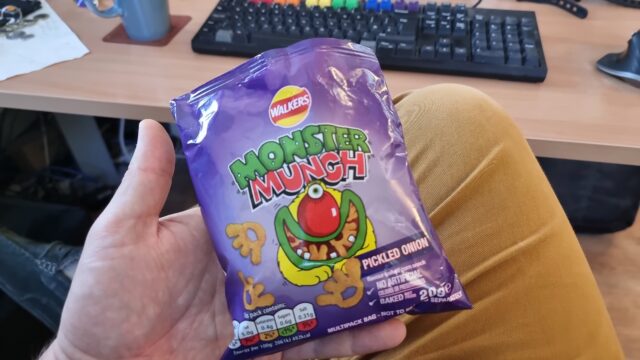
Conveniently, I have a cupboard in my kitchen containing approximately one billion packets of Pickled Onion Monster Munch. So let’s try it out.
The first time I’ve tried a pickled onion flavour crisp in almost 30 years, captured on camera for your amusement.
It turns out they’re okay!
They’re not going to dethrone either of the other two flavours of Monster Munch that we routinely restock on, but at least now I’m in a position where I can do something about our
oversupply.
And all it took was stopping to think rationally about it. If only everything were so simple.
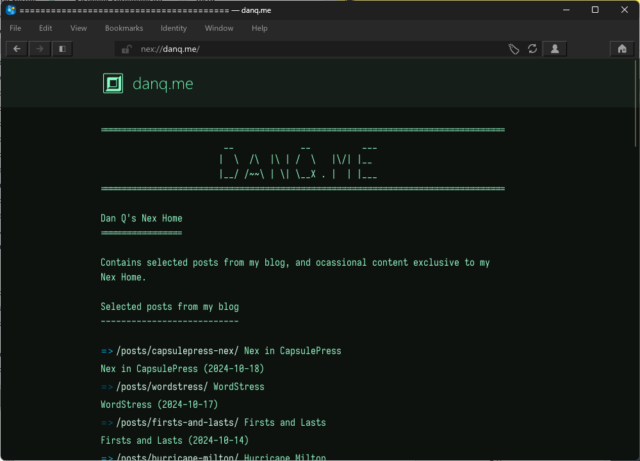
Here’s how nex://danq.me/ looks in my favourite desktop Gemini/smolweb browser Lagrange.
Nex is a lightweight Internet protocol reminiscent to me of Spartan (which CapsulePress also supports), but even more lightweight.
Without even affordances like host identification, MIME types, response codes, or the expectation that Gemtext might be supported by the client, it’s perhaps more like Gopher than it is
like Gemini.
It comes from the ever-entertaining smolweb hub of Nightfall City, whose Web interface clearly states at the top of every page the command you
could have run to see that content over the Nex protocol. Lagrange added support for Nex almost a year ago and it’s such a lightweight protocol that I was quickly able
to adapt CapsulePress’s implementation of Spartan to support Nex, too.
This is genuinely the entirety of my implementation of my Nex server, atop CapsulePress. And it’s mostly boilerplate.
Why, you might ask? Well, the reasons are the same as all the other standards supported by CapsulePress:
The smolweb is awesome.
Making WordPress into a CMS things it was never meant to do is sorta my jam.
It was a quick win while I waited for the pharmacist to shoot me up with 5G microchips my ‘flu and Covid boosters.
If you want to add Nex onto your CapsulePress, just git pull the latest version, ensure TCP port 1900 isn’t firewalled, and don’t add USE_NEX=false to
your environment. That’s all!
A lot of attention is paid, often in retrospect, to the experience of the first times in our lives. The first laugh; the first kiss; the first day at your job1.
But for every first, there must inevitably be a last.
I recall a moment when I was… perhaps the age our eldest child is now. As I listened to the bats in our garden, my mother told me about how she couldn’t hear them as clearly as she
could when she was my age. The human ear isn’t well-equipped to hear that frequency that bats use, and while children can often pick out the sounds, the ability tends to fade with age.
“Helloooo? Are you even listening to me?”
This recollection came as I stayed up late the other month to watch the Perseids. I lay in the hammock in our garden under a fabulously clear sky as the sun finished setting, and –
after being still and quiet for a time – realised that the local bat colony were out foraging for insects. They flew around and very close to me, and it occurred to me that I
couldn’t hear them at all.
There must necessarily have been a “last time” that I heard a bat’s echolocation. I remember a time about ten years ago, at the first house in Oxford of
Ruth, JTA and I (along with
Paul), standing in the back garden and listening to those high-pitched chirps. But I can’t tell you when the very
last time was. At the time it will have felt unremarkable rather than noteworthy.
First times can often be identified contemporaneously. For example: I was able to acknowledge my first time on a looping rollercoaster at the time.
The Tower of Terror at Camelot, circa 1994, was my first looping rollercoaster2.
The ride was disassembled in 2000 and, minus its “tower” theming3lived on for a while as Twist ‘N’ Shout at Loudoun Castle in Ayrshire, Scotland before that park shut down. I
looked at some recent satellite photography and I’m confident it’s now been demolished.
Last times are often invisible at the time. You don’t see the significance of the everyday and routine except in hindsight.
I wonder what it would be like if we had the same level of consciousness of last times as we did of firsts. How differently might we treat a final phone call to a loved one or the
ultimate visit to a special place if we knew, at the time, that there would be no more?
Would such a world be more-comforting, providing closure at every turn? Or would it lead to a paralytic anticipatory grief: “I can’t visit my friend; what if I find out that
it’s the last time?”
Footnotes
1 While watching a wooden train toy jiggle down a length of string, reportedly; Sarah
Titlow, behind the school outbuilding, circa 1988; and five years ago this week, respectively.
2 Can’t see the loop? It’s inside the tower. A clever bit of design conceals the
inversion from outside the ride; also the track later re-enters the fort (on the left of the photo) to “thread the needle” through the centre of the loop. When they were running three
trains (two in motion at once) at the proper cadence, it was quite impressive as you’d loop around while a second train went through the middle, and then go through the middle while a
third train did the loop!
3 I’m told that the “tower” caught fire during disassembly and was destroyed.
From safely outside of its predicted path, just around the Yucatan coast, Hurricane Milton seems like a forboding and distant monster. A growing threat whose path will thankfully take
it away, not towards, me.
My heart goes out to the people on the other side of the Gulf of Mexico who find themselves along the route of this awakened beast.
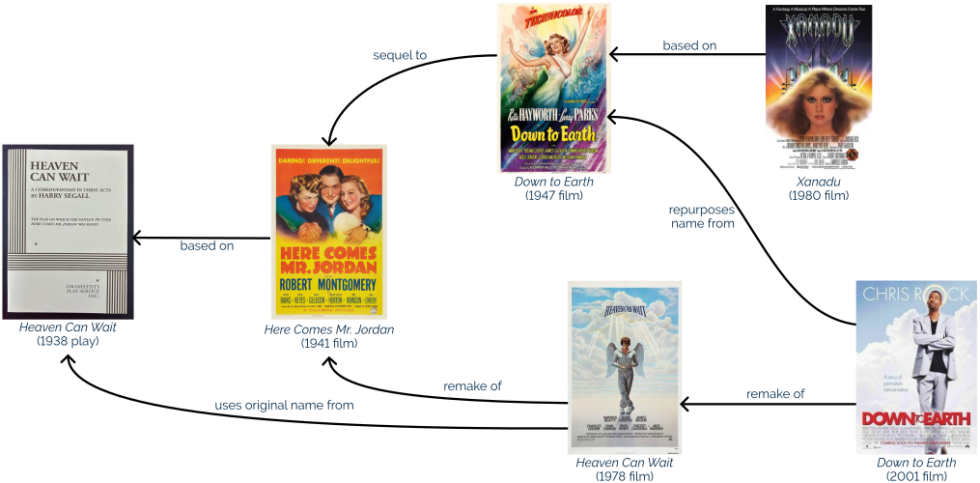
Harry Segell’s 1938 play Heaven Can Wait went on to inspire such an extraordinarily long legacy of follow-ups.
I’ve only seen the most-recent few and my experience is that the older iterations are better, so I probably ought to watch Here Comes Mr. Jordan, right?
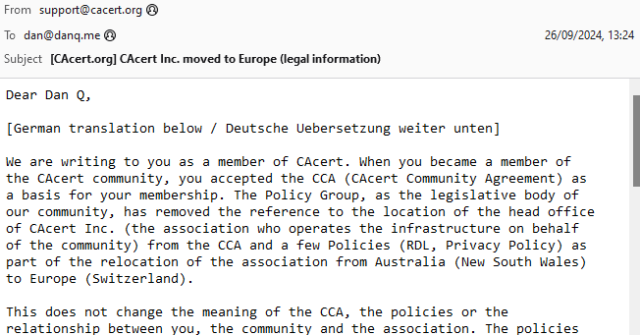
Back when I was a student in Aberystwyth, I used to receive a lot of bilingual emails from the University and its departments1.
I was reminded of this when I received an email this week from CACert, delivered in both English and German.
Simply putting one language after the other isn’t terribly exciting. Although to be fair, the content of this email wasn’t terribly exciting either.
Wouldn’t it be great if there were some kind of standard for multilingual emails? Your email client or device would maintain an “order of preference” of the languages that you
speak, and you’d automatically be shown the content in those languages, starting with the one you’re most-fluent in and working down.
It turns out that this is a (theoretically) solved problem. RFC8255 defines a mechanism for breaking an email into multiple
different languages in a way that a machine can understand and that ought to be backwards-compatible (so people whose email software doesn’t support it yet can still “get by”).
Here’s how it works:
You add a Content-Type: multipart/multilingual header with a defined boundary marker, just like you would for any other email with multiple “parts” (e.g. with a HTML
and a plain text version, or with text content and an attachment).
The first section is just a text/plain (or similar) part, containing e.g. some text to explain that this is a multilingual email, and if you’re seeing this
then your email client probably doesn’t support them, but you should just be able to scroll down (or else look at the attachments) to find content in the language you read.
Subsequent sections have:
Content-Disposition: inline, so that for most people using non-compliant email software they can just scroll down until they find a language they can read,
Content-Type: message/rfc822, so that an entire message can be embedded (which allows other headers, like the Subject:, to be translated too),
a Content-Language: header, specifying the ISO code of the language represented in that section, and
optionally, a Content-Translation-Type: header, specifying either original (this is the original text), human (this was translated by a
human), or automated (this was the result of machine translation) – this could be used to let a user say e.g. that they’d prefer a human translation to an automated
one, given the choice between two second languages.
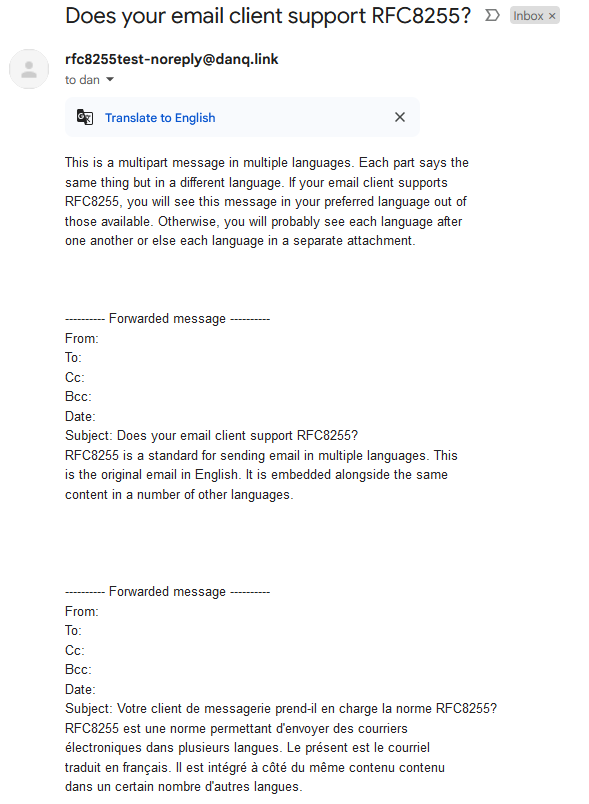
Let’s see a sample email:
Content-Type: multipart/multilingual;
 boundary=10867f6c7dbe49b2cfc5bf880d888ce1c1f898730130e7968995bea413a65664
To: <b24571@danq.me>
From: <rfc8255test-noreply@danq.link>
Subject: Does your email client support RFC8255?
Mime-Version: 1.0
Date: Fri, 27 Sep 2024 10:06:56 +0000

--10867f6c7dbe49b2cfc5bf880d888ce1c1f898730130e7968995bea413a65664
Content-Transfer-Encoding: quoted-printable
Content-Type: text/plain; charset=utf-8

This is a multipart message in multiple languages. Each part says the
same thing but in a different language. If your email client supports
RFC8255, you will see this message in your preferred language out of
those available. Otherwise, you will probably see each language after
one another or else each language in a separate attachment.

--10867f6c7dbe49b2cfc5bf880d888ce1c1f898730130e7968995bea413a65664
Content-Disposition: inline
Content-Type: message/rfc822
Content-Language: en
Content-Translation-Type: original

Subject: Does your email client support RFC8255?
Content-Type: text/plain; charset="UTF-8"
Content-Transfer-Encoding: 7bit
MIME-Version: 1.0

RFC8255 is a standard for sending email in multiple languages. This
is the original email in English. It is embedded alongside the same
content in a number of other languages.

--10867f6c7dbe49b2cfc5bf880d888ce1c1f898730130e7968995bea413a65664
Content-Disposition: inline
Content-Type: message/rfc822
Content-Language: fr
Content-Translation-Type: automated

Subject: Votre client de messagerie prend-il en charge la norme RFC8255?
Content-Type: text/plain; charset="UTF-8"
Content-Transfer-Encoding: 7bit
MIME-Version: 1.0

RFC8255 est une norme permettant d'envoyer des courriers
électroniques dans plusieurs langues. Le présent est le courriel
traduit en français. Il est intégré à côté du même contenu contenu
dans un certain nombre d'autres langues.

--10867f6c7dbe49b2cfc5bf880d888ce1c1f898730130e7968995bea413a65664--
Why not copy-paste this into a raw email and see how your favourite email client handles it! That’ll be fun, right?
Can I use it?
That proposed standard turns seven years old next month. Sooo… can we start using it?4
Turns out… not so much. I discovered that NeoMutt supports it:
NeoMutt’s implementation is basic, but it works: you can specify a preference order for languages and it respects it, and if you don’t then it shows all of the languages as a series
of attachments. It can apparently even be used to author compliant multilingual emails, although I didn’t get around to trying that.
Support in other clients is… variable.
A reasonable number of them don’t understand the multilingual directives but still show the email in a way that doesn’t suck:
Mozilla Thunderbird does a respectable job of showing each language’s subject and content, one after another.
Some shoot for the stars but blow up on the launch pad:
GMail displays all the content, but it pretends that the alternate versions are forwarded messages and adds a stack of meaningless blank headers to each. And then offers to
translate the result for you, even though the content is already right there in English.
Others still seem to be actively trying to make life harder for you:
ProtonMail’s Web interface shows only the fallback content, putting the remainder into .eml attachments… which is then won’t display, forcing you to download them and
find some other email client to look at them in!5
And still others just shit the bed at the idea that you might read an email like this one:
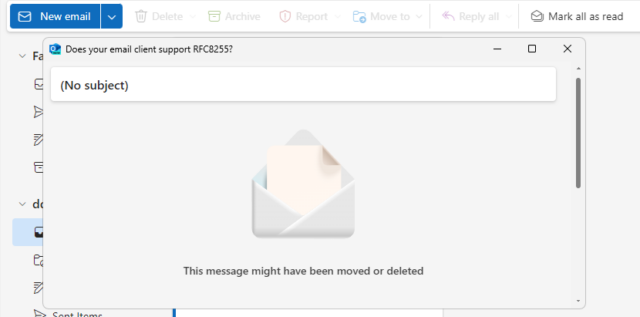
Outlook 365 does appallingly badly, showing the subject in the title bar, then the words “(No subject)”, then the message “This message might have been removed or deleted”. Just
great.
That’s just the clients I’ve tested, but I can’t imagine that others are much different. If you give it a go yourself with something I’ve not tried, then let me know!
I guess this means that standardised multilingual emails might be forever resigned to the “nice to have but it never took off so we went in a different direction” corner of the
Internet, along with the <keygen> HTML element and the concept of privacy.
Footnotes
1 I didn’t receive quite as much bilingual email as you might expect, given that the
University committed to delivering most of its correspondence in both English and Welsh. But I received a lot more than I do nowadays, for example
2 Although you might not guess it, given how many websites completely ignore your
Accept-Language header, even where it’s provided, and simply try to “guess” what language you want using IP geolocation or something, and then require that you find
whatever shitty bit of UI they’ve hidden their language selector behind if you want to change it, storing the result in a cookie so it inevitably gets lost and has to be set again the
next time you visit.
3 I suppose that if you were sending HTML emails then you might use the lang="..." attribute to mark up different parts of the message as being in different
languages. But that doesn’t solve all of the problems, and introduces a couple of fresh ones.
4 If it were a cool new CSS feature, you can guarantee that it’d be supported by every
major browser (except probably Safari) by now. But email doesn’t get so much love as the Web, sadly.
5 Worse yet, if you’re using ProtonMail with a third-party client, ProtonMail screws up
RFC8255 emails so badly that they don’t even work properly in e.g. NeoMutt any more! ProtonMail swaps the multipart/multilingual content type for
multipart/mixed and strips the Content-Language: headers, making the entire email objectively less-useful.
I’m a big fan of blocking out uninterrupted time on your work calendar for focus activities, even if you don’t have a specific focus task to fill them with.
It can be enough to simple know that, for example, you’ve got a 2-hour slot every Friday morning that you can dedicate to whatever focus-demanding task you’ve got that week, whether
it’s a deep debugging session, self-guided training and development activities, or finally finishing that paper that’s just slightly lower priority than everything else on your
plate.
My work focus time is Friday mornings. It was originally put there so that it immediately followed my approximately-monthly coaching sessions, but it’s remained even since they
wandered elsewhere.
I appreciate that my colleagues respect that blocked period: I almost never receive meeting requests in that time. That’s probably because most people, particularly because we’re in
such a multi-timezone company, use their calendar’s “find a
suitable time for everybody” tool to find the best time for everyone and it sees that I’m “busy” and doesn’t suggest it.
If somebody does schedule a meeting that clashes with that block then, well, it’s probably pretty urgent!
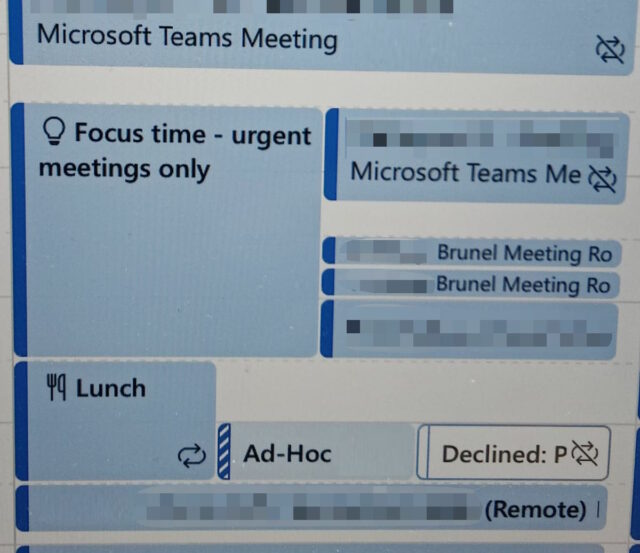
But it turns out this strategy doesn’t work for everybody:
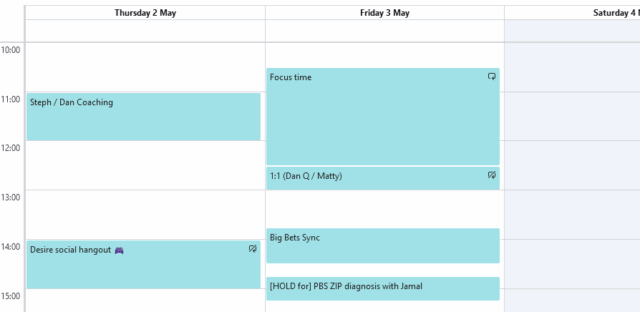
‘Urgent meetings only’ might not mean the same thing to you and I as it does to the not one, not two, not three, but four people who scheduled meetings that clash with it.
My partner recently showed me a portion of her calendar, observing that her scheduled focus time had been
overshadowed by four subsequently-created meetings that clashed with it. Four!
Maybe that’s an exception and this particular occasion really did call for a stack of back-to-back urgent meetings. Maybe everything was on fire. But whether or not this
particular occasion is representative for my partner, I’ve spoken to other friends who express the same experience: if they block out explicit non-meeting time on their
calendar, they get meeting requests for that time anyway. At many employers, “focus time” activities don’t seem to be widely-respected.
Maybe your workplace is the same. The correct solution probably involves a cultural shift: a company-wide declaration in favour of focus time as a valuable productivity tool
(which it is), possibly coupled with recommendations about how to schedule them sensitively, e.g. perhaps recommending a couple of periods in which they ought to be scheduled.
But for a moment, let’s consider a different option:
A silly solution?
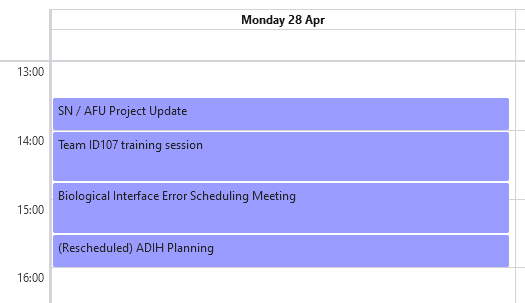
Does your work culture doesn’t respect scheduled focus time but does respect scheduled meetings? This might seem to be the case in the picture above: note that the meetings
that clash with the focus time don’t clash with one another but tessellate nicely. Perhaps you need… fake meetings.
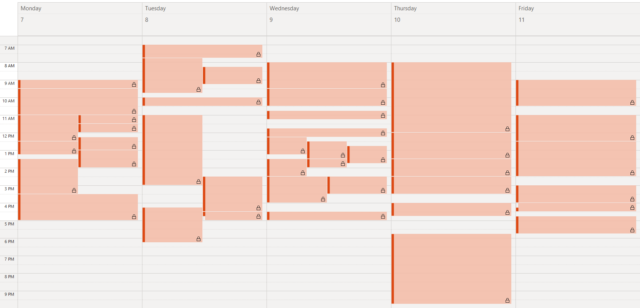
“Wow, what a busy afternoon Dan’s got. I’d better leave him be.”
Of course, creating fake meetings just so you can get some work done is actually creating more work. Wouldn’t it be better if there were some kind of service that could do it
for you?
Here’s the idea: a web service that exposes an API endpoint. You start by specifying a few things about the calendar you’d like to fill, for example:
What days/times you’d like to fill with “focus time”?
What industry you work in, to help making convincing (but generic) event names?
Whether you’d like the entire block consistently filled, or occasional small-but-useless gaps of up to 15 minutes inserted between them?
This results in a URL containing those parameters. Accessing that URL yields an iCalendar feed
containing those meetings. All you need to do is get your calendar software to subscribe to those events and they’ll appear in your calendar, “filling” your time.
So long as your iCalendar feed subscription refreshes often enough, you could even have an option to enable the events to self-delete e.g. 15 minutes before their start time, so that
you don’t panic when your meeting notification pops up right before they “start”!
This is the bit where you’re expecting me to tell you I made a thing
Normally, you’d expect me to pull the covers off some hilarious domain name I’ve chosen and reveal exactly the service I describe, but I’m not doing that today. There’s a few reasons
for that:
I’m not saying I think the prior art in this area is good, but it’s certainly good-enough.
Firstly, I’ve got enough too many pointless personal/side projects on the go already1. I don’t need another
distraction.
Secondly, it turns out others have already done 90% of the work. This
open-source project runs locally and fills calendars with (unnamed, private) blocks of varying lengths. This iOS app
does almost exactly what I described, albeit in an ad-hoc rather than fully-automated way. There’s no point me just doing the last 10% just to make a joke work.
And thirdly: while I searched for existing tools I discovered a significant number of people who confess online to creating fake meetings in their calendars! While some of these do
so for reasons like those I describe – i.e. to block out time and get more work done in an environment that doesn’t respect them simply blocking-out time – a lot of folks admit to doing
it just to “look busy”. That could be either the employee slacking off, or perhaps having to work around a manager with a presenteeism/input-measurement based outlook (which is a
terrible way to manage people). But either way: it’s a depressing reason to write software.
Nope
So yeah: I’m not going down that avenue.
But maybe if you’re in a field where you’d benefit from it, try blocking out some focus time in your calendar. I think it’s a fantastic idea, and I love that I’m employed somewhere that
I can do so and it works out.
Or if you’ve tried that and discovered that your workplace culture doesn’t respect it – if colleagues routinely book meetings into reserved spaces – maybe you should try fake
meetings and see if they’re any better-respected. But I’m afraid I can’t help you with that.