The goal: date-ordered, numbered, titled episodes of Forward in my feed reader.
Here’s the settings I came up with –
Feed URL:http://forwardcomic.com/list.php
Type of feed source:HTML + XPath (Web scraping)
XPath for finding news items://a[starts-with(@href,'archive.php')]
Item title:.
Item link (URL):./@href
Item date:./following-sibling::text()[1]
Custom date/time format:- Y.m.d
The comic pages themselves do a great thing for accessibility by including a complete transcript of each. But the listing page, which is basically a series of <a>s
separated by <br>s rather than a <ul> and <li>s, for example, leaves something to be desired (and makes it harder to scrape,
too!).
I continue to love this “killer feature” of FreshRSS, but I’m beginning to see how it could go further – I wish I had the free time to contribute to its development!
I’d love to see a mechanism for exporting/importing feed configurations like this so that I could share them more-easily, for example. I’d also be delighted if I could expand on my
XPath rules to load pages referenced by the results and get data from them, too, e.g. so I could use an image found by XPath on the “item link” page as the thumbnail
image! These are things RSSey could do for me, but FreshRSS can’t… yet!
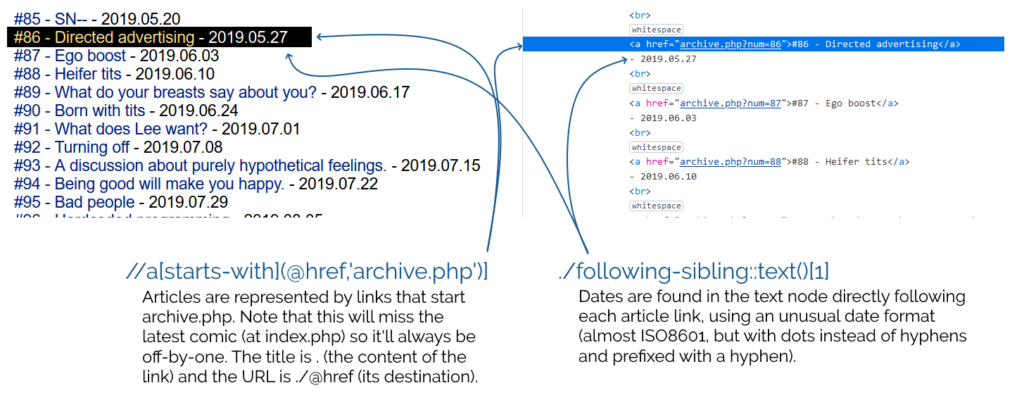
A year and a half ago I came up with a technique for intercepting the “shuffle” operation
on jigsaw website Jigidi, allowing players to force the pieces to appear in a consecutive “stack” for ludicrously easy solving. I did this
partially because I was annoyed that a collection of geocaches near me used Jigidi puzzles as a barrier to their coordinates1…
but also because I enjoy hacking my way around artificially-imposed constraints on the Web (see, for example, my efforts last week to circumvent region-blocking on radio.garden).
My solver didn’t work for long: code changes at Jigidi’s end first made it harder, then made it impossible, to use the approach I suggested. That’s fine by me – I’d already got what I
wanted – but the comments thread on that post suggests that there’s
a lot of people who wish it still worked!2
And so I ignored the pleas of people who wanted me to re-develop a “Jigidi solver”. Until recently, when I once again needed to solve a jigsaw puzzle in order to find a geocache’s
coordinates.
Making A Jigidi Helper
Rather than interfere with the code provided by Jigidi, I decided to take a more-abstract approach: swapping out the jigsaw’s image for one that would be easier.
This approach benefits from (a) having multiple mechanisms of application: query interception, DNS hijacking, etc., meaning that if one stops working then another one can be easily
rolled-out, and (b) not relying so-heavily on the structure of Jigidi’s code (and therefore not being likely to “break” as a result of future upgrades to Jigidi’s platform).
It’s not as powerful as my previous technique – more a “helper” than a “solver” – but it’s good enough to shave at least half the time off that I’d otherwise spend solving a Jigidi
jigsaw, which means I get to spend more time out in the rain looking for lost tupperware. (If only geocaching were even the weirdest of my hobbies…)
How To Use The Jigidi Helper
To do this yourself and simplify your efforts to solve those annoying “all one colour” or otherwise super-frustrating jigsaw puzzles, here’s what you do:
Visit a Jigidi jigsaw. Do not be logged-in to a Jigidi account.
Open your browser’s debug tools (usually F12). In the Console tab, paste it and press enter. You can close your debug tools again (F12) if you like.
Press Jigidi’s “restart” button, next to the timer. The jigsaw will restart, but the picture will be replaced with one that’s easier-to-solve than most, as described below.
Once you solve the jigsaw, the image will revert to normal (turn your screen around and show off your success to a friend!).
What makes it easier to solve?
The replacement image has the following characteristics that make it easier to solve than it might otherwise be:
Every piece has written on it the row and column it belongs in.
Every “column” is striped in a different colour.
Striped “bands” run along entire rows and columns.
To solve the jigsaw, start by grouping colours together, then start combining those that belong in the same column (based on the second digit on the piece). Join whole or partial
columns together as you go.
I’ve been using this technique or related ones for over six months now and no code changes on Jigidi’s side have impacted upon it at all, so it’s probably got better longevity than the
previous approach. I’m not entirely happy with it, and you might not be either, so feel free to fork my code and improve it: the legiblity of the numbers is sometimes suboptimal, and
the colour banding repeats on larger jigsaws which I’d rather avoid. There’s probably also potential to improve colour-recognition by making the colour bands span the gaps
between rows or columns of pieces, too, but more experiments are needed and, frankly, I’m not the right person for the job. For the second time, I’m going to abandon a tool
that streamlines Jigidi solving because I’ve already gotten what I needed out of it, and I’ll leave it up to you if you want to come up with an improvement and share it with the
community.
Footnotes
1 As I’ve mentioned before, and still nobody believes me: I’m not a fan of jigsaws! If you
enjoy them, that’s great: grab a bucket of popcorn and a jigsaw and go wild… but don’t feel compelled to share either with me.
2 The comments also include asuper-helpful person called Rich who’s been manually
solving people’s puzzles for them, and somebody called Perdita
who “could be my grandmother” (except: no) with whom I enjoyed a
conversation on- and off-line about the ethics of my technique. It’s one of the most-popular comment threads my blog has ever seen.
I wanted to play about with Listmonk and it’s available as a Docker image, so I figured I’d just install it on my Unraid box. It doesn’t have a recipe in Community Apps but it’s not usually hard to reverse-engineer an official installation guide into something that “just works” on Unraid. After a
first attempt failed, I looked around for a quick how-to guide online and mostly found… a mixture of people similarly failing to get it working or else having a kindly stranger offer to help… but not on the open Web where the rest of us can
benefit from their knowledge. Sigh.
So I resolved that when I figured it out, I’d document the steps so that the next person after me can have an easier job of it.
Installing Listmonk on Unraid
Install Postgres if you don’t have it already. I used the postgresql15 image from Community Apps.
Set up a role and database. To do this, log in to your Postgres database using your favourite Postgres client and run, for example:
CREATE USER listmonk WITH LOGIN PASSWORD 'my-listmonk-db-password';
CREATE DATABASE listmonk OWNER listmonk;
Create a Listmonk configuration file. I created a listmonk share and put it in there, calling it /listmonk/config.toml, but anywhere on your
Unraid server will do. There’s a sample configuration
in the repository. You’ll probably want to change:
[app] address: change to 0.0.0.0:9000 to listen on all interfaces so you can access it from elsewhere on your network (might not be needed if you
intend to proxy with a host-networked reverse proxy server)
[app] admin_username / admin_password: obviously change these – this is how you’ll log in to your Listmonk system
[db] host: if your Postgres container and/or Listmonk container is running in bridged networking mode rather than host networking mode, you’ll need to change this
to the name or IP address of your Postgres server
[db] password: set to the password you chose for the listmonk user on your Postgres server
Add a Listmonk container. In Unraid, on the Docker tab, click the Add Container button. A minimal configuration might look like this:
Name: Listmonk
Repository:listmonk/listmonk:latest
Network Type: consider using Host to simplify your [db] setup, above.
Add a Port with Name: HTTP and Host Port: 9000. Then fill in 9000 as the value (or
whatever port you want to run Listmonk on)
Add a Path with Name: Config and Container Path: /listmonk/config.toml. Set the Host
Path to wherever you put the Listmonk configuration file, e.g. /mnt/user/listmonk/config.toml.
Start the Listmonk container and watch it stop. When you click “Apply” the container will start, run for a few seconds, and then stop. If you want, look at the logs
and you’ll see what the problem is: it needs to be started in a different way in order to set up the database. Instead, what we’ll do is spin up a new Listmonk container just
for that purpose (and then throw it away).
Start Listmonk in “install” mode. SSH into your Unraid server itself and run, e.g.
docker run --rm -ti --net='host' -e TZ="UTC" -v '/mnt/user/listmonk/config.toml':'/listmonk/config.toml':'rw' listmonk/listmonk:latest ./listmonk -- --install
Substitute /mnt/user/listmonk/config.toml for whatever path your configuration file is at, if applicable. You’ll be prompted with the messages “** first time
installation **”, “** IMPORTANT: This will wipe existing listmonk tables and types in the DB ‘listmonk’ **”, and then asked “continue (y/N)?”. Press “y” and the installation will
complete.
Start the Listmonk container again. This time it’ll stay running and you’ll be able to access the Web interface via e.g. https://your-unraid-server:9000/
My evening just freed up, so – weather-permitting – I might brave the sleet and cold and cycle out to this hashpoint this evening.
Expedition
Our dog had surgery at the start of the week and has now recovered enough to want a short walk, so I changed my plan to cycle for one to drive (with the dog) out to somewhere near the
hashpoint and take her for a walk to and around it. Amazingly, I might have been faster to cycle: a crash on the A40 had lead to lots of traffic being re-routed along the exact same
back roads that was to be my most-direct route, and on the local rat run through South Leigh I got trapped behind a line of folks who weren’t familiar with this particular unlit and
twisty road and took the entire derestricted section at an average of 25mph. Ah well.
Out of laziness, I didn’t bring my GPSr or make a tracklog; I just used the Geohashdroid app and took a screenshot when I got there. South Leigh Common is pleasant, but it was dark, and
my photos are all a little bit hard to make out! But the stars were beautiful tonight, and the dog loved one of her first outings since her surgery and enjoying running around in the
long wet grass and sticking her head into rabbit holes. At 19:00 precisely I got within about a metre and a half of the hashpoint – well within the circle of uncertainty – and turned to
head home.
I also took the time while there to update OpenStreetMap by drawing in the
boundaries of the common, replacing the nondescript “point” that had marked it before.
Photos
Proof from Geohashdroid
Silly grins in the dark from a man and his dog
Long exposure, with flashlight on, showing the hashpoint and the Common beyond
My work colleague Simon was looking for a way to add all of the
upcoming UK strike action to their calendar, presumably so they know when not to try to catch a bus or require an ambulance or maybe
just so they’d know to whom they should be giving support on any particular day. Thom was able to suggest a
few places to see lists of strikes, such as this BBC News page and the comprehensive strikecalendar.co.uk, but neither provided a
handy machine-readable feed.
Gosh, there’s a lot of strikes going on. ✊
If only they knew somebody who loves an excuse to throw a screen-scraper together. Oh wait, that’s me!
I threw together a 36-line Ruby program that extracts all the data from strikecalendar.co.uk and outputs an
.ics file. I guess if you wanted you could set it up to automatically update the file a couple of times a day and host it at a URL that people can subscribe to; that’s an exercise left for the reader.
If you just want a one-off import based on the state-of-play right now, though, you can save this .ics file to your computer
and import it to your calendar. Simple.
Is there a name for that experience when you forget for a moment that somebody’s dead?
For a year or so after my dad’s death 11 years ago I’d routinely have that moment:
when I’d go “I should tell my dad about this!”, followed immediately by an “Oh… no, I can’t, can I?”. Then, of course, it got rarer. It happened in 2017, but I don’t know if it happened again after
that – maybe once? – until last week.
Last week I took our eldest up Cairn Gorm, a mountain my dad and I have climbed up (and/or skiied down!) many times.
I wonder if subconsciously I was aware that the anniversary of his death – “Dead Dad Day”, as my sisters and I call
it – was coming up? In any case, when I found myself on Cairn Gorm on a family trip and snapped a photo from near the summit, I had a moment where I thought “I should send this
picture to my dad”, before once again remembering that nope, that wasn’t possible.
My dad loved a good Munro: this photo of him was taken
only about a kilometre and a half West of where I took my most recent snap on Cairn Gorm, as he ice climbed up the North face of Stob Coire an t-Sneachda.
Strange that this can still happen, over a decade on. If there’s a name for the phenomenon, I’d love to know it.
The two most important things you can do to protect your online accounts remain to (a) use a different password, ideally a randomly-generated one, for every service, and (b) enable
two-factor authentication (2FA) where it’s available.
If you’re not already doing that, go do that. A password manager like 1Password, Bitwarden, or LastPass will help (although be aware that the latter’s had some security issues lately, as I’ve mentioned).
For many people, authentication looks like this: put in a username and password from a password safe (or their brain), and a second factor from their phone.
I promised back in 2018 to talk about what
this kind of authentication usually1
looks like for me, because my approach is a little different:
My password manager fills the username, password, and second factor parts of most login forms for me. It feels pretty magical.
I simply press my magic key combination, (re-)authenticate with my password safe if necessary, and then it does the rest. Including, thanks to some light scripting/hackery, many
authentication flows that span multiple pages and even ones that ask for randomly-selected characters from a secret word or similar2.
I love having long passwords and 2FA enabled. But I also love being able to log in with the convenience of a master
password and my fingerprint.
My approach isn’t without its controversies. The argument against it broadly comes down to this:
Storing the username, password, and the means to provide an authentication code in the same place means that you’re no-longer providing a second factor. It’s no longer e.g.
“something you have” and “something you know”, but just “something you have”. Therefore, this is equivalent to using only a username and password and not enabling 2FA at all.
I disagree with this argument. I provide two counter-arguments:
1. For most people, they’re already simplifying down to “something you have” by running the authenticator software on the same device, protected in the same way, as their
password safe: it’s their mobile phone! If your phone can be snatched while-unlocked, or if your password safe and authenticator are protected by the same biometrics3,
an attacker with access to your mobile phone already has everything.
If your argument about whether it counts as multifactor is based on how many devices are involved, this common pattern also isn’t multifactor.
2. Even if we do accept that this is fewer factors, it doesn’t completely undermine the value of time-based second factor codes4.
Time-based codes have an important role in protecting you from authentication replay!
For instance: if you use a device for which the Internet connection is insecure, or where there’s a keylogger installed, or where somebody’s shoulder-surfing and can see what you type…
the most they can get is your username, password, and a code that will stop working in 30 seconds5. That’s
still a huge improvement on basic username/password-based system.6
Note that I wouldn’t use this approach if I were using a cloud-based password safe like those I linked in the first paragraph! For me personally: storing usernames, passwords, and
2FA authentication keys together on somebody else’s hardware feels like too much of a risk.
But my password manager of choice is KeePassXC/KeePassDX, to which I migrated after I realised that the
plugins I was using in vanilla KeePass were provided as standard functionality in those forks. I keep the master copy of my password database
encrypted on a pendrive that attaches to my wallet, and I use Syncthing to push
secondary copies to a couple of other bits of hardware I control, such as my phone. Cloud-based password safes have their place and they’re extremely accessible to people new to
password managers or who need organisational “sharing” features, but they’re not the right tool for me.
As always: do your own risk assessment and decide what’s right for you. But from my experience I can say this: seamless, secure logins feel magical, and don’t have to require an
unacceptable security trade-off.
Footnotes
1 Not all authentication looks like this, for me, because some kinds of 2FA can’t be provided by my password safe. Some service providers “push” verification checks to an app, for example. Others use proprietary
TOTP-based second factor systems (I’m looking at you, banks!). And some, of course, insist on proven-to-be-terrible
solutions like email and SMS-based 2FA.
2 Note: asking for a username, password, and something that’s basically another-password
is not true multifactor authentication (I’m looking at you again, banks!), but it’s still potentially useful for organisations that need to authenticate you by multiple media
(e.g. online and by telephone), because it can be used to help restrict access to secrets by staff members. Important, but not the same thing: you should still demand 2FA.
3 Biometric security uses your body, not your mind, and so is still usable even if you’re
asleep, dead, uncooperative, or if an attacker simply removes and retains the body part that is to be scanned. Eww.
4 TOTP is a very popular
mechanism: you’ve probably used it. You get a QR code to scan into the authenticator app on your device (or multiple devices,
for redundancy), and it comes up with a different 6-digit code every 30 seconds or so.
5 Strictly, a TOTP code is
likely to work for a few minutes, on account of servers allowing for drift between your clock and theirs. But it’s still a short window.
6 It doesn’t protect you if an attacker manages to aquire a dump of the usernames,
inadequately-hashed passwords, and 2FA configuration from the server itself, of course, where other forms of 2FA (e.g. certificate-based) might, but protecting servers from bad actors is a whole separate essay.
If you read a lot of the “how to start a blog in 2023” type posts (please don’t ever use that title in a post) the advice will often boil down to something like:
Kev writes about what he’s learned from ten years of blogging. As a fellow long-term
blogger1, I was
especially pleased with his observation that, for some (many?) of us old hands, all the tips on starting a blog nowadays are things that we just don’t do, sometimes
deliberately.
Like Kev, I don’t have a “niche” (I write about the Web, life, geo*ing, technology, childwrangling, gaming, work…). I’ve experimented with email subscription but only as a convenience to people who prefer to get updates that way – the same reason I push articles to Facebook – and it certainly didn’t take off (and that’s fine!). And as
for writing on a regular schedule? Hah! I don’t even
manage to be uniform throughout the year, even after averaging over my blog’s quarter-century2 of history.
Also like Kev, and I think this is the reason that we ignore these kinds of guides to blogging, I blog for me first and foremost. Creation is a good thing, and I take
my “permission to write” and just create stuff. Not having a “niche” means that I can write about what interests me, variable as that is. In my opinion the only guide to starting a blog that anybody needs to read is
Andrew Stephens‘ “So You Want To Start An Unpopular Blog”.
And if that’s not enough inspiration for you to jump back in your time machine and party like the Web’s still in 2005, I don’t know what is.
Two years after our last murder mystery party, almost
three years since the one before, and much, much longer since our last in-person one, we finally managed to have another
get-the-guests-in-one-place murder mystery party, just like old times. And it was great!
Full credit goes to Ruth who did basically all the legwork this time around. Cheers!
D’Avekki’s murder mystery sets use an unusual mechanic that I’ve discussed before online with other murder mystery party authorship enthusiasts1 but never tried in practice: a way of determining at
random who the murderer is when play begins. This approach has a huge benefit in that it means that you can assign characters to players using a subset of those available (rather
than the usual challenges that often come up when, for example, somebody need to play somebody of a different gender than their own) and, more-importantly, it protects you from the
eventuality that a player drops-out at short notice. This latter feature proved incredibly useful as we had a total of three of our guests pull out unexpectedly!
Most of our guests were old hands at murder mystery games, but for Owen’s date Kirsty this was a completely novel experience.
The challenge of writing a murder mystery with such a mechanic is to ensure that the script and evidence adapt to the various possible murderers. When I first examined the set
that was delivered to us, I was highly skeptical: the approach is broadly as follows2:
At the start of the party, the players secretly draw lots to determine who is the murderer: the player who receives the slip marked with an X is the murderer.
Each character “script” consists of (a) an initial introduction, (b) for each of three acts, a futher introduction which sets up two follow-up questions, (c) the answers to those
two follow-up questions, (d) a final statement of innocence, and (e) a final statement of guilt, for use by the murderer.
In addition, each script has a handful of underlined sections, which are to be used only if you are the murderer. This
means that the only perceivable difference between one person and another being the murderer is that the only who is the murderer will present a small amount of additional information.
The writing is designed such that this additional piece of evidence will be enough to make the case against them be compelling (e.g. because their story becomes
internally-inconsistent).
The writing was good overall: I especially appreciated the use of a true crime podcast as a framing device (expertly delivered thanks to Rory‘s
radio voice). It was also pleasing to see, in hindsight, how the story had been assembled such that any character could be the murderer, but only one would give away a
crucial clue. The downside of the format is pretty obvious, though: knowing what the mechanic is, a detective only needs to look at each piece of evidence that appears and look for a
connection with each statement given by every other player, ruling out any “red herring” pairings that connect to every other player (as is common with just about the entire
genre, all of the suspects had viable motives: only means and opportunity may vary).
It worked very well, but I wonder if – now the formula’s understood by us – a second set in a similar style wouldn’t be as successful.
Our classic end-of-murder-mystery-party photo post makes a comeback. Extra-special hat tip to Kirsty, who ended up by coincidence being the murderer at her first ever such event and
did astoundingly well. From left to right: Rory (Major Clanger), Simon (Chef Flambé), JTA (Noah Sinner), Kirsty (Phyllis
Ora), Ruth (Dusty Tomes), Liz (Ruby Daggers), Owen (Max
Cruise), and me (Professor Pi).
That said, nobody correctly fingered the murderer this time around. Maybe we’re out of practice? Or maybe the quality of the hints in such a wide-open and dynamic murderer-selection
mechanic is less-solid than we’re used to? It’s hard to say: I’d certainly give another D’Avekki a go to find out.
It all started when I saw no-ht.ml, Terence Eden‘s hilarious response to Salma
Alam-Naylor‘s excellent HTML is all you need to make a website. The latter is an
argument against both the silly amount of JavaScript with which websites routinely burden their users, but also even against depending on CSS. As a fan of CSS Naked Day and a firm
believer in using JS only for progressive enhancement, I’m obviously in favour.
Obviously no-ht.ml is to be taken as tongue-in-cheek, but as you’re about to see: it caught my interest and got me thinking: how could I go even further.
Terence’s site works by delivering a document with a
claimed MIME type of text/html, but which contains only the (invalid) “HTML” code
<!doctype UNICODE><meta charset="UTF-8"><plaintext> (to work around browsers’ wish to treat the page as HTML). This is followed by a block of UTF-8 plain text making use of spacing
and emoji to illustrate and decorate the content. It’s frankly very silly, and I love it.1
I think it’s possible to go one step further, though, and create a web page with no code whatsoever. That is, one that you can read as if it were a regular web page, but where
using View Source or e.g. downloading the page with curl will show you… nothing.
I present: The Page With No Code! (It’ll probably only work if you’re using Firefox, for reasons that will become apparent later.)
I’d encourage you to visit The Page With No Code, use View Source to confirm for yourself that it truly has no code, and see if you can work out for yourself how it manages
this feat… before coming back here for an explanation. Again: probably Firefox-only.
Once you’ve had a look for yourself and had a chance to form an opinion, here’s an explanation of the black magic that makes this atrocity possible:
The page is blank. It’s delivered with Content-Type: text/html. Your browser interprets a completely-blank page as faulty and corrects it to a functionally-blank
minimal HTML page: <html><head></head><body></body></html>.
<body> and <html> elements can be styled with CSS; this includes the ability to add
content:::before and ::after each
element. If only we could load a stylesheet then content injection is possible.
We use the fourth way to inject
CSS – a Link: HTTP header – to deliver a CSS payload (this, unfortunately, only works in Firefox). To further obfuscate what’s happening and remove the need for a round-trip, this is encoded
as a data: URI.
The stylesheet – and all the page content – is right there in the Link: header if you just care to decode it! Observe that while 5.84kB of
data are transferred, the browser rightly states that the page is zero bytes in size.
My server-side implementation of this broke in 2023 after I upgraded Nginx; my new version doesn’t support the super-long Link: header needed
to make this hack work, so I’ve updated the page to use the Link: to reference the CSS file rather than embed it via a data URI. It’s not as cool, but it at least means you can
still see the page. Thanks to Thomas Bradshaw for pointing out the problem.
Footnotes
1 My first reaction was “why not just deliver something with Content-Type:
text/plain; charset=utf-8 and dispense with the invalid code, but perhaps that’s just me overthinking the non-existent problem.
Following their security incident last month, many users of LastPass are in the process of cycling
their security credentials for many of their accounts1.
I don’t use LastPass2,
but I’ve had ocassion to cycle credentials before, so I appreciate the pain that people are going through.
It’s not just passwords, though: it may well be your “security question” answers you need to rotate too. Your passwords quickly become worthless if an attacker can guess the answers to
your “security questions” at services that use them. If you’re using a password safe anyway, you should either:
Answer security questions with long strings of random garbage3,
or
Ensure that you use different answers for every service you use, as you would with passwords.4
In the latter case, you’re probably storing your security answers in a password safe5.
If the password safe they’re stored in is compromised, you need to change the answers to those security questions in order to secure the account.
This leads to the unusual situation where you can need to call up your bank and say: “Hi, I’d like to change my mother’s maiden name.” (Or, I suppose, father’s middle
name, first pet’s name, place of birth, or whatever.) Banks in particular are prone to disallowing you from changing your security answers over the Internet, but all kinds of other
businesses can also make this process hard… presumably because a well-meaning software engineer couldn’t conceive of any reason that a user might want to.
I sometimes use a pronouncable password generator to produce fake names for security question answers. And I’ll tell you what: I get some bemused reactions when I say things like “I’d
like to change my mother’s maiden name from Tuyiborhooniplashon to Mewgofartablejuki.”
1 If you use LastPass, you should absolutely plan to do this. IMHO, LastPass’s reassurances about the difficulty in cracking the encryption on the leaked data is a gross exaggeration. I’m not saying you need to
panic – so long as your master password is reasonably-long and globally-unique – but perhaps cycle all your credentials during 2023. Oh, and don’t rely on your second factor:
it doesn’t help with this particular incident.
2 I used to use LastPass, until around 2016, and I still think it’s a good choice for many
people, but nowadays I carry an encrypted KeePassXC password safe on a pendrive (with an automated backup onto an encrypted partition on our
household NAS). This gives me some security and personalisation benefits, at the expense of only a little convenience.
3 If you’re confident that you could never lose your password (or rather: that you could
never lose your password without also losing the security question answers because you would store them in the same place!), there’s no value in security questions, and the best thing
you can do might be to render them unusable.
4 If you’re dealing with a service that uses the security questions in a misguided effort
to treat them as a second factor, or that uses them for authentication when talking to them on the telephone, you’ll need to have usable answers to the questions for when they come
up.
5 You can, of course, use a different password safe for your randomly-generatred
security question answers than you would for the password itself; perhaps a more-secure-but-less-convenient one; e.g. an encrypted pendrive kept in your fire safe?
I bundled the dog into the car and drove out to Piddington, a couple of kilometres North of the hashpoint. Cherwell Council advertise a circular walk
that seems to circle from the village (which looked like a good place to park) up to Muswell Hill, the summit of which is near the hashpoint.
She and I walked through Piddington, past the church, and up onto the path. A soggy kilometre or so later we quickly discovered that this was going to be more-challenging than I’d
anticipated. We quickly got bogged down in a flooded field and needed to double-back. With my socks already soaking wet and the dog in a similar condition, we found a different route
that looped around the entire hill and through an alpaca farm (or were they llamas?), then we worked our way up the South face of the hill, over the summit, and down to the hashpoint.
We got there at 11:00 UTC, took a quick look around and pulled the closest thing a dog can manage to a silly grin, and then hacked our way back (by road) to Piddington for the drive
home and some dry clothes.
There’s been a bit of a resurgence lately of sites whose only subscription option is email, or – worse yet – who provide certain “exclusive” content only to email subscribers.
I don’t want to go giving an actual email address to every damn service, because:
It’s not great for privacy, even when (as usual) I use a unique alias for each sender.
It’s usually harder to unsubscribe than I’d like, and rarely consistent: you need to find a recent message, click a link, sometimes that’s enough or sometimes you need to uncheck a
box or click a button, or sometimes you’ll get another email with something to click in it…
I rarely want to be notified the very second a new issue is published; email is necessarily more “pushy” than I like a subscription to be.
I don’t want to use my email Inbox to keep track of which articles I’ve read/am still going to read: that’s what a feed reader is for! (It also provides tagging, bookmarking,
filtering, standardised and bulk unsubscribing tools, etc.)
So what do I do? Well…
I already operate an OpenTrashMail instance for one-shot throwaway email addresses (which I highly recommend). And
OpenTrashMail provides a rich RSS feed. Sooo…
How I subscribe to newsletters (in my feed reader)
If I want to subscribe to your newsletter, here’s what I do:
Put an email address (I usually just bash the keyboard to make a random one, then put @-a-domain-I-control on the end, where that domain is handled by OpenTrashMail) in to
subscribe.
Put https://my-opentrashmail-server/rss/the-email-address-I-gave-you/rss.xml into my feed reader.
That’s all. There is no step 3.
Now I get your newsletter alongside all my other subscriptions. If I want to unsubscribe I just tell my feed reader to stop polling the RSS feed (You don’t even get to find out that I’ve unsubscribed; you’re now just dropping emails into an unmonitored box, but of course I can
resubscribe and pick up from where I left off if I ever want to).
Obviously this approach isn’t suitable for personalised content or sites for which your email address is used for authentication, because anybody who can guess the random email address
can get the feed! But it’s ideal for those companies who’ll ocassionally provide vouchers in exchange for being able to send you other stuff to your Inbox, because you can
simply pipe their content to your feed reader, then add a filter to drop anything that doesn’t contain the magic keyword: regular vouchers, none of the spam. Or for blogs that provide
bonus content to email subscribers, you can get the bonus content in the same way as the regular content, right there in a folder of your reader. It’s pretty awesome.
If you don’t already have and wouldn’t benefit from running OpenTrashMail (or another trashmail system with feed support) it’s probably not worth setting one up just for this
purpose. But otherwise, I can certainly recommend it.
You don’t really see it any more, but: if you downloaded some media player software a couple of decades ago, it’d probably appear in a weird-shaped window, and I’ve never understood
why.
Mostly, these designs are… pretty ugly. And for what? It’s also worth noting that this kind of design can be found in all kinds of applications, in media players that
it was almost ubiquitous.
You might think that they’re an overenthusiastic kind of skeuomorphic design: people trying
to make these players look like their physical analogues. But hardware players were still pretty boxy-looking at this point, either because of the limitations of their data
storage1. By the time flash memory-based
portable MP3 players became commonplace their design was copying software players, not the other way around.
So my best guess is that these players were trying to stand out as highly-visible. Like: they were things you’d want to occupy a disproportionate amount of desktop space. Maybe
other people were listening to music differently than me… but for me, back when screen real estate was at such a premium2,
a music player’s job was to be small, unintrusive, and out-of-the-way.
I used to run Winamp in its very-smallest minified size, tucked up at the top of the screen, using
the default skin or one that made it even less-obtrusive.
It’s a mystery to me why anybody would (or still
does) make media player software or skins for them that eat so much screen space, frequently looking ugly while they do so, only to look like a hypothetical hardware device that
wouldn’t actually become commonplace until years after this kind of player design premiered!
Maybe other people listened to music on their computer differently from me: putting it front and centre, not using their computer for other tasks at the same time. And maybe for these
people the choice of player and skin was an important personalisation feature; a fashion statement or a way to show off their personal identity. But me? I didn’t get it then, and I
don’t get it now. I’m glad that this particular trend seems to have died and windows are, for the most part, rounded rectangles once more… even for music player software!
Footnotes
1 A walkman, minidisc player, or hard drive-based digital music device is always going to
look somewhat square because of what’s inside.
2 I “only” had 1600 × 1200 (UXGA) pixels on the very biggest monitor I owned before I went widescreen, and I spent a lot of time on monitors at lower resolutions e.g.
1024 × 768 (XGA); on such screens, wasting space on a music player when you’re mostly going to be listening “in the
background” while you do something else seemed frivolous.
…removing a SIM tray is harder than it looks when you don’t wear earrings. I had to search everywhere to find one of those little SIM tools…
Stuart writes a fun article about his experience of changing mobile network. It’s worth a read, and there’s only one “Dan pro tip” I’d add:
If you have a case on your mobile phone, tuck one of those SIM extractor tools into the case, behind your phone.
It’s exactly where you need it to be, if you need one yourself (you probably need to remove the case to access the SIM tray
anyway), but beyond that: it means you’re always carrying one for when a friend needs one. They’re also useful for pressing those tiny “factory reset” buttons you see
sometimes.
A SIM extractor has been sneakily part of my “everyday carry” for about a decade and it’s proven its value time and time
again.