Debugging WorldWideWeb

Earlier this week, I mentioned the exciting hackathon that produced a moderately-faithful reimagining of the world’s first Web browser. I was sufficiently excited about it that I not only blogged here but I also posted about it to MetaFilter. Of course, the very first thing that everybody there did was try to load MetaFilter in it, which… didn’t work.

MetaFilter failing to load on the reimagined WorldWideWeb.
500? Really?

People were quick to point this out and assume that it was something to do with the modernity of MetaFilter:

honestly, the disheartening thing is that many metafilter pages don’t seem to work. Oh, the modern web.

Some even went so far as to speculate that the reason related to MetaFilter’s use of CSS and JS:

CSS and JS. They do things. Important things.

This is, of course, complete baloney, and it’s easy to prove to oneself. Firstly, simply using the View Source tool in your browser on a MetaFilter page reveals source code that’s quite comprehensible, even human-readable, without going anywhere near any CSS or JavaScript.

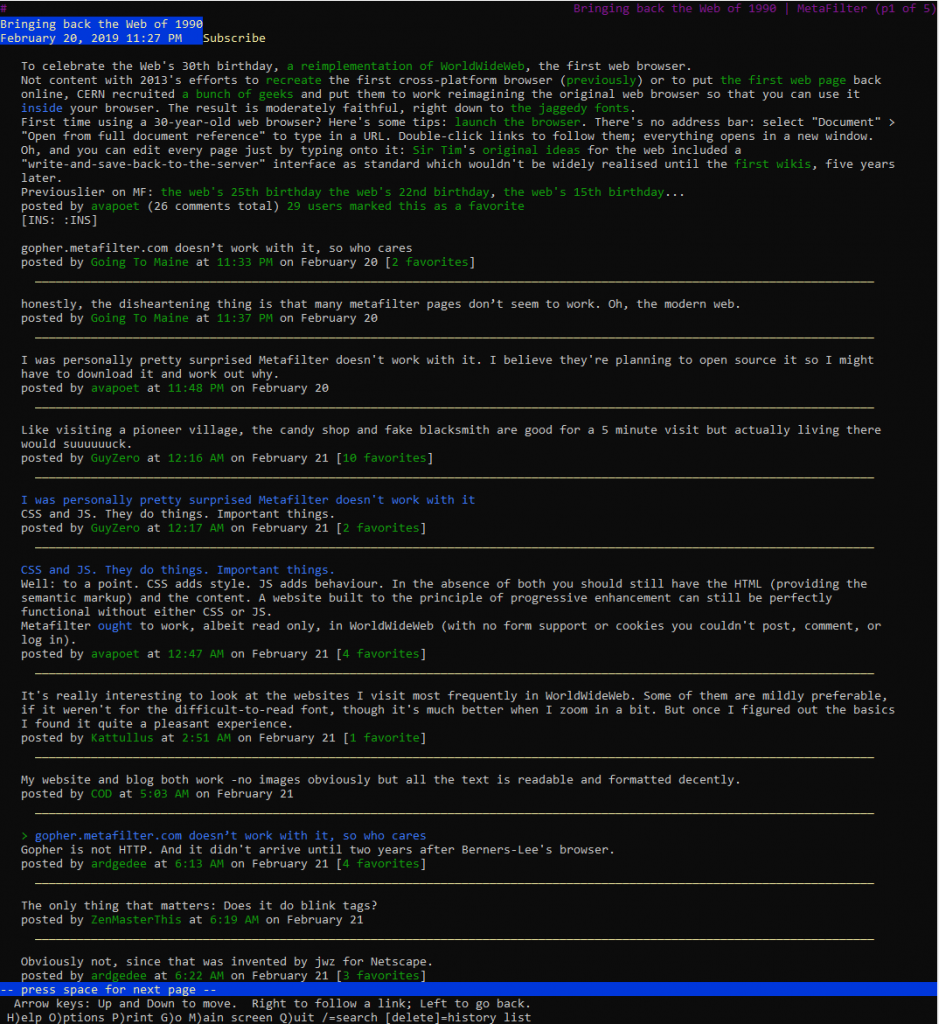
MetaFilter in Lynx: perfectly usable browing experience
As late as the early 2000s I’d occasionally use Lynx for serious browsing, but any time I’ve used it since it’s been by necessity.

Secondly, it’s pretty simple to try browsing MetaFilter without CSS or JavaScript enabled! I tried in two ways: first, by using Lynx, a text-based browser that’s never supported either of those technologies. I also tried by using Firefox but with them disabled (honestly, I slightly miss when the Web used to look like this):

MetaFilter in Firefox (with CSS and JS disabled)
It only took me three clicks to disable stylesheets and JavaScript in my copy of Firefox… but I’ll be the first to admit that I don’t keep my browser configured like “normal people” probably do.

And thirdly: the error code being returned by the simulated WorldWideWeb browser is a HTTP code 500. Even if you don’t know your HTTP codes (I mean, what kind of weirdo would take the time to memorise them all anyway <ahem>), it’s worth learning this: the first digit of a HTTP response code tells you what happened:

  • 1xx means “everything’s fine, keep going”;
  • 2xx means “everything’s fine and we’re done”;
  • 3xx means “try over there”;
  • 4xx means “you did something wrong” (the infamous 404, for example, means you asked for a page that doesn’t exist);
  • 5xx means “the server did something wrong”.

Simple! The fact that the error code begins with a 5 strongly implies that the problem isn’t in the (client-side) reimplementation of WorldWideWeb: if this had have been a CSS/JS problem, I’d expect to see a blank page, scrambled content, “filler” content, or incomplete content.

So I found myself wondering what the real problem was. This is, of course, where my geek flag becomes most-visible: what we’re talking about, let’s not forget, is a fringe problem in an incomplete simulation of an ancient computer program that nobody uses. Odds are incredibly good that nobody on Earth cares about this except, right now, for me.

Dan's proposed "Geek Flag"
I searched for a “Geek Flag” and didn’t like anything I saw, so I came up with this one based on… well, if you recognise what it’s based on, good for you, you’re certainly allowed to fly it. If not… well, you can too: there’s no geek-gatekeeping here.

Luckily, I spotted Jeremy’s note that the source code for the WorldWideWeb simulator was now available, so I downloaded a copy to take a look. Here’s what’s happening:

  1. The (simulated) copy of WorldWideWeb is asked to open a document by reference, e.g. “https://www.metafilter.com/”.
  2. To work around same-origin policy restrictions, the request is sent to an API which acts as a proxy server.
  3. The API makes a request using the Node package “request” with this line of code: request(url, (error, response, body) => { ... }).  When the first parameter to request is a (string) URL, the module uses its default settings for all of the other options, which means that it doesn’t set the User-Agent header (an optional part of a Web request where the computer making the request identifies the software that’s asking).
  4. MetaFilter, for some reason, blocks requests whose User-Agent isn’t set. This is weird! And nonstandard: while web browsers should – in RFC2119 terms – set their User-Agent: header, web servers shouldn’t require that they do so. MetaFilter returns a 403 and a message to say “Forbidden”; usually a message you only see if you’re trying to access a resource that requires session authentication and you haven’t logged-in yet.
  5. The API is programmed to handle response codes 200 (okay!) and 404 (not found), but if it gets anything else back it’s supposed to throw a 400 (bad request). Except there’s a bug: when trying to throw a 400, it requires that an error message has been set by the request module and if there hasn’t… it instead throws a 500 with the message “Internal Server Fangle” and  no clue what actually went wrong. So MetaFilter’s 403 gets translated by the proxy into a 400 which it fails to render because a 403 doesn’t actually produce an error message and so it gets translated again into the 500 that you eventually see. What a knock-on effect!
Illustration showing conversation between simulated WorldWideWeb and MetaFilter via an API that ultimately sends requests without a User-Agent, gets a 403 in response, and can't handle the 403 and so returns a confusing 500.
If you’re having difficulty visualising the process, this diagram might help you to continue your struggle with that visualisation.

The fix is simple: simply change the line:

request(url, (error, response, body) => { ... })

to:

request({ url: url, headers: { 'User-Agent': 'WorldWideWeb' } }, (error, response, body) => { ... })

This then sets a User-Agent header and makes servers that require one, such as MetaFilter, respond appropriately. I don’t know whether WorldWideWeb originally set a User-Agent header (CERN’s source file archive seems to be missing the relevant C sources so I can’t check) but I suspect that it did, so this change actually improves the fidelity of the emulation as a bonus. A better fix would also add support for and appropriate handling of other HTTP response codes, but that’s a story for another day, I guess.

I know the hackathon’s over, but I wonder if they’re taking pull requests…

× × × × ×

CSS-driven console graphics

If you’re reading this post via my blog and using a desktop computer, try opening your browser’s debug console (don’t worry; I’ll wait). If you don’t know how, here’s instructions for Firefox and instructions for Chrome. Other browsers may vary. You ought to see something like this in your debugger:

Debug console on DanQ.me showing Dan's head and a speech bubble.
I’m in your console, eating your commands!

What sorcery is this?

The debug console is designed to be used by web developers so that they can write Javascript code right in their browser as well as to investigate any problems with the code run by a web page. The web page itself can also output to the console, which is usually used for what I call “hello-based debugging”: printing out messages throughout a process so that the flow and progress can be monitored by the developer without having to do “proper” debugging. And it gets used by some web pages to deliver secret messages to any of the site users who open their debugger.

Facebook console messaging advising against the use of the console.
Facebook writes to the console a “stop” message, advising against using the console unless you know what you’re doing in an attempt to stop people making themselves victims of console-based social engineering attacks.

Principally, though, the console is designed for textual content and nothing else. That said, both Firefox and Chrome’s consoles permit the use of CSS to style blocks of debug output by using the %c escape sequence. For example, I could style some of a message with italic text:

>> console.log('I have some %citalic %ctext', 'font-style: italic;', '');
   I have some italic text

Using CSS directives like background, then, it’s easy to see how one could embed an image into the console, and that’s been done before. Instead, though, I wanted to use the lessons I’d learned developing PicInHTML 8¾ years ago to use text and CSS (only) to render a colour picture to the console. First, I created my template image – a hackergotchi of me and an accompanying speech bubble, shrunk to a tiny size and posterised to reduce the number of colours used and saved as a PNG.

Hackergotchi of Dan with a speech bubble, "squashed".
The image appears “squashed” to compensate for console monospace letters not being “square”.

Next, I wrote a quick Ruby program, consolepic.rb, to do the hard work. It analyses each pixel of the image and for each distinct colour assigns to a variable the CSS code used to set the background colour to that colour. It looks for “strings” of like pixels and combines them into one, and then outputs the Javascript necessary to write out all of the above. Finally, I made a few hand-tweaks to insert the text into the speech bubble.

The resulting output weighs in at 31.6kB – about a quarter of the size of the custom Javascript on the frontend of my site and so quite a bit larger than I’d have liked and significantly less-efficient than the image itself, even base64-encoded for embedding directly into the code, but that really wasn’t the point of the exercise, was it? (I’m pretty sure there’s significant room for improvement from a performance perspective…)

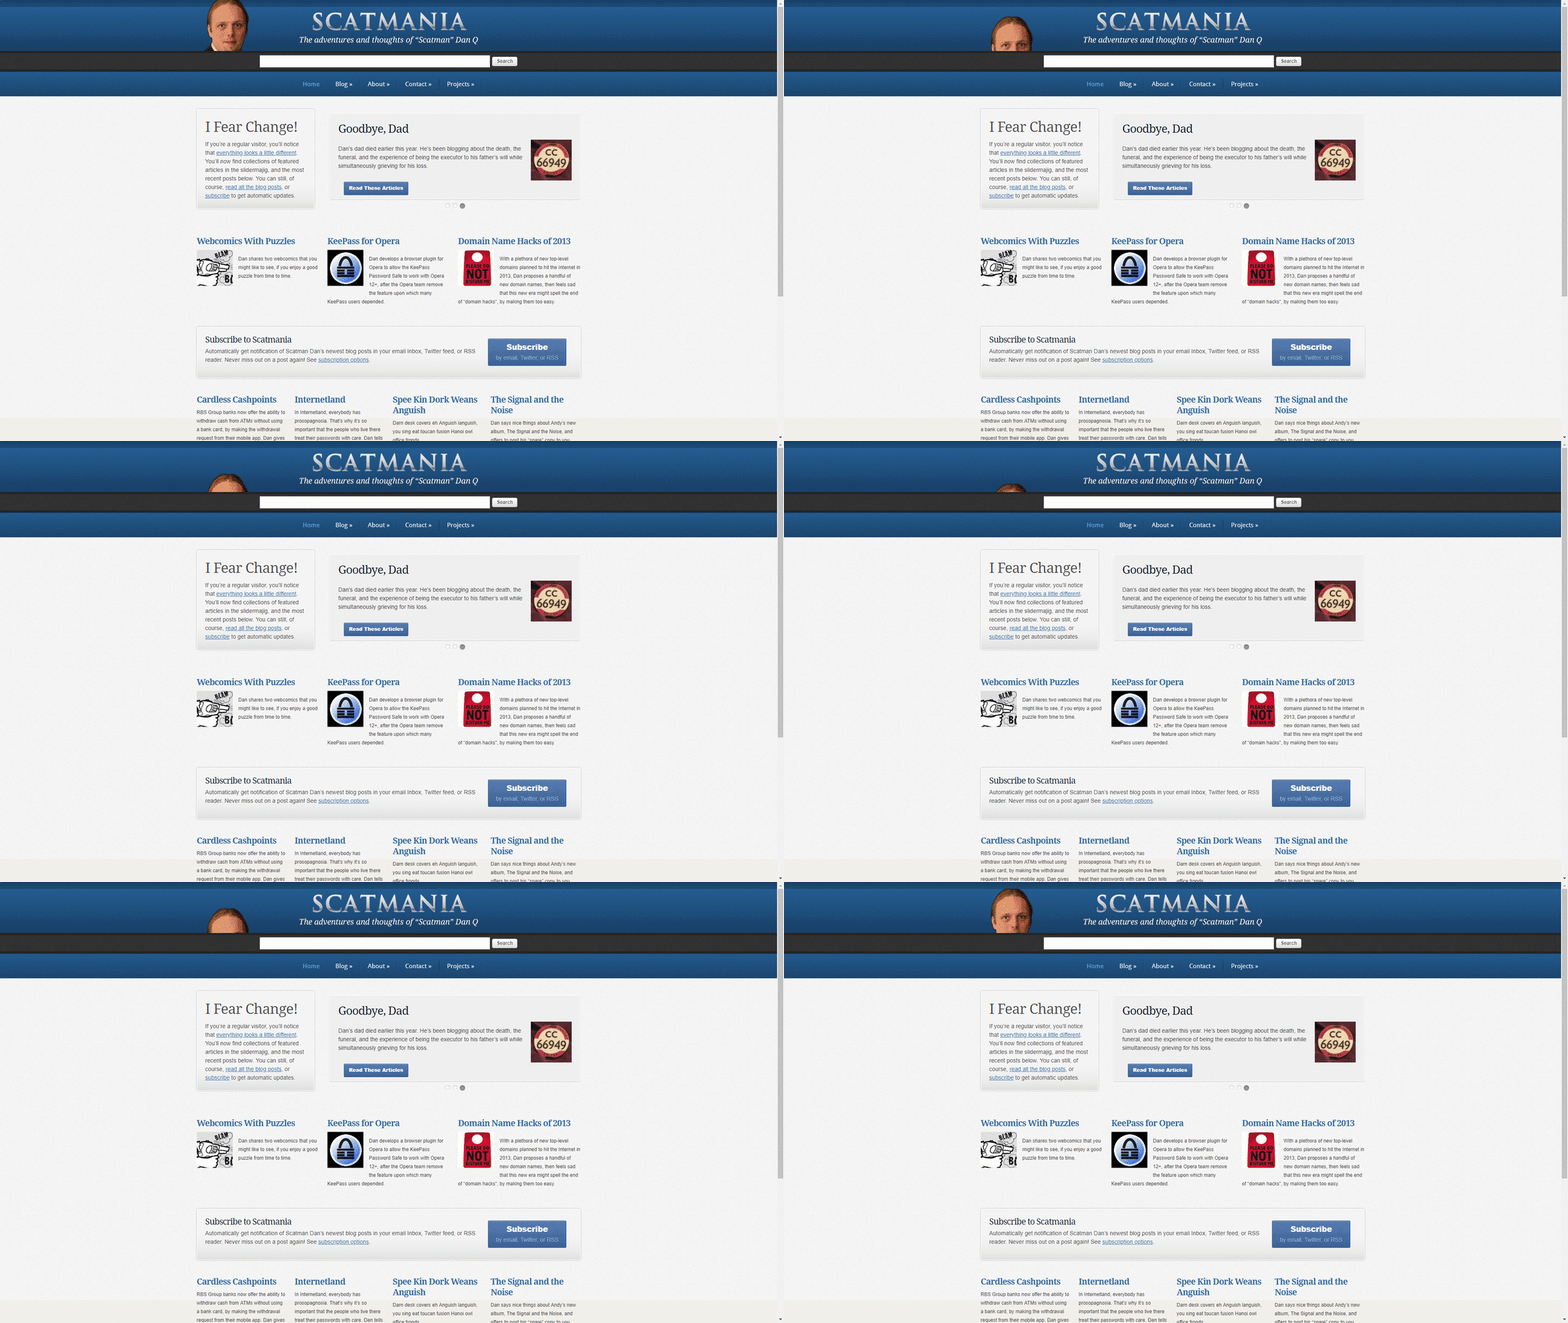
Scatmania.org in 2012
I’ll be first to admit it’s not as cool as the “pop-up Dan” in the corner of my 2012 design. You might enjoy my blog post about my 20 years of blogging or the one about how “pop-up Dan” worked.

What it achieved was an interesting experiment into what can be achieved with Javascript, CSS, the browser console, and a little imagination. An experiment that can live here on my site, for anybody who looks in the direction of their debugger, for the foreseeable future (or until I get bored of it). Anybody with any more-exotic/silly ideas about what this technique could be used for is welcome to let me know!

Update: 17 April 2019 – fun though this was, it wasn’t worth continuing to deliver an additional 25% Javascript payload to every visitor just for this, so I’ve stopped it for now. You can still read the source code (and even manually run it in the console) if you like. And I have other ideas for fun things to do with the console, so keep an eye out for that…

× × × ×

Note #10619

@adactio: The ampersand in https://adactio.com/notes/14395 isn’t being properly escaped in your RSS feed, breaking the XML – see e.g. https://validator.w3.org/feed/check.cgi?url=https%3A%2F%2Fadactio.com%2Frss

The Mystery Button-Box

Earlier this year I found a mystery cable. But today, I’ve got an even bigger mystery. What the hell is this?

Box with two keyhole-shaped "buttons" and a power cord.
It’s a… thing?

I found it in a meeting room at work, tucked away in a corner. Aside from the power cord, there are no obvious interfaces to it.

"Buttons" on the button-box.
There are two keyhole-shaped “buttons” which can be pressed down about 2cm and which spring back up (except when they jam, but I think they’re not supposed to).

My best bet is that it’s some kind of induction-based charger? I imagine some kind of device like a radio microphone or walkie-talkie that can be pushed-in to these holes and the button “spring” is just about closing the hole when it’s not in use. But the box is old, based on the style of plug, cable, and general griminess of the hardware… not to mention that it’s got a stack of PAT test stickers going back at least 11 years.

Bottom of the mystery button-box.
No real markings anywhere on it: there’s a small hole in the (metal) base and PAT test stickers.

I’ve plugged it in and tried “pressing” the buttons but it doesn’t appear to do anything, which supports my “induction charger” hypothesis. But what does it charge? I must know!

Edit: The only Electrak I can find make lighting control systems. Could it be something to do with lighting control? I can’t find anything that looks like this on their website, though.

Edit 2: Ah-hah! Looks like it’s some weird kind of electrical socket. You put the key-shaped plug in and “twist”.

Electrak plug
The plugs apparently look something like this, although I can’t find any here.

Edit 3: Hang on a minute… the most-recent PAT test sticker indicates that it was tested in… November 2019. Now my working hypothesis is that this is some kind of power supply system for a time machine we haven’t yet built. I’ve asked a number of colleagues what it’s for (i.e. what plugs into it) and nobody seems to have a clue.

× × × ×

The Alice and Bob After Dinner Speech

This is a repost promoting content originally published elsewhere. See more things Dan's reposted.

John Gordon: The Alice and Bob After Dinner Speech (urbigenous.net)

Good evening Ladies and Gentlemen.

There comes a time when people at a technical conference like this need something more relaxing. A change of pace. A shift of style. To put aside all that work stuff and think of something refreshingly different.

So let’s talk about coding theory. There are perhaps some of you here tonight who are not experts in coding theory, but rather have been dragged here kicking and screaming. So I thought it would be a good idea if I gave you a sort of instant, five minute graduate course in coding theory.

Coding theorists are concerned with two things. Firstly and most importantly they are concerned with the private lives of two people called Alice and Bob. In theory papers, whenever a coding theorist wants to describe a transaction between two parties he doesn’t call then A and B. No. For some longstanding traditional reason he calls them Alice and Bob.

Now there are hundreds of papers written about Alice and Bob. Over the years Alice and Bob have tried to defraud insurance companies, they’ve played poker for high stakes by mail, and they’ve exchanged secret messages over tapped telephones.

If we put together all the little details from here and there, snippets from lots of papers, we get a fascinating picture of their lives. This may be the first time a definitive biography of Alice and Bob has been given.

In papers written by American authors Bob is frequently selling stock to speculators. From the number of stock market deals Bob is involved in we infer that he is probably a stockbroker. However from his concern about eavesdropping he is probably active in some subversive enterprise as well. And from the number of times Alice tries to buy stock from him we infer she is probably a speculator. Alice is also concerned that her financial dealings with Bob are not brought to the attention of her husband. So Bob is a subversive stockbroker and Alice is a two-timing speculator.

But Alice has a number of serious problems. She and Bob only get to talk by telephone or by electronic mail. In the country where they live the telephone service is very expensive. And Alice and Bob are cheapskates. So the first thing Alice must do is MINIMIZE THE COST OF THE PHONE CALL.

The telephone is also very noisy. Often the interference is so bad that Alice and Bob can hardly hear each other. On top of that Alice and Bob have very powerful enemies. One of their enemies is the Tax Authority. Another is the Secret Police. This is a pity, since their favorite topics of discussion are tax frauds and overthrowing the government.

These enemies have almost unlimited resources. They always listen in to telephone conversations between Alice and Bob. And these enemies are very sneaky. One of their favorite tricks is to telephone Alice and pretend to be Bob.

Well, you think, so all Alice has to do is listen very carefully to be sure she recognizes Bob’s voice. But no. You see Alice has never met Bob. She has no idea what his voice sounds like.

So you see Alice has a whole bunch of problems to face. Oh yes, and there is one more thing I forgot so say – Alice doesn’t trust Bob. We don’t know why she doesn’t trust him, but at some time in the past there has been an incident.

Now most people in Alice’s position would give up. Not Alice. She has courage which can only be described as awesome. Against all odds, over a noisy telephone line, tapped by the tax authorities and the secret police, Alice will happily attempt, with someone she doesn’t trust, whom she cannot hear clearly, and who is probably someone else, to fiddle her tax returns and to organize a coup d’etat, while at the same time minimizing the cost of the phone call.

A coding theorist is someone who doesn’t think Alice is crazy.

I’ve always been a fan of the “expanded universe” of cyptography placeholders Alice & Bob, and this humorous speech – partially-reproduced here – is a great example of Alice & Bob headcanon at its best.

GIF MD5 hashquine

This is a repost promoting content originally published elsewhere. See more things Dan's reposted.

GIF MD5 hashquine – Rogdham (rogdham.net)

TL;DR: Quick access to GIF MD5 hasquine ressources:

Introduction

A few days ago, Ange Albertini retweteed an tweet from 2013 asking for a document that shows its own MD5 or SHA1 hash.

Later, he named such a document an hashquine, which seems to be appropriate: in computing, a quine is a program that prints its own source code when run.

Now, creating a program that prints its own hash is not that difficult, as several ways can be used to retrieve its source code before computing the hash (the second method does not work for compiled programs):

  • Reading its source or compiled code (e.g. from disk);
  • Using the same technique as in a quine to get the source code.

However, conventional documents such as images are likely not to be Turing-complete, so computing their hash is not possible directly. Instead, it is possible to leverage hash collisions to perform the trick.

This is the method that I used to create the following GIF MD5 hashquine:

hashquine and md5sum

Once I managed to do create it, I figured out that it was not the first GIF MD5 hashquine ever made, since spq beat me to it.

I will take that opportunity to look at how that one was done, and highlight the differences.

Finally, my code is on Github, so if you want to create your own gif md5 hashquine, you could easily start from there!

Creating a GIF MD5 hashquine

To create the hasquine, the two following ressources were used exhaustively:

A note about MD5 collisions

We say that MD5 is obsolete because one of the properties of a cryptographic hash function is that it should not be possible to find two messages with the same hash.

Today, two practical attacks can be performed on MD5:

  1. Given a prefix P, find two messages M1 and M2 such as md5(P || M1) and md5(P || M2) are equal (|| denotes concatenation);
  2. Given two prefixes P1 and P2, find two messages M1 and M2 such as md5(M1 || P1) and md5(M2 || P2) are equal.

To the best of my knowledge, attack 1 needs a few seconds on a regular computer, whereas attack 2 needs a greater deal of ressources (especially, time). We will use attack 1 in the following.

Please also note that we are not able (yet), given a MD5 hash H, to find a message M such as md5(M) is H. So creating a GIF displaying a fixed MD5 hash and then bruteforcing some bytes to append at the end until the MD5 is the one displayed is not possible.

Overview

The GIF file format does not allow to perform arbitrary computations. So we can not ask the software used to display the image to compute the MD5. Instead, we will rely on MD5 collisions.

First, we will create an animated GIF. The first frame is not interesting, since it’s only displaying the background. The second frame will display a 0 at the position of the first character of the hash. The third frame will display a 1 at that same position. And so on and so forth.

In other words, we will have a GIF file that displays all 16 possibles characters for each single character of the MD5 “output”.

If we allow the GIF to loop, it would look like this:

GIF showing all possible MD5 characters

Now, the idea is, for each character, to comment out each frame but the one corresponding to the target hash. Then, if we don’t allow the GIF to loop, it will end displaying the target MD5 hash, which is what we want.

To do so, we will, for each possible character of the MD5 hash, generate a MD5 collision at some place in the GIF. That’s 16×32=512 collisions to be generated, but we average 3.5 seconds per collision on our computer so it should run under 30 minutes.

Once this is done, we will have a valid GIF file. We can compute its hash: it will not change from that point.

Now that we have the hash, for each possible character of the MD5 hash, we will chose one or the other collision “block” previously computed. In one case, the character will be displayed, on the other it will be commented out. Because we replace some part of the GIF file with the specific collision “block” previously computed at that very same place, the MD5 hash of the GIF file will not change.

All what is left to do is to figure out how to insert the collision “blocks” in the GIF file (they look mostly random), so that:

  • It is a valid GIF file;
  • Using one “block” displays the corresponding character at the right position, but using the other “block” will not display it.

I will detail the process for one character.

Example for one character

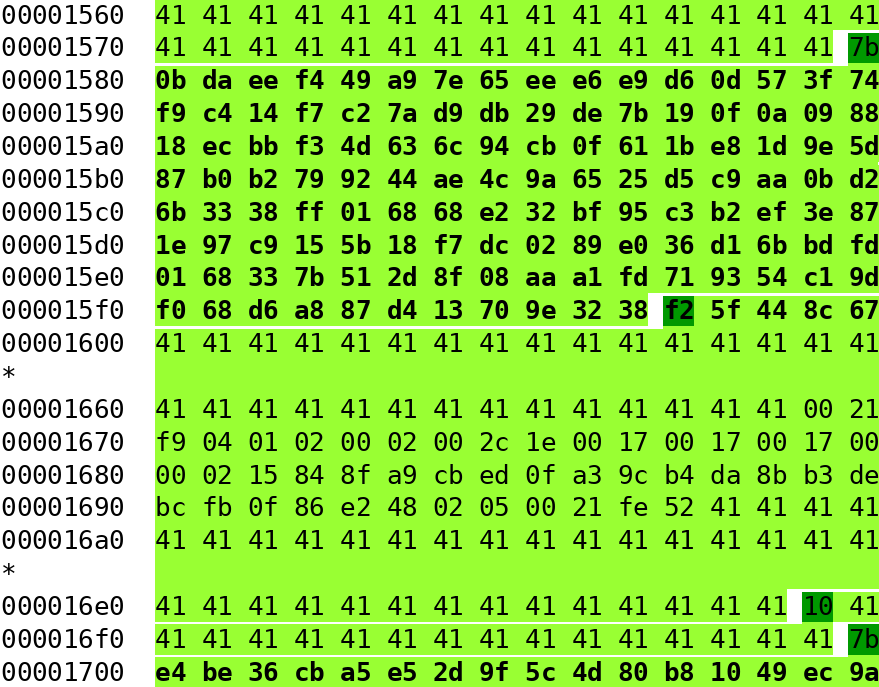
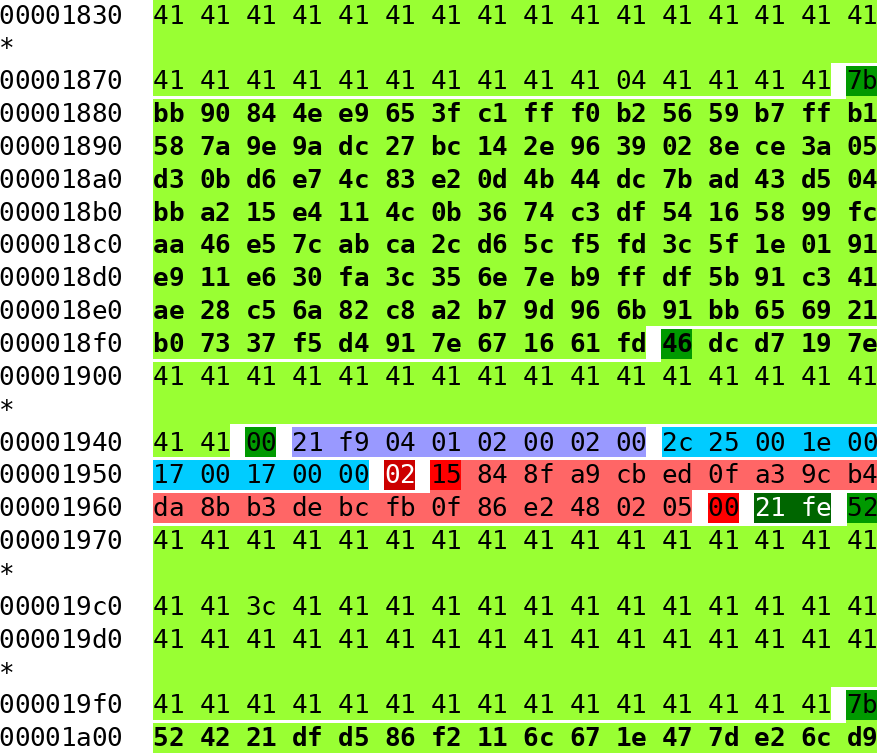
Let’s look at the part of the generated GIF file responsible for displaying (or not) the character 7 at the first position of the MD5 hash.

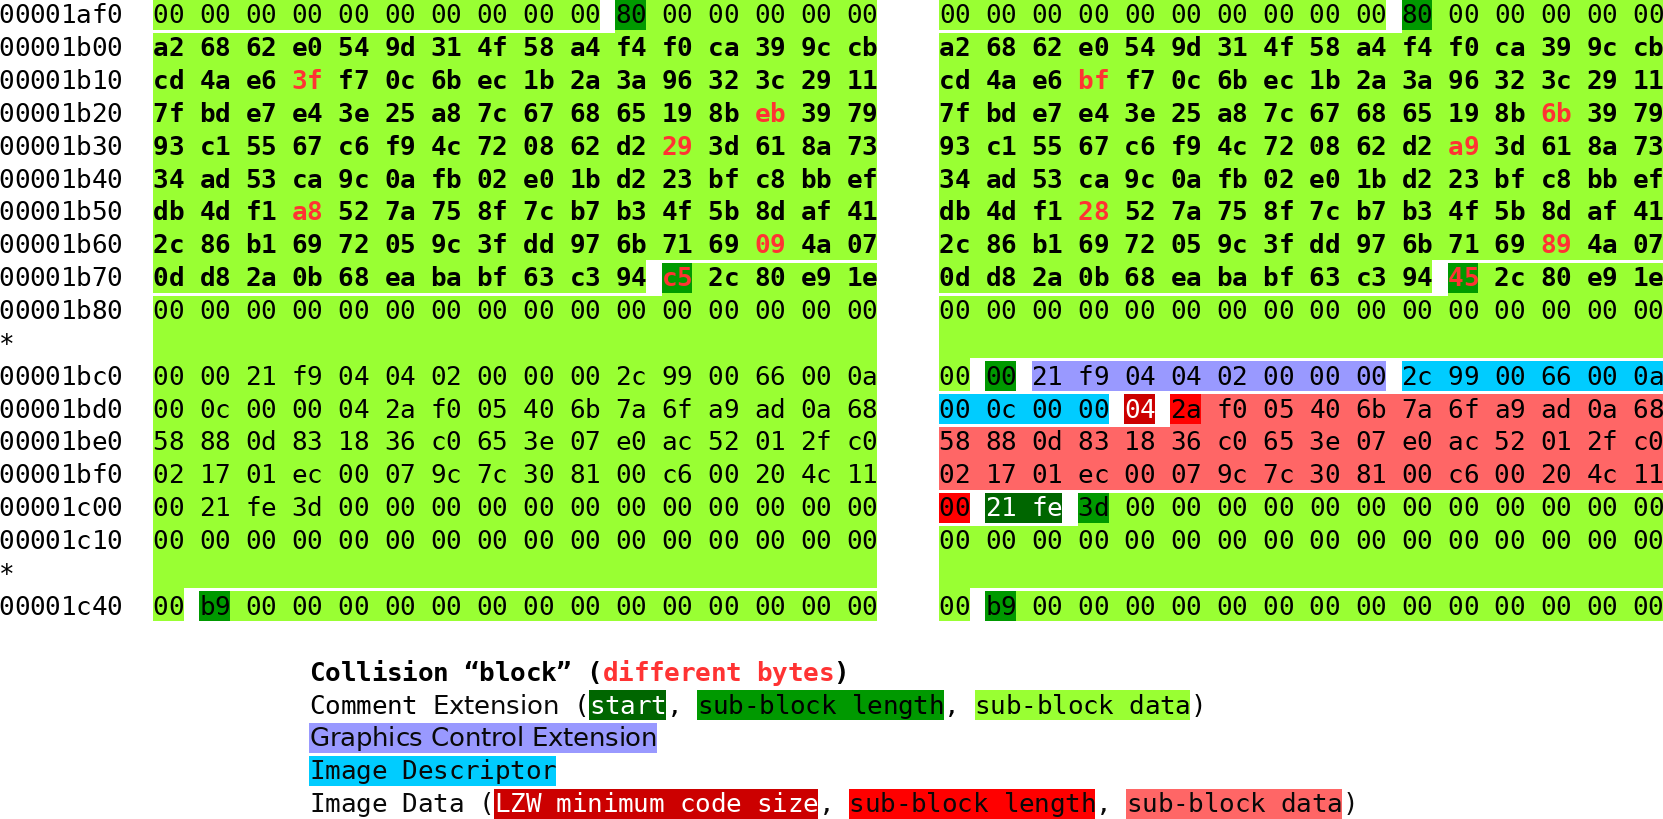
The figure below shows the relevant hexdump displaying side by side the two possible choices for the collision block (click to display in full size):

hexdump of two version of a character

The collision “block” is displayed in bold (from 0x1b00 to 0x1b80), with the changing bytes written in red.

In the GIF file formats, comments are defined as followed:

  • They start with the two bytes 21fe (written in white over dark green background);
  • Then, an arbitrary number of sub-blocks are present;
  • The first byte (in black over a dark green background) describes the length of the sub-block data;
  • Then the sub-block data (in black over a light green background);
  • When a sub-block of size 0 is reached, it is the end of the comment.

The other colours in the image above represent other GIF blocks:

  • In purple, the graphics control extension, starting a frame and specifying the duration of the frame;
  • In light blue, the image descriptor, specifying the size and position of the frame;
  • In various shades of red, the image data (just as for comments, it can be composed of sub-blocks).

To create this part of the GIF, I considered the following:

  • The collision “block” should start at a multiple of 64 bytes from the beginning of the file, so I use comments to pad accordingly.
  • The fastcoll software generating a MD5 collision seems to always create two outputs where the bytes in position 123 are different. As a result, I end the comment sub-block just before that position, so that this byte gives the size of the next comment sub-block.
  • For one chosen collision “block” (on the left), the byte in position 123 starts a new comment sub-block that skips over the GIF frame of the character, up to the start of a new comment sub-block which is used as padding to align the next collision “block”.
  • For the other chosen collision “block” (on the right), the byte in position 123 creates a new comment sub-block which is shorter in that case. Following it, I end the comment, add the frame displaying the character of the MD5 hash at the right position, and finally start a new comment up to the comment sub-block used as padding for the next collision “block”.

All things considered, it is not that difficult, but many things must be considered at the same time so it is not easy to explain. I hope that the image above with the various colours helps to understand.

Final thoughts

Once all this has been done, we have a proper GIF displaying its own MD5 hash! It is composed of one frame for the background, plus 32 frames for each character of the MD5 hash.

To speed-up the displaying of the hash, we can add to the process a little bit of bruteforcing so that some characters of the hash will be the one we want.

I fixed 6 characters, which does not add much computations to create the GIF. Feel free to add more if needed.

Of course, the initial image (the background) should have those fixed characters in it. I chose the characters d5 and dead as shown in the image below, so that this speed-up is not obvious!

Background and hash compared

That makes a total of 28 frames. At 20ms per frame, displaying the hash takes a little over half a second.

Analysis of a GIF MD5 hashquine

Since I found out that an other GIF MD5 hashquine has been created before mine once I finished creating one, I thought it may be interesting to compare the two independent creations.

Here is spq’s hashquine:

spq's hashquine

The first noticeable thing is that 7-digits displays have been used. This is an interesting trade-off:

  • On the plus side, this means that only 7×32=224 MD5 collisions are needed (instead of 16×32=512), which should make the generation of the GIF more than twice as fast, and the image size smaller (84Ko versus 152Ko, but I also chose to feature my avatar and some text).
  • However, there is a total of 68 GIF frames instead of 28, so the GIF takes more time to load: 1.34 seconds versus 0.54 seconds.

Now, as you can see when loading the GIF file, a hash of 32 8 characters is first displayed, then each segment needed to be turned off is hidden. This is done by displaying a black square on top. Indeed, if we paint the background white, the final image looks like this:

Using a white background reveals black squares

My guess is that it was easier to do so, because there was no need to handle all 16 possible characters. Instead, only a black square was needed.

Also, the size (in bytes) of the black square (42 bytes) is smaller than my characters (58 to 84 bytes), meaning that it is more likely to fit. Indeed, I needed to consider the case in my code where I don’t have enough space and need to generate an other collision.

Other than that, the method is almost identical: the only difference I noticed is that spq used two sub-block comments or collision alignment and skipping over the collision bytes, whereas I used only one.

For reference, here is an example of a black square skipped over:

hexdump of a commented square

And here is another black square that is displayed in the GIF:

hexdump of a used square

Conclusion

Hashquines are fun! Many thanks to Ange Albertini for the challenge, you made me dive into the GIF file format, which I probably wouldn’t have done otherwise.

And of course, well done to spq for creating the first known GIF MD5 hashquine!

×

The Mystery Cable

While rooting through our attic, Ruth‘s brother Owen just found a mystery cable. It almost certainly belongs to me (virtually all of the cables in the house, especially the unusual ones, do), but this one is a mystery to me.

6-of-13-pin plug, believed to be proprietary.
End #1 of the cable is a 13-pin male serial connection with 6 connected pins, spring-loaded. It seems to be designed to screw in at one end. The screw is worn.

The more I look at it, the more I feel like I’m slowly going mad, as if the cable is some kind of beast from the Lovecraftian Cable Dimension which mortal minds were not meant to comprehend. It’s got three “ends” and is clearly some kind of signal combining (or separating) cable, but it doesn’t look like anything I’ve ever seen before (and don’t forget, I probably own it).

End #2 of the cable: a microphone, perhaps?
On the other side of the split, end #2 of the cable terminates in a fine metal mesh (perhaps concealing a microphone, small speaker, or temperature/humidity sensor). It has a “push-to-talk” style clicker switch and a “tie clip” on it.

Every time I look at it I have a new idea of what it could be. Some kind of digital dictophone or radio mic connector? Part of a telephone headset? Weather monitoring hardware? A set of converters between two strange and unusual pieces of hardware? But no matter what I come up with, something doesn’t add up? Why only 6 pins? Why the strange screw-in connector? Why the clicker switch? Why the tie clips? Why “split” the output (let alone have cables of different lengths)?

End #3: an earpiece, maybe?
End #3 looks like a fibreoptic audio terminator. Or perhaps a part of an earpiece. It, too, has a “tie clip” on (do I clip it to… my ear?)

In case it helps, I’ve made a video of it. You’ll note that I use the word “thingy” more times than might perhaps be justified, but I’ve been puzzling over this one for a while:

Can you help? Can you identify this mystery cable? Prize for the correct answer!

× × ×

Lunar Lander

Just want to play my game without reading this whole post? Play the game here – press a key, mouse button, or touch the screen to fire the thrusters, and try to land at less than 4 m/s with as much fuel left over as possible.

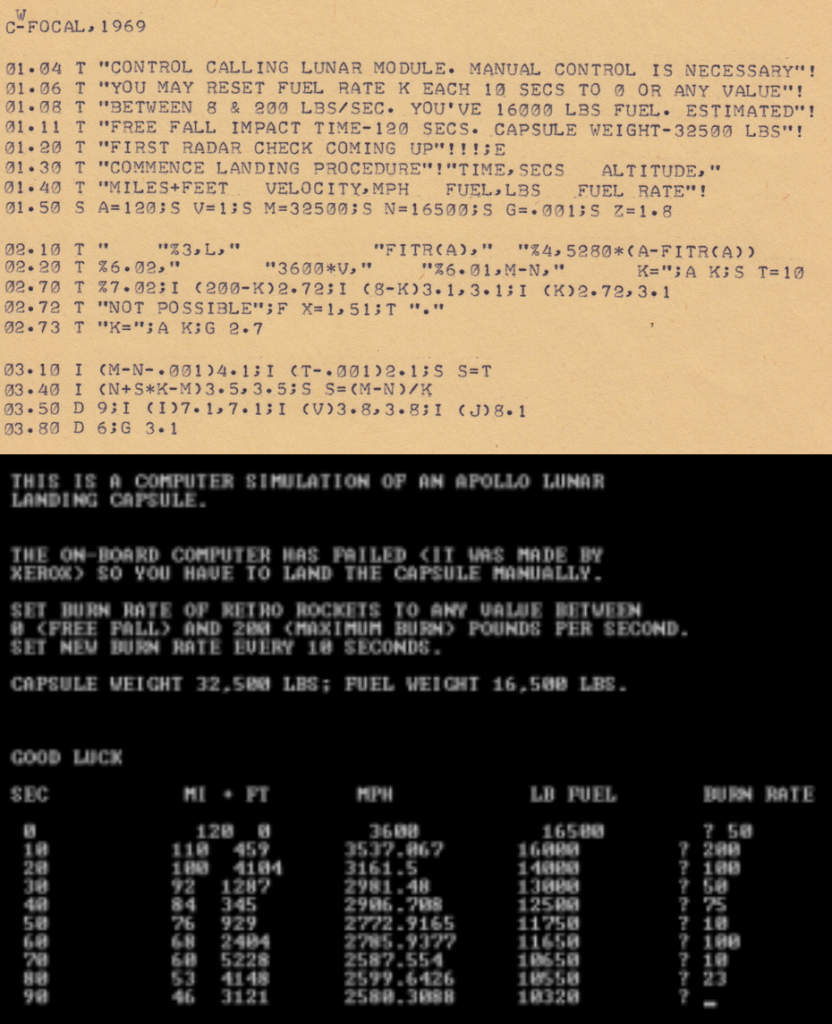
In 1969, when all the nerds were still excited by sending humans to the moon instead of flinging cars around the sun, the hottest video game was Rocket (or Lunar) for the PDP-8. Originally implemented in FOCAL by high school student Jim Storer and soon afterwards ported to BASIC (the other dominant language to come as standard with microcomputers), Rocket became the precursor to an entire genre of video games called “Lunar Lander games“.

Source code of Rocket and sample output.
Like many pieces of microcomputer software of the time, Rocket was distributed as printed source code that you’d need to carefully type in at the other end.

The aim of these games was to land a spacecraft on the moon or similar body by controlling the thrust (and in some advanced versions, the rotation) of the engine. The spacecraft begins in freefall towards the surface and will accelerate under gravity: this can be counteracted with thrust, but engaging the engine burns through the player’s limited supply of fuel. Furthermore, using fuel lowers the total mass of the vessel (a large proportion of the mass of the Apollo landers was fuel for use in the descent stage) which reduces its inertia, giving the engine more “kick” which must be compensated for during the critical final stages. It sounds dry and maths-y, but I promise that graphical versions can usually be played entirely “by eye”.

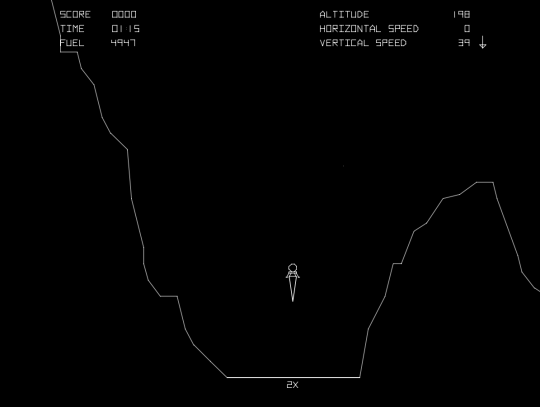
Atari's Lunar Lander (1979)
Atari’s 1979 adaptation is perhaps the classic version you’d recognise, although its release was somewhat overshadowed by their other vector-graphics space-themed release in 1979: Asteroids.

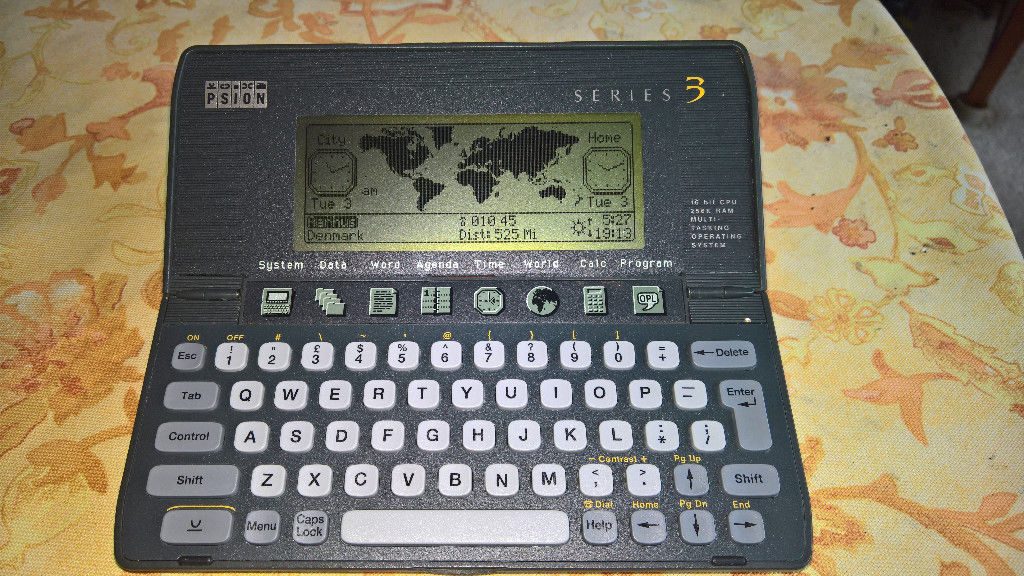
Let’s fast-forward a little. In 1997 I enrolled to do my A-levels at what was then called Preston College, where my Computing tutor was a chap called Kevin Geldard: you can see him at 49 seconds into this hilariously low-fi video which I guess must have been originally shot on VHS despite being uploaded to YouTube in 2009. He’s an interesting chap in his own right whose contributions to my career in computing deserve their own blog post, but for the time being all you need to know is that he was the kind of geek who, like me, writes software “for fun” more often than not. Kevin owned a Psion 3 palmtop – part of a series of devices with which I also have a long history and interest – and he taught himself to program OPL by reimplementing a favourite game of his younger years on it: his take on the classic mid-70s-style graphical Lunar Lander.

Psion Series 3
I never owned a Psion Series 3 (pictured), but I bought a Series 5mx in early 2000 out of my second student loan cheque, ultimately wrote most of my undergraduate dissertation using it, and eventually sold it to a collector in about 2009 for almost as much as I originally paid for it. The 5mx was an amazing bit of kit. But I’ll blog about that another day, I guess.

My A-level computing class consisted of a competitive group of geeky lads, and we made sort-of a personal extracurricular challenge to ourselves of re-implementing Kevin’s take on Lunar Lander using Turbo Pascal, the primary language in which our class was taught. Many hours out-of-class were spent in the computer lab, tweaking and comparing our various implementations (with only ocassional breaks to play Spacy, CivNet, or my adaptation of LORD2): later, some of us would extend our competition by going on to re-re-implement in Delphi, Visual Basic, or Java, or by adding additional levels relating to orbital rendezvous or landing on other planetary bodies. I was quite proud of mine at the time: it was highly-playable, fun, and – at least on your first few goes – moderately challenging.

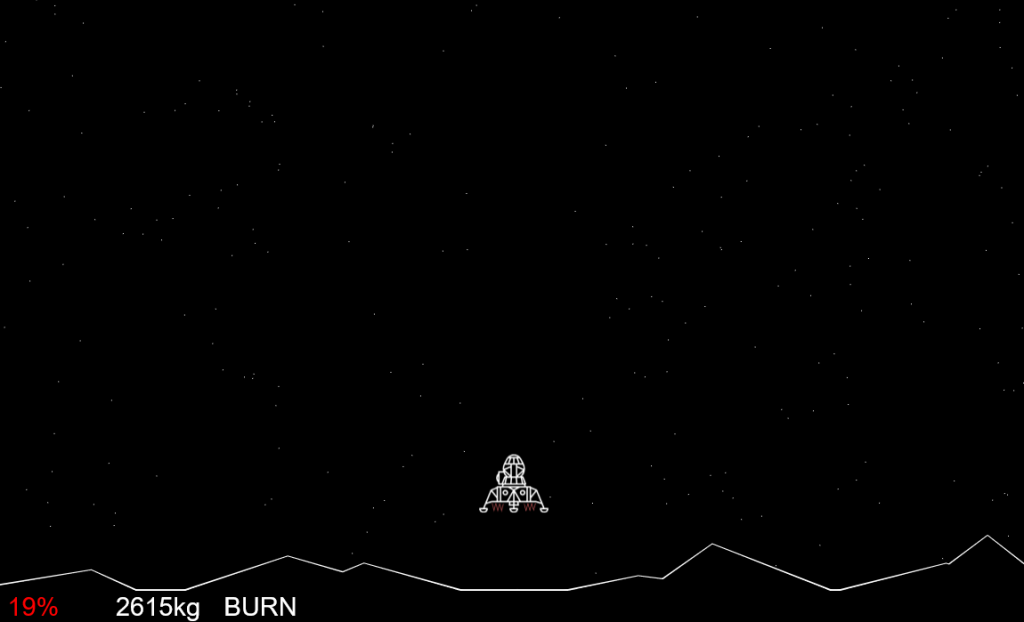
Dan's Lunar Lander (2018)
I sometimes wonder what it would have looked like if I’d have implemented my 1997 Lunar Lander today. So I did.

Always game to try old new things, and ocassionally finding time between the many things that I do to code, I decided to expand upon my recently-discovered interest in canvas coding to bring back my extracurricular Lunar Lander game of two decades ago in a modern format. My goals were:

  • A one-button version of a classic “straight descent only” lunar lander game (unlike my 1997 version, which had 10 engine power levels, this remake has just “on” and “off”)
  • An implementation based initially on real physics (although not necessarily graphically to scale)… and then adapted as necessary to give a fun/playability balance that feels good
  • Runs in a standards-compliant browser without need for plugins: HTML5, Canvas, Javascript
  • Adapts gracefully to any device, screen resolution, and orientation with graceful degredation/progressive enhancement

You can have a go at my game right here in your web browser! The aim is to reach the ground travelling at a velocity of no more than 4 m/s with the maximum amount of fuel left over: this, if anything, is your “score”. My record is 52% of fuel remaining, but honestly anything in the 40%+ range is very good. Touch the screen (if it’s a touchscreen) or press a mouse button or any key to engage your thrusters and slow your descent.

End point of Dan's Lunar Lander (2018)
“Houston, the Eagle has landed.” Kerbal Space Program, it isn’t. Here’s a very good landing: 3 m/s with 48% of the fuel tank remaining.

And of course it’s all open-source, so you’re more than welcome to take it, rip it apart, learn from it, or make something better out of it.

× × ×

Steer! An Experimental Canvas/Websocket Game

As you may know, I’ve lately found an excuse to play with some new web technologies, and I’ve also taken the opportunity to try to gain a deeper understanding of some less bleeding-edge technologies that I think have some interesting potential. And so it was that, while I was staffing the Three Rings stall at last week’s NCVO conference, I made use of the time that the conference delegates were all off listening to a presentation to throw together a tech demo I call Steer!

Animated GIF from a video, showing a player using their mobile phone to steer a car on a desktop computer screen, all using the web browsers on both devices.
A player uses their mobile phone to steer a car on a desktop computer, using nothing more than a web browser.

As you can see from the GIF above, Steer! is a driving game. The track and your car are displayed in a web browser on a large screen, for example a desktop or laptop computer, television, or tablet, and your mobile phone is used to steer the car by tilting it to swerve around a gradually-narrowing weaving road. It’s pretty fun, but what really makes it interesting to me is the combination of moderately-new technologies I’ve woven together to make it possible, specifically:

  • The Device Orientation API, which enables a web application to detect the angle at which you’re holding your mobile phone
  • Websockets as a mechanism to send that data in near-real-time from the phone to the browser, via a web server: for the fastest, laziest possible development, I used Firebase for this, but I’m aware that I could probably get better performance by running a local server on the LAN shared by both devices
  • The Canvas API to draw the output to the screen

Infographic showing how Steer! works. Phone accelerometer determines orientation, pushes to Firebase (up to 60 times/sec), which pushes to browser (via Websocket), which updates screen.

The desktop browser does all of the real work: it takes the orientation of the device and uses that, and the car’s current speed, to determine how it’s position changes over the time that’s elapsed since the screen was last refreshed: we’re aiming for 60 frames a second, of course, but we don’t want the car to travel slower when the game is played on a slower computer, so we use requestAnimationFrame to get the fastest rate possible and calculate the time between renderings to work out how much of a change has occurred this ‘tick’. We leave the car’s sprite close to the bottom of the screen at all times but change how much it rotates from side to side, and we use it’s rotated to decide how much of its motion is lateral versus the amount that’s “along the track”. The latter value determines how much track we move down the screen “behind” it.

The track is generated very simply by the addition of three sine waves of different offset and frequency – a form of very basic procedural generation. Despite the predictability of mathematical curves, this results in a moderately organic-feeling road because the player only sees a fraction of the resulting curve at any given time: the illustration below shows how these three curves combine to make the resulting road. The difficulty is ramped up the further the player has travelled by increasing the amplitude of the resulting wave (i.e. making the curves gradually more-agressive) and by making the road itself gradually narrower. The same mathematics are used to determine whether the car is mostly on the tarmac or mostly on the grass and adjust its maximum speed accordingly.

Sum of sine waves as used to generate the track for Steer!

In order to help provide a visual sense of the player’s speed, I added dashed lines down the road (dividing it into three lanes to begin with and two later on) which zip past the car and provide a sense of acceleration, deceleration, overall speed, and the impact of turning ‘sideways’ (which of course reduces the forward momentum to nothing).

This isn’t meant to be a finished game: it’s an experimental prototype to help explore some technologies that I’d not had time to look seriously at before now. However, you’re welcome to take a copy – it’s all open source – and adapt or expand it. Particular ways in which it’d be fun to improve it might include:

  • Allowing the player more control, e.g. over their accelerator and brakes
  • Adding hazards (trees, lamp posts, and others cars) which must be avoided
  • Adding bonuses like speed boosts
  • Making it challenging, e.g. giving time limits to get through checkpoints
  • Day and night cycles (with headlights!)
  • Multiplayer capability, like a real race?
  • Smarter handling of multiple simultaneous users: right now they’d share control of the car (which is the major reason I haven’t given you a live online version to play with and you have to download it yourself!), but it’d be better if they could “queue” until it was their turn, or else each play in their own split-screen view or something
  • Improving the graphics with textures
  • Increasing the entropy of the curves used to generate the road, and perhaps adding pre-scripted scenery or points of interest on a mathematically-different procedural generation algorithm
  • Switching to a local LAN websocket server, allowing better performance than the dog-leg via Firebase
  • Greater compatibility: I haven’t tried it on an iPhone, but I gather than iOS devices report their orientation differently from Android ones… and I’ve done nothing to try to make Steer! handle more-unusual screen sizes and shapes
  • Anything else? (Don’t expect me to have time to enhance it, though: but if you do so, I’d love to hear about it!)

What Does Jack FM Sound Like?

Those who know me well know that I’m a bit of a data nerd. Even when I don’t yet know what I’m going to do with some data yet, it feels sensible to start collecting it in a nice machine-readable format from the word go. Because you never know, right? That’s how I’m able to tell you how much gas and electricity our house used on average on any day in the last two and a half years (and how much off that was offset by our solar panels).

Daily energy usage at Dan's house for the last few years. Look at the gas peaks in the winters, when the central heating ramps up!
The red lumps are winters, when the central heating comes on and starts burning a stack of gas.

So it should perhaps come as no huge surprise that for the last six months I’ve been recording the identity of every piece of music played by my favourite local radio station, Jack FM (don’t worry: I didn’t do this by hand – I wrote a program to do it). At the time, I wasn’t sure whether there was any point to the exercise… in fact, I’m still not sure. But hey: I’ve got a log of the last 45,000 songs that the radio station played: I might as well do something with it. The Discogs API proved invaluable in automating the discovery of metadata relating to each song, such as the year of its release (I wasn’t going to do that by hand either!), and that gave me enough data to, for example, do this (click on any image to see a bigger version):

Jack FM: Decade Frequency by Hour
Decade frequency by hour: you’ve got a good chance of 80s music at any time, but lunchtime’s your best bet (or perhaps just after midnight). Note that times are in UTC+2 in this graph.

I almost expected a bigger variance by hour-of-day, but I guess that Jack isn’t in the habit of pandering to its demographics too heavily. I spotted the post-midnight point at which you get almost a plurality of music from 1990 or later, though: perhaps that’s when the young ‘uns who can still stay up that late are mostly listening to the radio? What about by day-of-week, then:

Jack FM: Decade Frequency by Day of Week
Even less in it by day of week… although 70s music fans should consider tuning in on Fridays, apparently, and 80s fans will be happiest on Sundays.

The chunks of “bonus 80s” shouldn’t be surprising, I suppose, given that the radio station advertises that that’s exactly what it does at those times. But still: it’s reassuring to know that when a radio station claims to play 80s music, you don’t just have to take their word for it (so long as their listeners include somebody as geeky as me).

It feels to me like every time I tune in they’re playing an INXS song. That can’t be a coincidence, right? Let’s find out:

Jack FM: Artist Frequency
One in every ten songs are by just ten artists (including INXS). One in every four are by just 34 artists.

Yup, there’s a heavy bias towards Guns ‘n’ Roses, Michael Jackson, Prince, Oasis, Bryan Adams, Madonna, INXS, Bon Jovi, Queen, and U2 (who collectively are responsible for over a tenth of all music played on Jack FM), and – to a lesser extent – towards Robert Palmer, Meatloaf, Blondie, Green Day, Texas, Whitesnake, the Pet Shop Boys, Billy Idol, Madness, Rainbow, Elton John, Bruce Springsteen, Aerosmith, Fleetwood Mac, Phil Collins, ZZ Top, AC/DC, Duran Duran, the Police, Simple Minds, Blur, David Bowie, Def Leppard, and REM: taken together, one in every four songs played on Jack FM is by one of these 34 artists.

Jack FM: Top 20
Amazingly, the most-played song on Jack FM (Alice Cooper’s “Poison”) is not by one of the most-played 34 artists.

I was interested to see that the “top 20 songs” played on Jack FM these last six months include several songs by artists who otherwise aren’t represented at all on the station. The most-played song is Alice Cooper’s Poison, but I’ve never recorded them playing any other Alice Cooper songs (boo!). The fifth-most-played song is Fight For Your Right, by the Beastie Boys, but that’s the only Beastie Boys song I’ve caught them playing. And the seventh-most-played – Roachford’s Cuddly Toy – is similarly the only Roachford song they ever put on.

Next I tried a Markov chain analysis. Markov chains are a mathematical tool that examines a sequence (in this case, a sequence of songs) and builds a map of “chains” of sequential songs, recording the frequency with which they follow one another – here’s a great explanation and playground. The same technique is used by “predictive text” features on your smartphone: it knows what word to suggest you type next based on the patterns of words you most-often type in sequence. And running some Markov chain analysis helped me find some really… interesting patterns in the playlists. For example, look at the similarities between what was played early in the afternoon of Wednesday 19 October and what was played 12 hours later, early in the morning of Thursday 20 October:

19 October 2016 20 October 2016
12:06:33 Kool & The Gang – Fresh Kool & The Gang – Fresh 00:13:56
12:10:35 Bruce Springsteen – Dancing In The Dark Bruce Springsteen – Dancing In The Dark 00:17:57
12:14:36 Maxi Priest – Close To You Maxi Priest – Close To You 00:21:59
12:22:38 Van Halen – Why Can’t This Be Love Van Halen – Why Can’t This Be Love 00:25:00
12:25:39 Beats International / Lindy – Dub Be Good To Me Beats International / Lindy – Dub Be Good To Me 00:29:01
12:29:40 Kasabian – Fire Kasabian – Fire 00:33:02
12:33:42 Talk Talk – It’s My Life Talk Talk – It’s My Life 00:38:04
12:41:44 Lenny Kravitz – Are You Gonna Go My Way Lenny Kravitz – Are You Gonna Go My Way 00:42:05
12:45:45 Shalamar – I Can Make You Feel Good Shalamar – I Can Make You Feel Good 00:45:06
12:49:47 4 Non Blondes – What’s Up 4 Non Blondes – What’s Up 00:50:07
12:55:49 Madness – Baggy Trousers Madness – Baggy Trousers 00:54:09
Eagle Eye Cherry – Save Tonight 00:56:09
Feeling – Love It When You Call 01:04:12
13:02:51 Fine Young Cannibals – Good Thing Fine Young Cannibals – Good Thing 01:10:14
13:06:54 Blur – There’s No Other Way Blur – There’s No Other Way 01:14:15
13:09:55 Pet Shop Boys – It’s A Sin Pet Shop Boys – It’s A Sin 01:17:16
13:14:56 Zutons – Valerie Zutons – Valerie 01:22:18
13:22:59 Cure – The Love Cats Cure – The Love Cats 01:26:19
13:27:01 Bryan Adams / Mel C – When You’re Gone Bryan Adams / Mel C – When You’re Gone 01:30:20
13:30:02 Depeche Mode – Personal Jesus Depeche Mode – Personal Jesus 01:33:21
13:34:03 Queen – Another One Bites The Dust Queen – Another One Bites The Dust 01:38:22
13:42:06 Shania Twain – That Don’t Impress Me Much Shania Twain – That Don’t Impress Me Much 01:42:23
13:45:07 ZZ Top – Gimme All Your Lovin’ ZZ Top – Gimme All Your Lovin’ 01:46:25
13:49:09 Abba – Mamma Mia Abba – Mamma Mia 01:50:26
13:53:10 Survivor – Eye Of The Tiger Survivor – Eye Of The Tiger 01:53:27
Scouting For Girls – Elvis Aint Dead 01:57:28
Verve – Lucky Man 02:00:29
Fleetwood Mac – Say You Love Me 02:05:30
14:03:13 Kiss – Crazy Crazy Nights Kiss – Crazy Crazy Nights 02:10:31
14:07:15 Lightning Seeds – Sense Lightning Seeds – Sense 02:14:33
14:11:16 Pretenders – Brass In Pocket Pretenders – Brass In Pocket 02:18:34
14:14:17 Elvis Presley / JXL – A Little Less Conversation Elvis Presley / JXL – A Little Less Conversation 02:21:35
14:22:19 U2 – Angel Of Harlem U2 – Angel Of Harlem 02:24:36
14:25:20 Trammps – Disco Inferno Trammps – Disco Inferno 02:28:37
14:29:22 Cast – Guiding Star Cast – Guiding Star 02:31:38
14:33:23 New Order – Blue Monday New Order – Blue Monday 02:36:39
14:41:26 Def Leppard – Let’s Get Rocked Def Leppard – Let’s Get Rocked 02:40:41
14:46:28 Phil Collins – Sussudio Phil Collins – Sussudio 02:45:42
14:50:30 Shawn Mullins – Lullaby Shawn Mullins – Lullaby 02:49:43
14:55:31 Stars On 45 – Stars On 45 Stars On 45 – Stars On 45 02:53:45
16:06:35 Dead Or Alive – You Spin Me Round Like A Record Dead Or Alive – You Spin Me Round Like A Record 03:00:47
16:09:36 Dire Straits – Walk Of Life Dire Straits – Walk Of Life 03:03:48
16:13:37 Keane – Everybody’s Changing Keane – Everybody’s Changing 03:07:49
16:17:39 Billy Idol – Rebel Yell Billy Idol – Rebel Yell 03:10:50
16:25:41 Stealers Wheel – Stuck In The Middle Stealers Wheel – Stuck In The Middle 03:14:51
16:28:42 Green Day – American Idiot Green Day – American Idiot 03:18:52
16:33:44 A-Ha – Take On Me A-Ha – Take On Me 03:21:53
16:36:45 Cranberries – Dreams Cranberries – Dreams 03:26:54
Elton John – Philadelphia Freedom 03:30:56
Inxs – Disappear 03:36:57
Kim Wilde – You Keep Me Hanging On 03:40:59
16:44:47 Living In A Box – Living In A Box
16:47:48 Status Quo – Rockin’ All Over The World Status Quo – Rockin’ All Over The World 03:45:00

The similarities between those playlists (which include a 20-songs-in-a-row streak!) surely can’t be coincidence… but they do go some way to explaining why listening to Jack FM sometimes gives me a feeling of déjà vu (along with, perhaps, the no-talk, all-jukebox format). Looking elsewhere in the data I found dozens of other similar occurances, though none that were both such long chains and in such close proximity to one another. What does it mean?

There are several possible explanations, including:

  • The exotic, e.g. they’re using Markov chains to control an auto-DJ, and so just sometimes it randomly chooses to follow a long chain that it “learned” from a real DJ.
  • The silly, e.g. Jack FM somehow knew that I was monitoring them in this way and are trying to troll me.
  • My favourite: these two are actually the same playlist, but with breaks interspersed differently. During the daytime, the breaks in the list are more-frequent and longer, which suggests: ad breaks! Advertisers are far more-likely to pay for spots during the mid-afternoon than they are in the middle of the night (the gap in the overnight playlist could well be a short ad or a jingle), which would explain why the two are different from one another!

But the question remains: why reuse playlists in close proximity at all? Even when the station operates autonomously, as it clearly does most of the time, it’d surely be easy enough to set up an auto-DJ using “smart random” (because truly random shuffles don’t sound random to humans) to get the same or a better effect.

Jack FM Style Guide
One of the things I love about Jack FM is how little they take seriously. Like their style guide.

Which leads to another interesting observation: Jack FM’s sister stations in Surrey and Hampshire also maintain a similar playlist most of the time… which means that they’re either synchronising their ad breaks (including their duration – I suspect this is the case) or else using filler jingles to line-up content with the beginnings and ends of songs. It’s a clever operation, clearly, but it’s not beyond black-box comprehension. More research is clearly needed. (And yes, I’m sure I could just call up and ask – they call me “Newcastle Dan” on the breakfast show – but that wouldn’t be even half as fun as the data mining is…)

× × × × × ×

DevCamp – have we really been doing this for 7 years?

An annual tradition at Three Rings is DevCamp, an event that borrows from the “hackathon” concept and expands it to a week-long code-producing factory for the volunteers of the Three Rings development team. Motivating volunteers is a very different game to motivating paid employees: you can’t offer to pay them more for working harder nor threaten to stop paying them if they don’t work hard enough, so it’s necessary to tap in to whatever it is that drives them to be a volunteer, and help them get more of that out of their volunteering.

Table full of computers at DevCamp 2011.
This photo, from DevCamp 2011, is probably the only instance where I’ve had fewer monitors out than another developer.

At least part of what appeals to all of our developers is a sense of achievement – of producing something that has practical value – as well as of learning new things, applying what they’ve learned, and having a degree of control over the parts of the project they contribute most-directly to. Incidentally, these are the same things that motivate paid developers, too, if a Google search for studies on the subject is to believed. It’s just that employers are rarely able to willing to offer all of those things (and even if they can, you can’t use them to pay your mortgage), so they have to put money on the table too. With my team at Three Rings, I don’t have money to give them, so I have to make up for it with a surplus of those things that developers actually want.

A developer hides inside a handmade camera obscura to watch the solar eclipse at DevCamp 2015.
At the 2015 DevCamp, developers used the solar eclipse as an excuse for an impromptu teambuilding activity: making a camera obscura out of stuff we had lying about.

It seems strange to me in hindsight that for the last seven years I’ve spent a week of my year taking leave from my day job in order to work longer, harder, and unpaid for a voluntary project… but that I haven’t yet blogged about it. Over the same timescale I’ve spent about twice as long at DevCamp than I have, for example, skiing, yet I’ve managed to knock out several blog posts on that subject. Part of that might be borne out of the secretive nature of Three Rings, especially in its early days (when involvement with Three Rings pretty-much fingered you as being a Nightline volunteer, which was frowned upon), but nowadays we’ve got a couple of dozen volunteers with backgrounds in a variety of organisations: and many of those of us that ever were Nightliner volunteers have long since graduated and moved-on to other volunteering work besides.

DevCamp and DocsCamp 2016 volunteers play Betrayal at the House on the Hill
Semi-cooperative horror-themed board games by candlelight are a motivator for everybody, right?

Part of the motivation – one of the perks of being a Three Rings developer – for me at least, is DevCamp itself. Because it’s an opportunity to drop all of my “day job” stuff for a week, go to some beatiful far-flung corner of the country, and (between early-morning geocaching/hiking expeditions and late night drinking tomfoolery) get to spend long days contributing to something awesome. And hanging out with like-minded people while I do so. I like I good hackathon of any variety, but I love me some Three Rings DevCamp!

Geocache GC4EE6C, with accompanying caterpillar and mushroom
The geocaches near DevCamp 2016 were particularly fabulous, though. Like this one – GC4EE6C – part of an Alice In Wonderland-themed series.

So yeah: DevCamp is awesome. It’s more than a little different than those days back in 2003 when I wrote all the code and Kit worked hard at distracting me with facts about the laws of Hawaii – for the majority of DevCamp 2016 we had half a dozen developers plus two documentation writers in attendance! – but it’s still fundamentally about the same thing: producing a piece of software that helps about 25,000 volunteers do amazing things and make the world a better place. We’ve collectively given tens, maybe hundreds of thousands of hours of time in developing and supporting it, but that in turn has helped to streamline the organisation of about 16 million person-hours of other volunteering.

So that’s nice.

Developers marvel at one another's code, etc.
An end-of-day “Show & Tell” session at DevCamp 2016.

Oh, and I was delighted that one of my contributions this DevCamp was that I’ve finally gotten around to expanding the functionality of the “gender” property so that there are now more than three options. That’s almost more-exciting than the geocaches. Almost.

Edit: added a missing word in the sentence about how much time our volunteers had given, making it both more-believable and more-impressive.

× × × × ×

Raspberry Pi VPN Hotspot (or How To Infuriate Theresa May For Under £40)

As you’re no-doubt aware, Home Secretary Theresa May is probably going to get her way with her “snooper’s charter” by capitalising on events in Paris (even though that makes no sense), and before long, people working for law enforcement will be able to read your Internet usage history without so much as a warrant (or, to put it as the UN’s privacy chief put it, it’s “worse than scary”).

John Oliver on Last Week Tonight discusses the bill.
Or as John Oliver put it, “This bill could write into law a huge invasion of privacy.” Click to see a clip.

In a revelation that we should be thankful of as much as we’re terrified by, our government does not understand how the Internet works. And that’s why it’s really easy for somebody with only a modicum of geekery to almost-completely hide their online activities from observation by their government and simultaneously from hackers. Here’s a device that I built the other weekend, and below I’ll tell you how to do it yourself (and how it keeps you safe online from a variety of threats, as well as potentially giving you certain other advantages online):

"Iceland", one of my Raspberry Pi VPN hotspots
It’s small, it’s cute, and it goes a long way to protecting my privacy online.

I call it “Iceland”, for reasons that will become clear later. But a more-descriptive name would be a “Raspberry Pi VPN Hotspot”. Here’s what you’ll need if you want to build one:

  • A Raspberry Pi Model B (or later) – you can get these from less than £30 online and it’ll come with an SD card that’ll let it boot Raspbian, which is the Linux distribution I’ve used in my example: there’s no reason you couldn’t use another one if you’re familiar with it
  • A USB WiFi dongle that supports “access point” mode – I’m using an Edimax one that cost me under a fiver – but it took a little hacking to make it work – I’ve heard that Panda and RALink dongles are easier
  • A subscription to a VPN with OpenVPN support and at least one endpoint outside of the UK – I’m using VyprVPN because I have a special offer, but there are lots of cheaper options: here’s a great article about choosing one
  • A basic familiarity with a *nix command line, an elementary understanding of IP networking, and a spare 20 minutes.

From here on, this post gets pretty geeky. Unless you plan on building your own little box to encrypt all of your home’s WiFi traffic until it’s well out of the UK and close-to-impossible to link to you personally (which you should!), then you probably ought to come back to it another time.

Here’s how it’s done:

1. Plug in, boot, and install some prerequisites

Plug the WiFi dongle into a USB port and connect the Ethernet port to your Internet router.  Boot your Raspberry Pi into Raspbian (as described in the helpsheet that comes with it), and run:

sudo apt-get install bridge-utils hostapd udhcpd bind9 openvpn

2. Make HostAPD support your Edimax dongle

If, like me, you’re using an Edimax dongle, you need to do an extra couple of steps to make it work as an access point. Skip this bit if you’re using one of the other dongles I listed or if you know better.

wget http://dl.dropbox.com/u/1663660/hostapd/hostapd.zip
unzip hostapd.zip
sudo mv /usr/sbin/hostapd /usr/sbin/hostapd.original
sudo mv hostapd /usr/sbin/hostapd.edimax
sudo ln -sf /usr/sbin/hostapd.edimax /usr/sbin/hostapd
sudo chown root.root /usr/sbin/hostapd
sudo chmod 755 /usr/sbin/hostapd

3. Set up OpenVPN

Get OpenVPN configuration files from your VPN provider: often these will be available under the iOS downloads. There’ll probably be one for each available endpoint. I chose the one for Reyjkavik, because Iceland’s got moderately sensible privacy laws and I’m pretty confident that it would take judicial oversight for British law enforcement to collaborate with Icelandic authorities on getting a wiretap in place, which is the kind of level of privacy I’m happy with. Copy your file to /etc/openvpn/openvpn.conf and edit it: you may find that you need to put your VPN username and password into it to make it work.

sudo service openvpn start

You can now test your VPN’s working, if you like. I suggest connecting to the awesome icanhazip.com and asking it where you are (you can use your favourite GeoIP website to tell you what country it thinks you’re in, based on that):

curl -4 icanhazip.com

Another option would be to check with a GeoIP service directly:

curl freegeoip.net/json/

4. Set up your firewall and restart the VPN connection

Unless your VPN provider gives you DNAT (and even if they do, if you’re paranoid), you should set up a firewall to allow only outgoing connections to be established, and then restart your VPN connection:

sudo iptables -A INPUT -i tun0 -m conntrack --ctstate RELATED,ESTABLISHED -j ACCEPT
sudo iptables -A INPUT -i tun0 -j DROP
sudo sh -c "iptables-save > /etc/iptables.nat.vpn.secure"
sudo sh -c "echo 'up iptables-restore < /etc/iptables.nat.vpn.secure' >> /etc/network/interfaces"
sudo service openvpn restart

5. Configure your WiFi hotspot

Configure bind as your DNS server, caching responses on behalf of Google’s DNS servers, or another DNS server that you trust. Alternatively, you can just configure your DHCP clients to use Google’s DNS servers directly, but caching will probably improve your performance overall. To do this, add a forwarder to /etc/bind/named.conf.options:

forwarders {
  8.8.8.8;
  8.8.4.4;
};

Restart bind, and make sure it loads on boot:

sudo service bind9 restart
sudo update-rc.d bind9 enable

Edit /etc/udhcpd.conf. As a minimum, you should have a configuration along these lines (you might need to tweak your IP address assignments to fit with your local network – the “router” and “dns” settings should be set to the IP address you’ll give to your Raspberry Pi):

start 192.168.0.2
end 192.168.0.254
interface wlan0
remaining yes
opt dns 192.168.0.1
option subnet 255.255.255.0
opt router 192.168.0.1
option lease 864000 # 10 days

Enable DHCP by uncommenting (remove the hash!) the following line in /etc/default/udhcpd:

#DHCPD_ENABLED="yes"

Set a static IP address on your Raspberry Pi in the same subnet as you configured above (but not between the start and end of the DHCP list):

sudo ifconfig wlan0 192.168.0.1

And edit your /etc/network/interfaces file to configure it to retain this on reboot (you’ll need to use tabs, not spaces, for indentation):

iface wlan0 inet static
  address 192.168.0.1
  netmask 255.255.255.0

And comment out the lines relating to hot-plugging of WiFi adapters/network hopping:

#allow-hotplug wlan0
#wpa-roam /etc/wpa_supplicant/wpa_supplicant.conf
#iface default inet manual

Right – onto hostapd, the fiddliest of the tools you’ll have to configure. Create or edit /etc/hostapd/hostapd.conf as follows, but substitute in your own SSID, hotspot password, and channel (to minimise interference, which can slow your network down, I recommend using WiFi scanner tool on your mobile to find which channels your neighbours aren’t using, and use one of those – you should probably avoid the channel your normal WiFi uses, too, so you don’t slow your own connection down with crosstalk):

interface=wlan0
driver=nl80211
ssid=your network name
hw_mode=g
channel=6
macaddr_acl=0
auth_algs=1
ignore_broadcast_ssid=0
wpa=2
wpa_passphrase=your network password
wpa_key_mgmt=WPA-PSK
wpa_pairwise=TKIP
rsn_pairwise=CCMP

Hook up this configuration by editing /etc/default/hostapd:

DAEMON_CONF="/etc/hostapd/hostapd.conf"

Fire up the hotspot, and make sure it runs on reboot:

sudo service hostapd start
sudo service udhcpd start
sudo update-rc.d hostapd enable
sudo update-rc.d udhcpd enable

Finally, set up NAT so that people connecting to your new hotspot are fowarded through the IP tunnel of your VPN connection:

sudo sh -c "echo 1 > /proc/sys/net/ipv4/ip_forward"
sudo sh -c "echo net.ipv4.ip_forward=1 >> /etc/sysctl.conf"
sudo iptables -t nat -A POSTROUTING -o tun0 -j MASQUERADE
sudo sh -c "iptables-save > /etc/iptables.nat.vpn.secure"

6. Give it a go!

Connect to your new WiFi hotspot, and go to your favourite GeoIP service. Or, if your VPN endpoint gives you access to geographically-limited services, give those a go (you’d be amazed how different the Netflix catalogues are in different parts of the world). And give me a shout if you need any help or if you have any clever ideas about how this magic little box can be improved.

Further reading:

×

Twee2 – Interactive Fiction Authoring for Geeks

There’s a wonderful tool for making web-based “choose your own adventure”-type games, called Twine. One of the best things about it is that it’s so accessible: if you wanted to, you could be underway writing your first ever story with it in about 5 minutes from now, without installing anything at all, and when it was done you could publish it on the web and it would just work.

Screenshot of a Twine 2 story map
A “story map” in Twine 2. Easy interactive fiction writing for normal people.

But the problem with Twine is that, in its latest and best versions, you’re trapped into using the Twine IDE. The Twine IDE is an easy-to-use, highly visual, ‘drag-and-drop’ interface for making interactive stories. Which is probably great if you’re into IDEs or if you don’t “know better”… but for those of us who prefer to do our writing in a nice clean, empty text editor like Sublime or TextMate or to script/automate our builds, it’s just frustrating to lose access to the tools we love. Plus, highly-visual IDEs make it notoriously hard to collaborate with other authors on the same work without simply passing it back and forwards between you: unless they’ve been built with this goal in mind, you generally can’t have two people working in the same file at the same time.

Sublime Text demonstrating multi-line-selection.
Now THIS is what code editing should look like.

Earlier versions of Twine had a command-line tool called Twee that perfectly filled this gap. But the shiny new versions don’t. That’s where I came in.

In that way that people who know me are probably used to by now, I was very-slightly unsatisfied with one aspect of an otherwise fantastic product and decided that the correct course of action was to reimplement it myself. So that’s how, a few weeks ago, I came to release Twee2.

Twee2 logo
Twee2’s logo integrates the ‘branching’ design of Twine adventures with the ‘double-colon’ syntax of Twee.

If you’re interested in writing your own “Choose Your Own Adventure”-type interactive fiction, whether for the world or just for friends, but you find user-friendly IDEs like Twine limiting (or you just prefer a good old-fashioned text editor), then give Twee2 a go. I’ve written a simple 2-minute tutorial to get you started, it works on Windows, MacOS, Linux, and just-about everything else, and it’s completely open-source if you’d like to expand or change it yourself.

(there are further discussions about the concept and my tool on Reddit here, here, here and here, and on the Twinery forums herehere and here)

Get Twee2

× ×