This checkin to GCADM5E Rembrandt park #2 reflects a geocaching.com log entry. See more of Dan's cache logs.
On my way out for pizza with my work colleagues, a quick and easy find in the first place I looked. SL, TFTC!
This checkin to GCADM5E Rembrandt park #2 reflects a geocaching.com log entry. See more of Dan's cache logs.
On my way out for pizza with my work colleagues, a quick and easy find in the first place I looked. SL, TFTC!
This checkin to GCA7Q4A Elephant Parade reflects a geocaching.com log entry. See more of Dan's cache logs.
Big thanks to the cache owner for their note, letting me know that the cache location is still accessible. Somehow I’d not seen the obvious route. Followed a family of ducks and soon found the cache location. So excited I could jump for joy.

FP awarded in part for the lovely cache but mostly for the attentive CO who posted a note so promptly. TFTC!
This checkin to GCA1JJ5 Gemaal Mercatorstraat reflects a geocaching.com log entry. See more of Dan's cache logs.
My work colleagues from around the world have gathered for a meeting at a hotel near here. I woke a little early this morning and so I decided to come out and try to find a couple of geocaches before our team meeting starts.
After failing to find nearby GCA7Q4A “Elephant Parade” owing to construction work, I was hopeful of a find here. The coordinates put me exactly on top of a likely hiding place, and with a little exploration (and some pretending to tie my shoes!) I had the cache in my hand. SL, TFTC.
Listened for water pumping but couldn’t hear any over the traffic noise, I’m afraid! Greetings from Oxfordshire, UK.
I’m in Amsterdam for a meetup for my new team at Automattic.

When we’ve not been out tackling escape rooms, finding geocaches, and eating curry, we’ve been doing a variety of activities to help solidify our new team’s goals, priorities, and expertise: y’know, the normal things you might expect on a company away week.
I volunteered to lead the initial session on our first day with a couple of icebreaker games, which went well enough that I’m inclined to share them here in case they’re of any use to you. The games we played are called Heraldry and Compairs. Let’s take a look:

I was looking at the coat of arms of Noord Holland, the province in which Amsterdam lies, and thinking about all the symbolism and propaganda that’s encoded into traditional heraldry, and how much effort it takes to decode it… unless you just, y’know, guess!
I asked each participant to divide a shield into five quadrants and draw their own coats of arms, featuring aspects of (a) their work life, (b) their personal life, (c) something they value, (d) something they’re good at, and (e) something surprising or unusual. I really wanted to keep the time pressure on and not allow anybody to overthink things, so I set a 5-minute timer from the moment everybody had finished drawing their shield outline.
Then, everybody passed their drawing to the right, and each person in turn tried, as best they could, to introduce the person to their left by attempting to interpret their neighbour’s drawing. The known categories helped to make it easier by helping people latch onto something to start talking about, but also more-challenging as people second-guessed themselves (“no, wait, maybe it’s sailing you’re good at and guitar you play in your personal life?”).
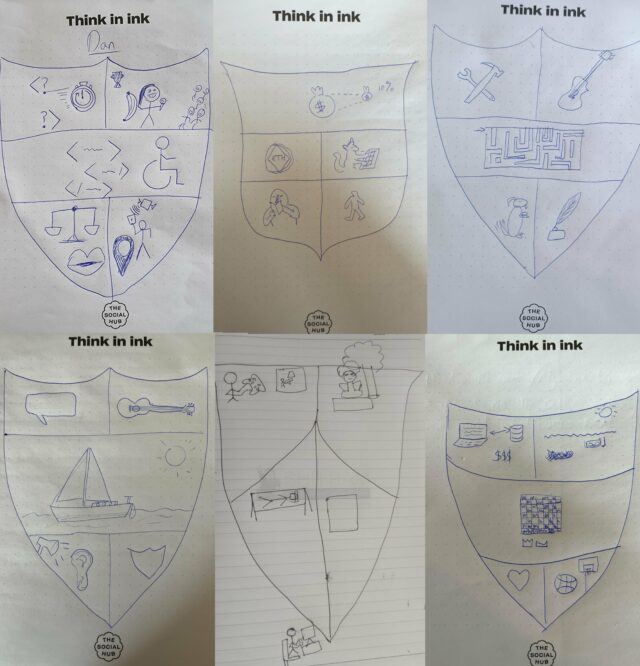
After each introduction is made, the person being introduced gets to explain their heraldry for themselves, congratulating their introducer on the things they got right and their close-guesses along the way.
It’s sort-of halfway between “introduce your neighbour” and “pictionary”. And it worked well to get us warmed-up, feeling a little silly, knowing one another slightly better, and in a space in which everybody had been expected to have spoken and to have made a harmless mistake (everybody managed to partially-interpret a shield correctly). A useful place to be at the end of an icebreaker exercise is left with the reminder that we are, after all, only human.
Next up, we played a game only slightly inspired by witnessing a game of Mr and Mrs the other week3. I threw together a Perchance (which, in the nature of such things, is entirely open-source and you’re welcome to adapt it for your own use) that generated a series of randomly-selected pairs of teammates and asked a question to differentiate the two of them.

Participants other than the two shown on the screen were challenged to guess the answer to the question. Sometimes the questions would have a definitive answer, and sometimes not: the joy was in the speculation! “Hmm, I know that Dan’s done quite a bit of globetrotting… but could he actually have travelled further East than a colleague who lives much further East than him?”
After a few seconds to a minute, once their colleagues had settled on an answer, the people listed on the question were encouraged to make their own guesses. Usually they’ll have a better idea as they are one of the data points, but that’s not always true!
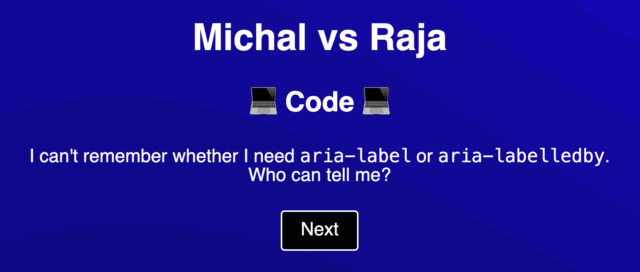
There’s no points, and you can play for as long as you like so long as it’s long enough that everybody gets at least one turn, so it’s a good “fill the rest of the time slot” game. It follows Heraldry moderately well as an icebreaker double-feature because the former is firstly about learning things about one another (and to a lesser extent guessing), and the latter is about the opposite.
I came out of both games knowing more about the humans behind the screens in my new team, and it seemed to open up the room for some good discussions afterwards, so the social lubricant effect was clearly effective too. If you give them a go or adapt them into anything else, let me know!
1 Our absent colleague instead had to tower over us on an enormous projector screen.
2 The red (“gules”) upright (“rampant”) lion in the coat of arms possibly comes from the heraldry of the city of Gelderen in Germany, but once part of the Dutch Republic. The lions striding (“passant”) to the left (“to dexter”) but turning to face you (“guardant”) come from the arms of Fryslân (Friesland), and its rectangles represent the districts of Fryslân. Aren’t you glad you asked.
3 Also known as The Newlyweds Game after the US game show of that name and basically the same format, Mr and Mrs is a game in which a (typically newly) married couple are asked questions about one another and their lives together which they answer separately and then those answers are compared. This induces a reaction of compersion when they’re “right” and in-sync and when the couple disagree it results in amusement. Or possibly divorce.
This checkin to GCA7Q4A Elephant Parade reflects a geocaching.com log entry. See more of Dan's cache logs.
Finding the elephant and the numbers was easy.
But some construction is happening at the GZ and I couldn’t see a safe/permitted way to get close. 😢
This checkin to GCADMXH Rembrandt park #3 reflects a geocaching.com log entry. See more of Dan's cache logs.
I’ve recently changed team at work, so my new team and I have gotten together – from the UK, France, Poland, India and South Africa – here in Amsterdam to meet up in person and do some work “together” for a change: normally we work entirely distributed. After our day of work we did an escape room together, then on our way to dinner I dragged them out of their way a bit to find this geocache.
Quick easy find, TFTC! Greetings from Oxfordshire, UK (and from many other corners of the world, courtesy of Team Desire from Automattic!).
This checkin to GC7B9CP Platform 9 3/4 reflects a geocaching.com log entry. See more of Dan's cache logs.
Even on a Monday morning the muggles are lining up to hold the trolley. Not me. As an actual magician, I’ve no need for such frivolities. Instead, as I’m passing anyway on my way to a train to an entirely different magical land (The Netherlands), I just snapped a selfie with the sign visible in the background. Easy peasy. TFTC.
This checkin to GC1TK6P Narrow Minded reflects a geocaching.com log entry. See more of Dan's cache logs.
QEF while out hunting for some breakfast this morning between trains on my journey from Oxford to Amsterdam for a work meetup. Lovely thematic cache container in a great spot. FP awarded. TFTC.
Hey, this is my 100th post of 2024!1
1 This being my 100th post relies on you using non-pedant counting, that is: allowing “checkins” like this to count as fully-fledged blog posts. There’s more thought given to this question in my blog post about Kev Quirk’s #100DaysToOffload challenge, but the short answer seems to be that the challenge’s creator would count this as my 100th post of the year, so perhaps you should too. If you don’t, though, then I’ve so-far published 74 posts this year and – thanks to Bloganuary and a general renewed focus on blogging I’m probably still on-track to make 100. And if I remember to do so I’ll post a footnote for you pedants when I do.
Back in 2019, the kids – so much younger back then! – and I helped undertake some crowdsourced citizen science for the Thames WaterBlitz. This year, we’re helping out again.
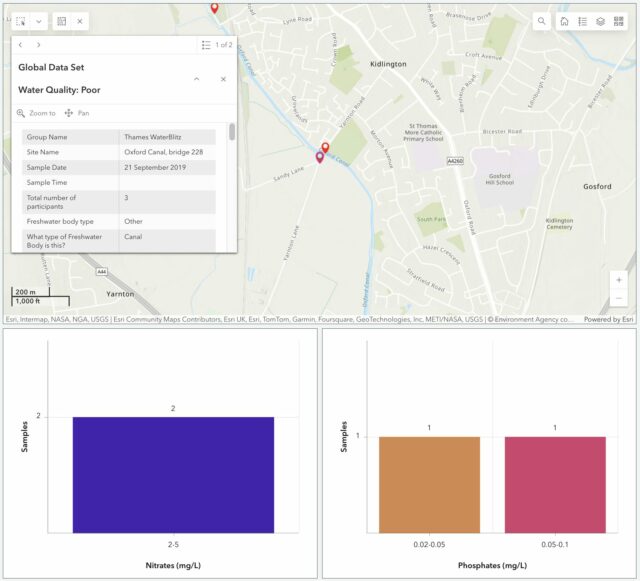
We’ve moved house since then, but we’re still within the Thames basin and can provide value by taking part in this weekend’s sampling activity. The data that gets collected on nitrate and phosphate levels in local water sources – among other observations – gets fed into an open dataset for the benefit of scientists and laypeople.

It’d have been tempting to be exceptionally lazy and measure the intermittent water course that runs through our garden! It’s an old, partially-culverted drainage ditch1, but it’s already reached the “dry” part of its year and taking a sample wouldn’t be possible right now.

But more-importantly: the focus of this season’s study is the River Evenlode, and we’re not in its drainage basin! So we packed up a picnic and took an outing to the North Leigh Roman Villa, which I first visited last year when I was supposed to be on the Isle of Man with Ruth.

Our lunch consumed, we set off for the riverbank, and discovered that the field between us and the river was more than a little waterlogged. One of the two children had been savvy enough to put her wellies on when we suggested, but the other (who claims his wellies have holes in, or don’t fit, or some other moderately-implausible excuse for not wearing them) was in trainers and Ruth and I needed to do a careful balancing act, holding his hands, to get him across some of the tougher and boggier bits.

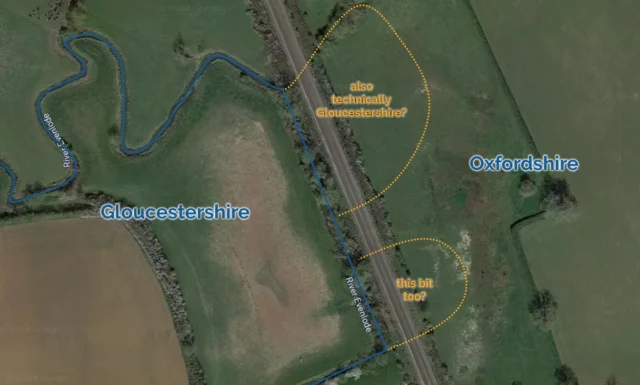
Eventually we reached the river, near where the Cotswold Line crosses it for the fifth time on its way out of Oxford. There, almost-underneath the viaduct, we sent the wellie-wearing eldest child into the river to draw us out a sample of water for testing.
Looking into our bucket, we were pleased to discover that it was, relatively-speaking, teeming with life: small insects and a little fish-like thing wriggled around in our water sample2. This, along with the moorhen we disturbed3 as we tramped into the reeds, suggested that the river is at least in some level of good-health at this point in its course.

We were interested to observe that while the phosphate levels in the river were very high, the nitrate levels are much lower than they were recorded near this spot in a previous year. Previous years’ studies of the Evenlode have mostly taken place later in the year – around July – so we wondered if phosphate-containing agricultural runoff is a bigger problem later in the Spring. Hopefully our data will help researchers answer exactly that kind of question.
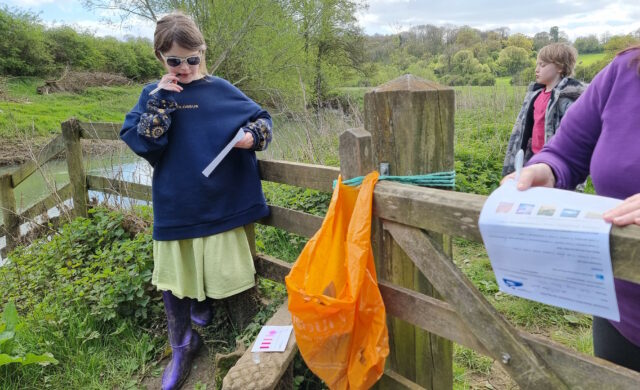
Regardless of the value of the data we collected, it was a delightful excuse for a walk, a picnic, and to learn a little about the health of a local river. On the way back to the car, I showed the kids how to identify wild garlic, which is fully in bloom in the woods nearby, and they spent the rest of the journey back chomping down on wild garlic leaves.

The car now smells of wild garlic. So I guess we get a smelly souvenir from this trip, too4!
1 Our garden ditch, long with a network of similar channels around our village, feeds into Limb Brook. After a meandering journey around the farms to the East this eventually merges with Chill Brook to become Wharf Stream. Wharf Stream passes through a delightful nature reserve before feeding into the Thames near Swinford Toll Bridge.
2 Needless to say, we were careful not to include these little animals in our chemical experiments but let them wait in the bucket for a few minutes and then be returned to their homes.
3 We didn’t catch the moorhen in a bucket, though, just to be clear.
4 Not counting the smelly souvenir that was our muddy boots after splodging our way through a waterlogged field, twice
This checkin to GCAP4K8 Village Hall Series 1573 - Standlake reflects a geocaching.com log entry. See more of Dan's cache logs.
FTF! Can’t remember the last time I got one of those; it’s been a while. I woke up this morning thinking about an errand I need to run today that would take me near Standlake when I saw the notification that new cache had appeared.
Spurred into action, I opted to do my chore first thing… and find this geocache while on the way there. Parked up at the village hall and quickly found the sign and all the requisite numbers. Spent a little while looking at the wrong host before spotting the other likely candidate, after which the cache was in hand.
Didn’t bring tweezers in my haste to leave the house, and I trimmed my nails just the other day, so retrieving the log book was a bit of a challenge. Eventually I was successful; log signed and retrieved. So nice to see an empty logbook for once! I’m usually beaten to these things by (CO) muddy legs or Go Catch!
I saw a variation of this email back in the day, which provides a Mad Libs style approach to formulating a country & western song. When I was reminded of it today, I adapted it for Perchance. Give it a go!
Earlier this year, I changed team at work1.
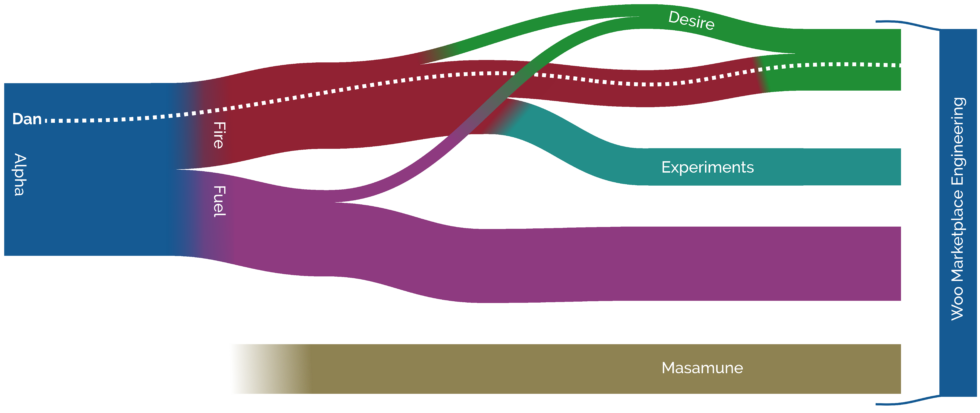
When I started at Automattic in 2019 I was assigned to Team Alpha, the engineering team responsible for WooCommerce.com. In 2020 the team later forked into teams Fire and Fuel, and I landed on the Fire side of the split2.
This winter, though, Fire became underpopulated. We lost a few folks to a newly-formed Experiments team, and several individual team members moved to other parts of the company. Once we got small enough it wasn’t worthwhile being a team in our own right. Our focus areas got split between Desire and Masume, and those of us who were left got absorbed into Team Desire. That’s where you’ll now find me.

I was initially a bit bummed about the dissolution of my old team3 and struggled to find my place in my new team. The work is similar and the codebases overlap, but even sibling teams can have different rituals and approaches to problems that provide a learning barrier4.
I think I’ve begun to find my feet now, and next week I’m excited to meet many of my new team in-person for the first time at a Desire-wide meetup in Amsterdam5.
1 Strangely, this isn’t directly related to Automattic’s recent re-organisation, which I’ve written about previously, but is a result of more-local changes within my division coupled with the natural flow of Automatticians around the company. But it does make it feel from my perspective like a lot of things are getting jiggled about simultaneously!
2 When Alpha were first discussing the upcoming split, I suggested that we might like to give our new teams a “pair” of names that linked to one another, and threw out a few ideas to get the ball rolling. One of those ideas was “Fuel and Fire”; I jokingly added that “it was like the Metallica song, which also gave us ‘Desire’ as a possible third team name should the need arise”. This wasn’t supposed to be taken seriously, but apparently it was taken seriously enough because my suggestion was the winner and I soon ended up “on Fire”.
3 Many of my old teammates and I did at least manage to get together for one final (virtual) social event, culminating in a symbolic “extinguishing of fire” as a candle that had been left burning through the meeting was put out at the end.
4 A team’s rituals aren’t just about the way they hold their meetings or run their retros; for example my new team are very disciplined about announcing their appearance on a morning with a friendly greeting in our social channel, which are for some reason generally responded-to with a barrage of “waving Pikachu” slackmoji. I don’t know why Pikachu is the mascot of our mornings, but I’ve joined in because it’s a fun gesture of the team’s distinct collective personality. Also it’s a cute GIF: it’s nice to get waved-at by Pikachu on a morning.
5 Doubly-awesome, the destination’s proximity means that I get to travel by Eurostar rather than having to fly.
This is a repost promoting content originally published elsewhere. See more things Dan's reposted.
Molly White writes, more-eloquently than I would’ve, almost-exactly my experience of LLMs and similar modern generative AIs:
…
I, like many others who have experimented with or adopted these products, have found that these tools actually can be pretty useful for some tasks. Though AI companies are prone to making overblown promises that the tools will shortly be able to replace your content writing team or generate feature-length films or develop a video game from scratch, the reality is far more mundane: they are handy in the same way that it might occasionally be useful to delegate some tasks to an inexperienced and sometimes sloppy intern.
…
Very much this.
I’ve experimented with a handful of generative AIs, such as:
Most-recently, I’ve played with music-making AI Suno and… it’s not great.. but like all these others it’s really interesting to experiment with and think about. Here: let me just ask it to write some “vocal trance europop about a woman called Molly; Molly has a robot friend who is pretty good at doing many tasks, but the one thing she’ll never trust the robot to do is write in her blog” –

So yes, like Molly:
It’s still an interesting field to follow-along with. Stuff like Sora from OpenAI and VASA-1 from Microsoft are just scary (the latter seems to have little purpose other than for misinformation-generation3!), but the genie’s out of the bottle now.
1 Visually-distinct tokens adds depth to the world and helps players communicate with one another: “You distract the skinny cultist, and I’ll try to creep up on the ugly one!”
2 I’m going to gloss right over the question of whether or not these tools are capable of creating anything truly original. You know what I mean.
3 Gotta admit though that I laughed like a drain at the Mona Lisa singing along with Anne Hathaway’s Lil’ Wayne Style Paparazzi Rap. If you’ve not seen the thing I’m talking about, go do that now.
Like much of the UK, there are local elections where I live next month. After coming home from a week of Three Rings volunteering I found my poll card on the doormat. Can you spot the bleeding-obvious mistake?
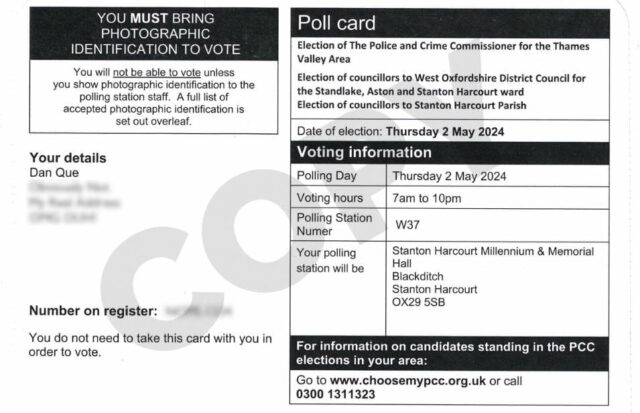
This’ll be the first election for which I’ve needed to bring photographic ID to the polling station. That shouldn’t be a problem: I have a passport and driving license and whatnot.
But just to be absolutely certain, I had the local council – the same people who issued me the polling card! – supply me with a voter authority certificate:
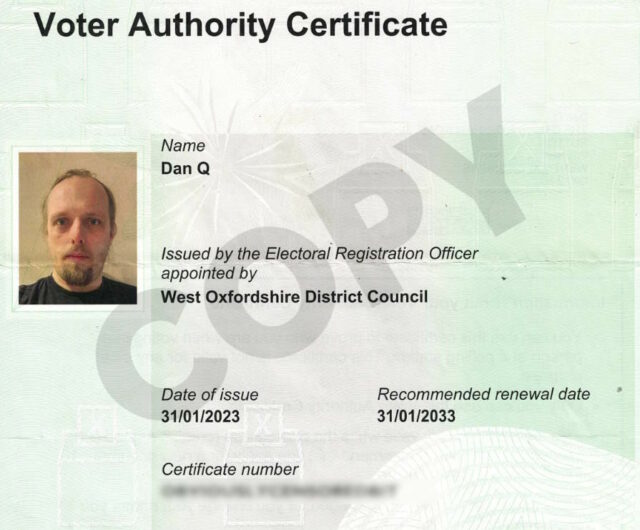
So now I’m in a pickle. West Oxfordshire District Council are asking me to produce photo ID in the wrong name when I turn up at a polling station next month. It doesn’t even match the name on the photo ID that they themselves issued me.
This would be less-infuriating were it not for the fact that they had my name wrong in the same way on an electoral roll form they sent me in August 20221. When I contacted them to have them fix it, they promised that the underlying problem was solved2 so this very thing wouldn’t happen.
And yet here we are.
Hopefully they’ll be able to fix their records promptly or else I guess I’ll have to apply for a proxy vote, to allow the ballot of my imaginary friend “Dan Que” to be cast by me, Dan Q, instead.
And if that isn’t the most bizarre form of election fraud you’ve ever heard of, I don’t know what is.
Update: True to their word, the council had managed to correct their records by the time I reached the polling station this morning. It’s still a little annoying that they somehow mucked it up in the first place, but I appreciate the efficiency with which they corrected their mistake.
1 They’d had my name right before August 2022, including on previous poll cards; I can only assume that some human operator “corrected” it to the wrong thing at some point.
2 They didn’t fix the problem immediately in August 2022. Initially, they demanded that I produce proof of my change of name from “Dan Que” (which has, of course, never been my name!) to “Dan Q”, and only later backed down and admitted that they’d made a mistake and would correct the PII they were holding about me.