Earlier this year, for reasons of privacy/love of selfhosting, I moved the DanQ.me mailing list from Mailchimp to Listmonk (there’s a blog post about how I set it up), relaying outbound messages via an SMTP server provided by my domain registrar, Gandi.
Unfortunately, Gandi recently announced that they’ll no longer be providing email services for free, so rather than fork out €4/month for an email address I won’t even read, I decided to inhouse it.
And because I learned a few things while doing so, I wrote this blog post so that next time I have to configure Postfix + DKIM, I’ll know where to find a guide. If it helps you in the meantime, that’s just a bonus.

Postfix
Running your own mailserver is a pain. I used to do it for all of my email, but – like many other nerds – when spam reached its peak and deliverability became an issue, I gave up and oursourced it1.

sudo apt install postfix, accepted all the default
options, and put the details into Listmonk.
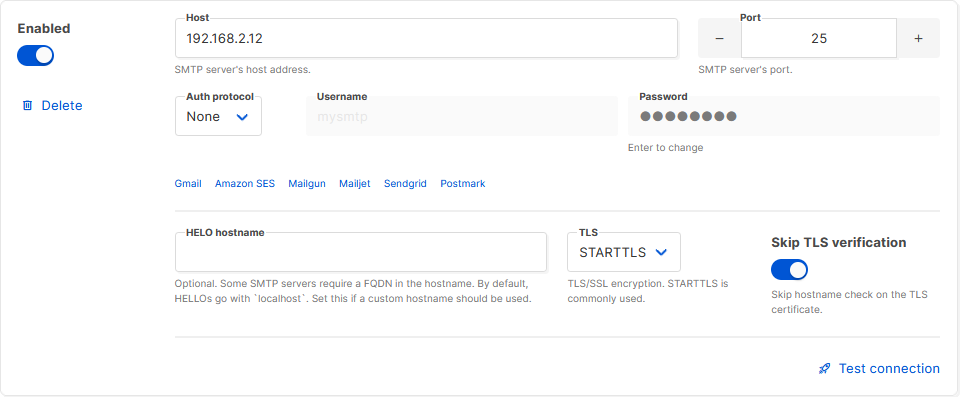
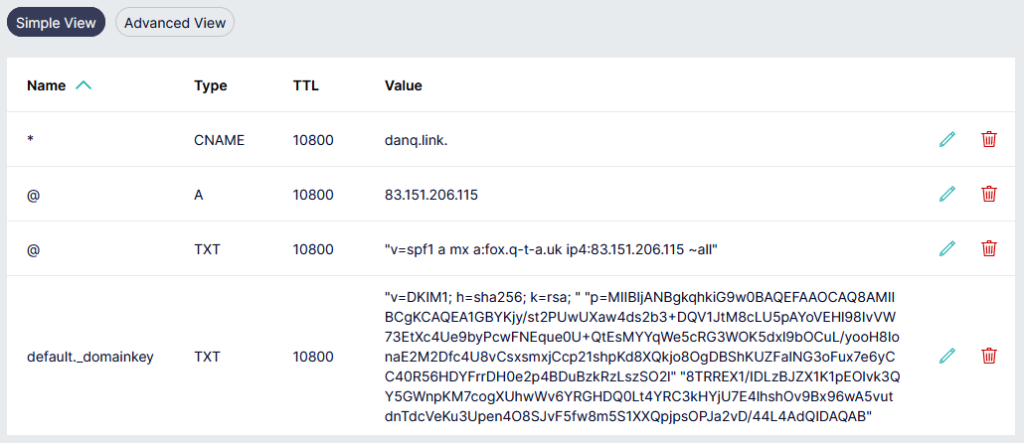
Next, I tweaked my DNS configuration to add an SPF record, and tested it. This ought to have been enough to achieve approximate parity with what Gandi had been providing me with. Not bad.
$ dig +short -t TXT danq.link
"v=spf1 a mx a:fox.q-t-a.uk ip4:83.151.206.115 ~all"
I sent a test email to a Gmail account, where I noticed two problems:
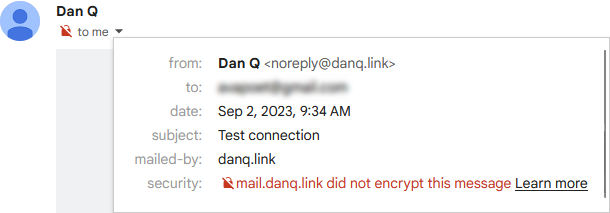
The first problem was that Postfix on Debian isn’t configured by-default to use opportunistic TLS when talking to other
mailservers. That’s a bit weird, but I’m sure there’s a good reason for it. The solution was to add smtp_tls_security_level = may to my
/etc/postfix/main.cf.
The second problem was that without a valid DKIM signature on them, about half of my test emails were going straight to the spam folder. Again, it seems that since the last time I seriously ran a mailserver 20 years ago, this has become something that isn’t strictly required… but your emails aren’t going to get through if you don’t.
I’ve put it off this long, but I think it’s finally time for me to learn some practical DKIM.
Understanding DKIM
What’s DKIM, then?

- A server that wants to send email from a domain generates a cryptographic keypair.
- The public part of the key is published using DNS. The private part is kept securely on the server.
- When the server relays mail on behalf of a user, it uses the private key to sign the message body and a stated subset of the headers3, and attaches the signature as an email header.
- When a receiving server (or, I suppose, a client) receives mail, it can check the signature by acquiring the public key via DNS and validating the signature.
In this way, a recipient can be sure that an email received from a domain was sent with the authorisation of the owner of that domain. Properly-implemented, this is a strong mitigation against email spoofing.
OpenDKIM
To set up my new server to sign outgoing mail, I installed OpenDKIM and its keypair generator using sudo apt install opendkim
opendkim-tools. It’s configuration file at /etc/opendkim.conf needed the following lines added to it:
# set up a socket for Postfix to connect to:
Socket inet:12301@localhost

# set up a file to specify which IPs/hosts can send through us without authentication and get their messages signed:
ExternalIgnoreList      refile:/etc/opendkim/TrustedHosts
InternalHosts           refile:/etc/opendkim/TrustedHosts

# set up a file to specify which selector/domain are used to each incoming email address:
SigningTable            refile:/etc/opendkim/SigningTable

# set up a file to specify which signing key to use for each selector/domain:
KeyTable                refile:/etc/opendkim/KeyTable
Into /etc/opendkim/TrustedHosts I put a list of local IPs/domains that would have their emails signed by this server. Mine looks like this (in this example I’m using
example.com as my domain name, and default as the selector for it: the selector can be anything you like, it only matters if you’ve got multiple
mailservers signing mail for the same domain). Note that 192.168.0.0/16 is the internal subnet on which my sending VM will
run.
127.0.0.0.1
::1
192.168.0.0/16
*.example.com
example.com
/etc/opendkim/SigningTable maps email addresses (I’m using a wildcard) to the subdomain whose TXT record will hold the public key for the signature. This also goes on to
inform the KeyTable which private key to use:
*@example.com default._domainkey.example.com
And then /etc/opendkim/KeyTable says where to find the private key for that:
default._domainkey.example.com example.com:default:/etc/opendkim/keys/example.com/default.private
Next, we need to create and secure that keypair. In /etc/opendkim/keys/example.com/, we run:
sudo opendkim-genkey -s default -d example.com
sudo chown opendkim:opendkim default.private
At last, we can configure Postfix to filter all mail through OpenDKIM by adding to our /etc/postfix/main.cf file:
milter_protocol = 2
milter_default_action = accept
smtpd_milters = inet:localhost:12301
non_smtpd_milters = inet:localhost:12301
DNS
The public key needs publishing via DNS. Conveniently, when you create a keypair using its tools, OpenDKIM provides a sample (in
BIND-style) for you to copy-paste from or adapt: look in /etc/opendkim/keys/example.com/default.txt!
Once we’ve restarted both services (sudo service postfix restart; sudo service opendkim restart), we can test it!
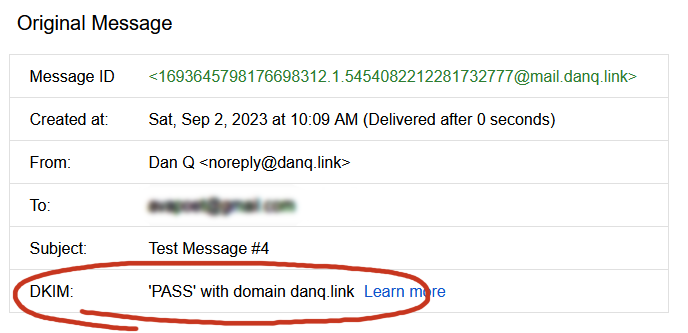
So I learned something new today.
If you, too, love to spend your Saturday mornings learning something new, have a look at those subscription options to decide how you’d like to hear about whatever I get up to next.
Footnotes
1 I still outsource my personal email, and I sing the praises of the excellent folks behind ProtonMail.
2 My desktop email client also doubles as my newsreader, because, yes, of course you can still find me on USENET. Which, by the way, is undergoing a mini-revival…
3 Why doesn’t DKIM sign
all the headers in an email? Because intermediary servers and email clients will probably add their own headers, thereby invalidating the signature! DKIM gets used to sign the From: header, for obvious reasons, and ought to be used for other headers whose tampering could be
significant such as the Date: and Subject:, but it’s really up to the signing server to choose a subset.
0 comments