Debian + DKIM for Dummies

Earlier this year, for reasons of privacy/love of selfhosting, I moved the DanQ.me mailing list from Mailchimp to Listmonk (there’s a blog post about how I set it up), relaying outbound messages via an SMTP server provided by my domain registrar, Gandi.

Subscribe for email updates, or discover other ways to subscribe:

Email no more than
I assume that you knew that you can get an email, no more than once per day or once per week (your choice!) of what I get up to online, right? Email not your jam: there are plenty of other options too!

Unfortunately, Gandi recently announced that they’ll no longer be providing email services for free, so rather than fork out €4/month for an email address I won’t even read, I decided to inhouse it.

And because I learned a few things while doing so, I wrote this blog post so that next time I have to configure Postfix + DKIM, I’ll know where to find a guide. If it helps you in the meantime, that’s just a bonus.

Photograph of a French Bulldog on a wooden floor playing tug-of-war using a multicoloured plaited rope (the human holding the other end of the rope is behind the camera).
If the first rule of computing is “never roll your own crypto” (based on Schneier’s Law), the second rule might be “don’t run your own mailserver”. I don’t have a good picture to illustrate that, so here’s a photo of my dog playing tug-of-war.

Postfix

Running your own mailserver is a pain. I used to do it for all of my email, but – like many other nerds – when spam reached its peak and deliverability became an issue, I gave up and oursourced it1.

Screenshot of a Weekly Digest email from DanQ.me, showing in Mozilla Thunderbird.
Fun fact: when I’m at my desktop, I use a classic desktop email application for my personal email, like it’s the 90s or something2.
Luckily, I don’t need it to do much. I just need a mail transfer agent with an (unauthenticated, but local-only) SMTP endpoint: something that Listmonk can dump emails into, which will then reach out to the mailservers representing each of the recipients and relay them on. A default install of Postfix does all that out-of-the-box, so I ran 
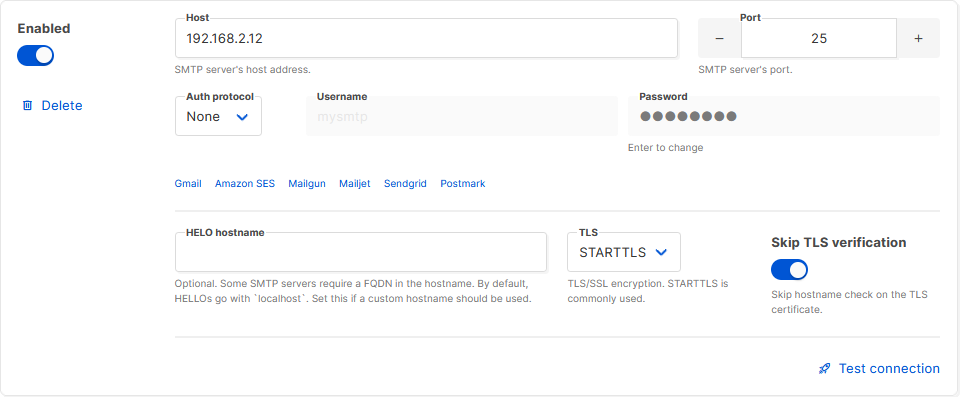
sudo apt install postfix, accepted all the default options, and put the details into Listmonk.
Screenshot showing Listmonk's SMTP configuration screen. The host "192.168.2.12" and port "25" have been entered, TLS has been set to "STARTTLS", Skip TLS verification is enabled, and Auth Protocol is set to "None".
Listmonk makes adding an SMTP server very easy, and even includes a quick “test connection” link with which you can try out your settings.

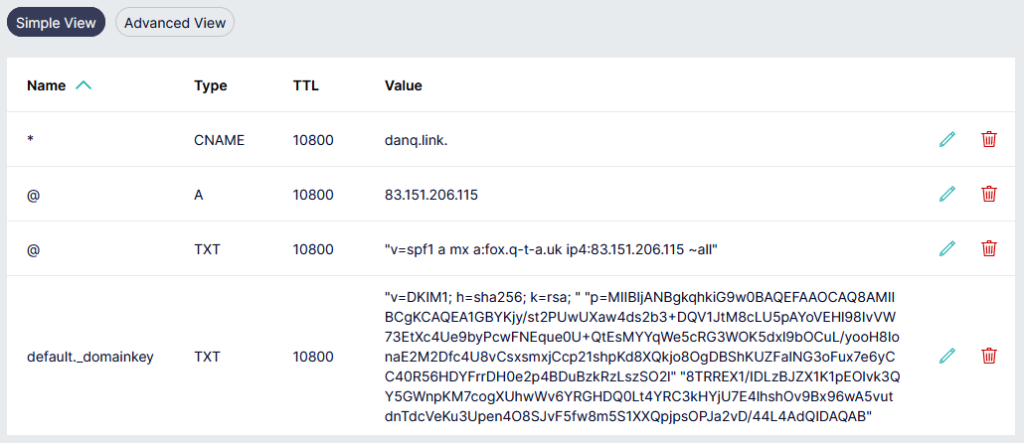
Next, I tweaked my DNS configuration to add an SPF record, and tested it. This ought to have been enough to achieve approximate parity with what Gandi had been providing me with. Not bad.

$ dig +short -t TXT danq.link
"v=spf1 a mx a:fox.q-t-a.uk ip4:83.151.206.115 ~all"
You really can’t be doing without an SPF record as a minimum these days.

I sent a test email to a Gmail account, where I noticed two problems:

Screenshot from GMail showing a message with a red slashed padlock icon, which when clicked advises that "mail.danq.link did not encrypt this message".
It turns out that since the last time I ran a mailserver “for real”, the use of TLS for inter-server communication has become… basically mandatory. You don’t strictly have to do it, but if you don’t, some big email providers will put scary security warnings on your messages. This is a good thing.

The first problem was that Postfix on Debian isn’t configured by-default to use opportunistic TLS when talking to other mailservers. That’s a bit weird, but I’m sure there’s a good reason for it. The solution was to add smtp_tls_security_level = may to my /etc/postfix/main.cf.

The second problem was that without a valid DKIM signature on them, about half of my test emails were going straight to the spam folder. Again, it seems that since the last time I seriously ran a mailserver 20 years ago, this has become something that isn’t strictly required… but your emails aren’t going to get through if you don’t.

I’ve put it off this long, but I think it’s finally time for me to learn some practical DKIM.

Understanding DKIM

What’s DKIM, then?

Diagram illustrating the flow of email from sender to recipient. On the way it's signed by the sender's mailserver's private key, which publishes the public key via DNS. Further along, the recipient's mailserver retreives the public key and uses it to verify the signature.
I’ve already got an elementary understanding of how DKIM works, which I’ll summarise below.
  1. A server that wants to send email from a domain generates a cryptographic keypair.
  2. The public part of the key is published using DNS. The private part is kept securely on the server.
  3. When the server relays mail on behalf of a user, it uses the private key to sign the message body and a stated subset of the headers3, and attaches the signature as an email header.
  4. When a receiving server (or, I suppose, a client) receives mail, it can check the signature by acquiring the public key via DNS and validating the signature.

In this way, a recipient can be sure that an email received from a domain was sent with the authorisation of the owner of that domain. Properly-implemented, this is a strong mitigation against email spoofing.

OpenDKIM

To set up my new server to sign outgoing mail, I installed OpenDKIM and its keypair generator using sudo apt install opendkim opendkim-tools. It’s configuration file at /etc/opendkim.conf needed the following lines added to it:

# set up a socket for Postfix to connect to:
Socket inet:12301@localhost

# set up a file to specify which IPs/hosts can send through us without authentication and get their messages signed:
ExternalIgnoreList      refile:/etc/opendkim/TrustedHosts
InternalHosts           refile:/etc/opendkim/TrustedHosts

# set up a file to specify which selector/domain are used to each incoming email address:
SigningTable            refile:/etc/opendkim/SigningTable

# set up a file to specify which signing key to use for each selector/domain:
KeyTable                refile:/etc/opendkim/KeyTable

Into /etc/opendkim/TrustedHosts I put a list of local IPs/domains that would have their emails signed by this server. Mine looks like this (in this example I’m using example.com as my domain name, and default as the selector for it: the selector can be anything you like, it only matters if you’ve got multiple mailservers signing mail for the same domain). Note that 192.168.0.0/16 is the internal subnet on which my sending VM will run.

127.0.0.0.1
::1
192.168.0.0/16
*.example.com
example.com

/etc/opendkim/SigningTable maps email addresses (I’m using a wildcard) to the subdomain whose TXT record will hold the public key for the signature. This also goes on to inform the KeyTable which private key to use:

*@example.com default._domainkey.example.com

And then /etc/opendkim/KeyTable says where to find the private key for that:

default._domainkey.example.com example.com:default:/etc/opendkim/keys/example.com/default.private

Next, we need to create and secure that keypair. In /etc/opendkim/keys/example.com/, we run:

sudo opendkim-genkey -s default -d example.com
sudo chown opendkim:opendkim default.private

At last, we can configure Postfix to filter all mail through OpenDKIM by adding to our /etc/postfix/main.cf file:

milter_protocol = 2
milter_default_action = accept
smtpd_milters = inet:localhost:12301
non_smtpd_milters = inet:localhost:12301

DNS

The public key needs publishing via DNS. Conveniently, when you create a keypair using its tools, OpenDKIM provides a sample (in BIND-style) for you to copy-paste from or adapt: look in /etc/opendkim/keys/example.com/default.txt!

Screenshot from Gandi's Simple DNS management tools, showing danq.link with an SPF record as descibed earlier and a new TXT record on default._domainkey as just described.
Gandi’s DNS “Simple View” is great for one-off and quick operations, but I really appreciate that they have a BIND-style syntax “Advanced View” for when I’m making bigger and more-complex DNS configuration changes.

Once we’ve restarted both services (sudo service postfix restart; sudo service opendkim restart), we can test it!

Screenshot from GMail showing "DKIM: 'PASS' with domain danq.link".
Once the major email providers – who have the worst spam problem to deal with – say that your email signature looks good, you’re good.

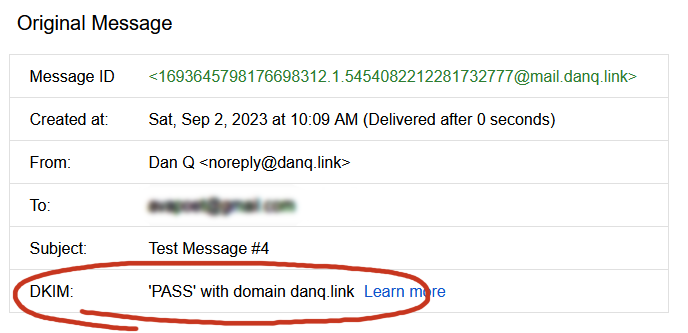
So I learned something new today.

If you, too, love to spend your Saturday mornings learning something new, have a look at those subscription options to decide how you’d like to hear about whatever I get up to next.

Footnotes

1 I still outsource my personal email, and I sing the praises of the excellent folks behind ProtonMail.

2 My desktop email client also doubles as my newsreader, because, yes, of course you can still find me on USENET. Which, by the way, is undergoing a mini-revival

3 Why doesn’t DKIM sign all the headers in an email? Because intermediary servers and email clients will probably add their own headers, thereby invalidating the signature! DKIM gets used to sign the From: header, for obvious reasons, and ought to be used for other headers whose tampering could be significant such as the Date: and Subject:, but it’s really up to the signing server to choose a subset.

Photograph of a French Bulldog on a wooden floor playing tug-of-war using a multicoloured plaited rope (the human holding the other end of the rope is behind the camera).× Screenshot of a Weekly Digest email from DanQ.me, showing in Mozilla Thunderbird.× Screenshot showing Listmonk's SMTP configuration screen. The host "192.168.2.12" and port "25" have been entered, TLS has been set to "STARTTLS", Skip TLS verification is enabled, and Auth Protocol is set to "None".× Screenshot from GMail showing a message with a red slashed padlock icon, which when clicked advises that "mail.danq.link did not encrypt this message".× Diagram illustrating the flow of email from sender to recipient. On the way it's signed by the sender's mailserver's private key, which publishes the public key via DNS. Further along, the recipient's mailserver retreives the public key and uses it to verify the signature.× Screenshot from Gandi's Simple DNS management tools, showing danq.link with an SPF record as descibed earlier and a new TXT record on default._domainkey as just described.× Screenshot from GMail showing "DKIM: 'PASS' with domain danq.link".×

GMail Tip: Use A Plus Sign To Avoid Spam

This technique’s about a decade old, but a lot of people still aren’t using it, and I can’t help but suspect that can only be because they didn’t know about it yet, so let’s revisit:

You have a GMail account, right? Or else Google for Domains? Suppose your email address is dan@gmail.com… did you know that also means that you own:

  • dan+smith@gmail.com
  • dan+something@gmail.com
  • dan+anything-really@gmail.com
  • d.an@gmail.com
  • d..a..n@gmail.com

You have a practically infinite number of GMail addresses. Just put a plus sign (+) after your name but before the @-sign and then type anything you like there, and the email will still reach you. You can also insert as many full stops (.) as you like, anywhere in the first half of your email address, and they’ll still reach you, too. And that’s really, really useful.

Filling in an Equifax registration form.
Often, you end up having to give your email address to companies that you don’t necessarily trust…

When you’re asked to give your email address to a company, don’t give them your email address. Instead, give them a mutated form of your email address that will still work, but that identifies exactly who you gave it to. So for example you might give the email address dan+amazon@gmail.com to Amazon, the email address dan+twitter@gmail.com to Twitter, and the email address dan+pornhub@gmail.com to… that other website you have an account on.

Why is this a clever idea? Well, there are a few reasons:

  • If the company sells your email address to spammers, or hackers steal their database, you’ll know who to blame by the email address they’re sending to. I’ve actually caught out an organisation in this way who were illegally reselling their mailing lists to third parties.
  • If you start getting unwanted mail from somebody (whether because spammers got the email or because you don’t like what the company is sending to you), you can easily block them. Even if you can’t unsubscribe or just because they make it hard to do so, you can just set up a filter to automatically discard anything that comes to that email address in future.
  • If you feel like organising your life better, you can set up filters for that, too: it doesn’t matter what address a company sends from, so long as you know what address they’re sending to, so you can easily have filters that e.g. automatically forward copies of the mortgage statement that come to dan+yourbank@gmail.com to your spouse, or automatically label anything coming to
    dan+someshop@gmail.com with the label “Shopping”.
  • If you’re signing up just to get a freebie and you don’t trust them not to spam you afterwards, you don’t need to use a throwaway: just receive the goodies from them and them block them at the source.
The email address dan+equifax@gmail.com being entered into a form.
Certainly, you can have… THIS email address.

I know that some people get some of these benefits by maintaining a ‘throwaway’ email address. But it’s far more-convenient to use the email address you already have (you’re already logged-in to it and you use it every day)! And if you ever do want a true ‘throwaway’, you’re generally better using Mailinator: when you’re asked for your email address, just mash the keyboard and then put @mailinator.com on the end, to get e.g. dsif9tsnev4y8594es87n65y4@mailinator.com. Copy the first half of the email address to the clipboard, and then when you’re done signing up to whatever spammy service it is, just go to mailinator.com and paste into the box to see what they emailed you.

A handful of badly-configured websites won’t accept email addresses with plus signs in them, claiming that they’re invalid (they’re not). Personally, when I come across these I generally just inform the owner of the site of the bug and then take my business elsewhere; that’s how important it is to me to be able to filter my email properly! But another option is to exploit the fact that you can put as many dots in (the first part of) your GMail address as you like. So you could put d…an@gmail.com in and the email will still reach you, and you can later filter-out emails to that address. I’ll leave it as an exercise for the reader to decide how to encode information about the service you’re signing up to into the pattern and number of dots that you use.

Go forth and avoid spam.

Filling in an Equifax registration form.× The email address dan+equifax@gmail.com being entered into a form.×

I have multiple GMail accounts. I’d like to see a different notification icon for each. Any suggestions?

This self-post was originally posted to /r/androidapps. See more things from Dan's Reddit account.

The first of the two apps mentioned in this article – “Gmail Notifier” – sounds perfect, but doesn’t seem to exist any more.

GMail Notifier + Widgets looks like it might do it (it’s designed to do different icons depending on labels). Does anybody have any experience with this?

Or any other suggestions? I’m running CM7.1 on a HTC Sensation, in case it matters.