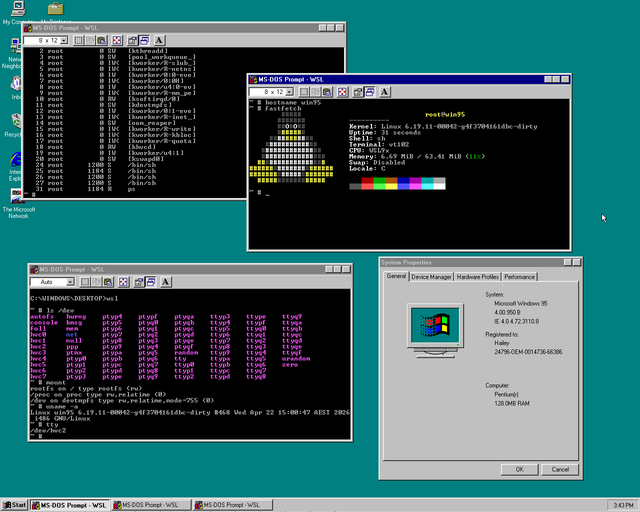
WSL9x runs a modern Linux kernel (6.19 at time of writing) cooperatively inside the Windows 9x kernel, enabling users to take advantage of the full suite of capabilities of both
operating systems at the same time, including paging, memory protection, and pre-emptive scheduling. Run all your favourite applications side by side – no rebooting required!
…
Well this blew my mind.
Windows Subsystem for Linux (WSL) is one of the single best things Microsoft have added to Windows in the last decade1.
But, of course, it’s for Windows 10 and 11 only. I would never have conceived that somebody could make the same trick work for, like, Windows 95!
But Hails has done so. And no, this isn’t some kind of emulation; it’s proper cooperative multitasking between the two kernels, just like regular WSL does. Somehow, in a version that
came out nine years before Windows even supported the NX bit. Mindboggling.
Footnotes
1 This ought to be a little embarrassing for them: I mean – if the most-valuable
improvement you make to your operating system is to make it… more like a different operating system… – that’s not a great sign, is it?
I just needed to spin up a new PHP webserver and I was amazed how fast and easy it was, nowadays. I mean: Caddyalready makes it
pretty easy, but I was delighted to see that, since the last time I did this, the default package repositories had 100% of what I needed!
Apart from setting the hostname, creating myself a user and adding them to the sudo group, and reconfiguring sshd to my preference, I’d
done nothing on this new server. And then to set up a fully-functioning PHP-powered webserver, all I needed to run (for a domain “example.com”) was:
After that, I was able to put an index.php file into /var/www/example.com and it just worked.
And when I say “just worked”, I mean with all the bells and whistles you ought to expect from Caddy. HTTPS came as standard (with a solid QualSys grade). HTTP/3 was supported with a
0-RTT handshake.
Got to admit, this is really cool and something I can see myself using a lot. So I installed the prerequisites:
brew install asciinema
npm install -g svg-term-cli
Then I gave it a go. I needed to use asciinema rec -f asciicast-v2 myfile.cast to record my screen into Asciinema‘s version 2 format,
because the new version 3 format isn’t yet supported by svg-term-cli (but there is at least an asciinema
convert command if you record in the “wrong” one).
Then I ran cat myfile.cast | svg-term --out myfile.cast.svg to convert that terminal recording into an SVG: I happened to be in a directory containing the source code of FreeDeedPoll.org.uk, so recorded myself running an 11ty development server with npm serve:
Note to future self: when you want git to tell you all the files you’ve modified, but not those you’ve deleted (e.g. to pipe through xargs and feed to your linter for bulk-linting), the
command you’re looking for is –
I had a smug moment when I saw security researcher Rob Ricci and friends’ paper empirically analysing brute-force attacks against SSH “in the wild”.1 It turns out that putting all your SSH servers on “weird” port
numbers – which I’ve routinely done for over a decade – remains a pretty-effective way to stop all that unwanted traffic2,
whether or not you decide to enhance that with some fail2ban magic.
I was just setting up a new Debian 12 server when I learned about this. I’d already moved the SSH server port away from the default 224, so I figured
I’d launch Endlessh on port 22 to slow down and annoy scanners.
Installation wasn’t as easy as I’d hoped considering there’s a package. Here’s what I needed to do:
Move any existing SSH server to a different port, if you haven’t already, e.g. as shown in the footnotes.
change InaccessiblePaths=/run /var into InaccessiblePaths=/var
Reload the modified service: sudo systemctl daemon-reload
Configure Endlessh to run on port 22 rather than its default of 2222: echo "Port 22" | sudo tee /etc/endlessh/config
Start Endlessh: sudo service endlessh start
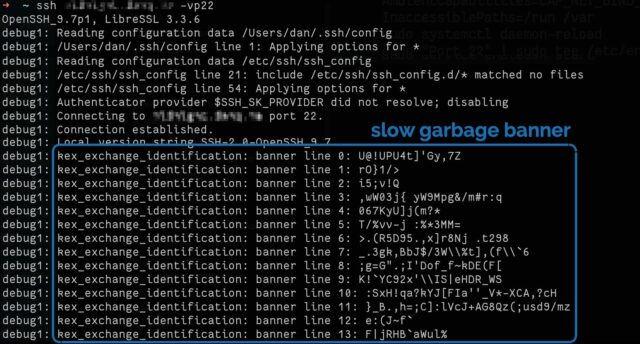
To test if it’s working, connect to your SSH server on port 22 with your client in verbose mode, e.g. ssh -vp22 example.com and look for banner lines full of random garbage
appearing at 10 second intervals.
It doesn’t provide a significant security, but you get to enjoy the self-satisfied feeling that you’re trolling dozens of opportunistic script kiddies a day.
Footnotes
1 It’s a good paper in general, if that’s your jam.
2 Obviously you gain very little security by moving to an unusual port number, given that
you’re already running your servers in “keys-only” (PasswordAuthentication no) configuration mode already, right? Right!? But it’s nice to avoid all the unnecessary
logging that wave after wave of brute-force attempts produce.
3 Which I can only assume is pronounced endle-S-S-H, but regardless of how it’s said out
loud I appreciate the wordplay of its name.
4 To move your SSH port, you might run something like echo "Port 12345" | sudo tee
/etc/ssh/sshd_config.d/unusual-port.conf and restart the service, of course.
Foundry is a wonderful virtual tabletop tool well-suited to playing tabletop roleplaying games with your friends, no
matter how far away they are. It compares very favourably to the market leader Roll20, once you get past some of the initial set-up
challenges and a moderate learning curve.
The party of adventurers I’ve been DMing
for since last summer use Foundry to simulate a tabletop
(alongside a conventional video chat tool to let us see and hear one another).
You can run it on your own computer and let your friends “connect in” to it, so long as you’re able to reconfigure your router a little, but you’ll be limited by the speed of your home
Internet connection and people won’t be able to drop in and e.g. tweak their character sheet except when you’ve specifically got the application running.
A generally better option is to host your Foundry server in the cloud. For most of its history, I’ve run mine on Fox, my NAS, but I’ve recently set one up on a more-conventional cloud
virtual machine too. A couple of friends have asked me about how to set up their own, so here’s a quick guide:
I used Linode to spin up a server because I still had a stack of free credits following a recent
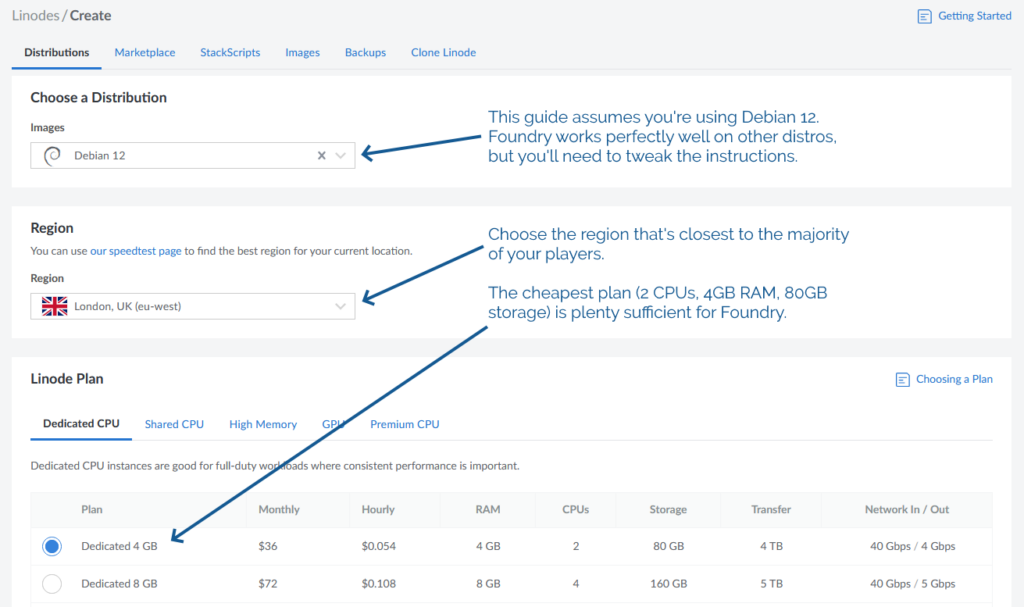
project. The instructions will work on any cloud host where you can spin up a Debian 12 virtual machine, and can be adapted for other distributions of Linux.
You will need…
A Foundry license ($50 USD / £48 GBP, one-off payment1)
A domain name for which you control the DNS records; you’ll need to point a domain, like “danq.me” (or a subdomain of it, e.g.
“vtt.danq.me”), at an IP address you’ll get later by creating an “A” record: your domain name registrar can probably help with this –
I mostly use Gandi and, ignoring my frustration with recent changes to their email
services, I think they’re great
An account with a cloud hosting provider: this example uses Linode but you can adapt for any of them
A basic level of comfort with the command-line
1. Spin up a server
Getting a virtual server is really easy nowadays.
Click, click, click, and you’ve got yourself a server.
You’ll need:
The operating system to be Debian 12 (or else you’ll need to adapt the instructions below)
The location to be somewhere convenient for your players: pick a server location that’s relatively-local to the majority of them to optimise for connection speeds
An absolute minimum of 1GB of storage space, I’d recommend plenty more: The Levellers’ campaign currently uses about 10GB for all of its various maps, art, videos,
and game data, so give yourself some breathing room (space is pretty cheap) – I’ve gone with 80GB for this example, because that’s what comes as standard with the 2
CPU/4GB RAM server that Linode offer
Choose a root password when you set up your server. If you’re a confident SSH user, add your public key so you can log in easily (and then
disable password authentication
entirely!).
For laziness, this guide has you run Foundry as root on your new server. Ensure you understand the implications of this.2
2. Point your (sub)domain at it
DNS propogation can be pretty fast, but… sometimes it isn’t. So get this step underway before you need it.
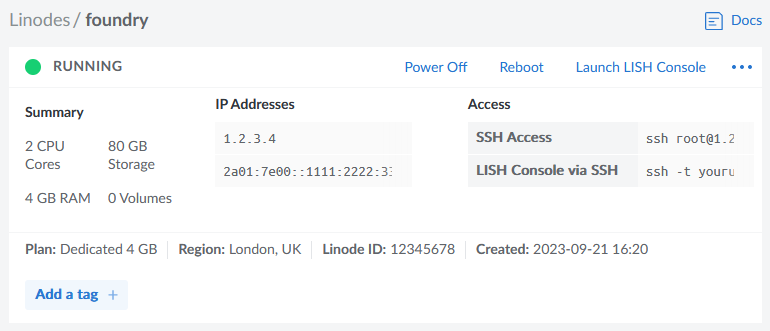
Your newly-created server will have an IP address, and you’ll be told what it is. Put that IP address into an A-record for your domain.
The interface for adding a new DNS record in Gandi is pretty simple – record type, time to live, name, address – but it’s rarely
more complicated that this with any registrar that provides DNS services.
3. Configure your server
In my examples, my domain name is vtt.danq.me and my server is at 1.2.3.4. Yours will be different!
Connect to your new server using SSH. Your host might even provide a web interface if you don’t have an SSH client installed: e.g. Linode’s “Launch LISH Console” button will do pretty-much exactly that for you. Log in as root using the password you chose
when you set up the server (or your SSH private key, if that’s your preference). Then, run each of the commands below in order (the full script is available as a single file if you
prefer).
3.1. Install prerequisites
You’ll need unzip (to decompress Foundry), nodejs (to run Foundry), ufw (a firewall, to prevent unexpected surprises), nginx (a
webserver, to act as a reverse proxy to Foundry), certbot (to provide a free SSL certificate for Nginx),
nvm (to install pm2) and pm2 (to keep Foundry running in the background). You can install them all like this:
By default, Foundry runs on port 30000. If we don’t configure it carefully, it can be accessed directly, which isn’t what we intend: we want connections to go through the webserver
(over https, with http redirecting to https). So we configure our firewall to allow only these ports to be accessed. You’ll also want ssh enabled so we can remotely connect into the
server, unless you’re exclusively using an emergency console like LISH for this purpose:
Putting the domain name we’re using into a variable for the remainder of the instructions saves us from typing it out again and again. Make sure you type your domain name (that
you pointed to your server in step 2), not mine (vtt.danq.me):
DOMAIN=vtt.danq.me
3.4. Get an SSL certificate with automatic renewal
So long as the DNS change you made has propogated, this should Just Work. If it doesn’t, you might need to wait for a bit then try
again.
3.5. Configure Nginx to act as a reverse proxy for Foundry
You can, of course, manually write the Nginx configuration file: just remove the > /etc/nginx/sites-available/foundry from the end of the printf line to see
the configuration it would write and then use/adapt to your satisfaction.
set +H
printf "server {\n listen 80;\n listen [::]:80;\n server_name $DOMAIN;\n\n # Redirect everything except /.well-known/* (used for ACME) to HTTPS\n root /var/www/html/;\n if (\$request_uri !~ \"^/.well-known/\") {\n return 301 https://\$host\$request_uri;\n }\n}\n\nserver {\n listen 443 ssl http2;\n listen [::]:443 ssl http2;\n server_name $DOMAIN;\n\n ssl_certificate /etc/letsencrypt/live/$DOMAIN/fullchain.pem;\n ssl_certificate_key /etc/letsencrypt/live/$DOMAIN/privkey.pem;\n\n client_max_body_size 300M;\n\n location / {\n # Set proxy headers\n proxy_set_header Host \$host;\n proxy_set_header X-Forwarded-For \$proxy_add_x_forwarded_for;\n proxy_set_header X-Forwarded-Proto \$scheme;\n\n # These are important to support WebSockets\n proxy_set_header Upgrade \$http_upgrade;\n proxy_set_header Connection \"Upgrade\";\n\n proxy_pass http://127.0.0.1:30000/;\n }\n}\n" > /etc/nginx/sites-available/foundry
ln -sf /etc/nginx/sites-available/foundry /etc/nginx/sites-enabled/foundry
service nginx restart
3.6. Install Foundry
3.6.1. Create a place for Foundry to live
mkdir {vtt,data}
cd vtt
3.6.2. Download and decompress it
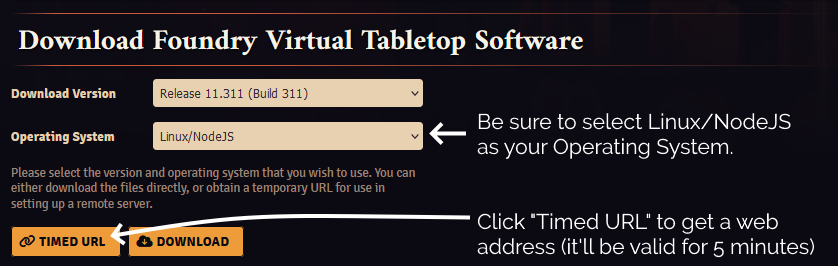
For this step, you’ll need to get a Timed URL from the Purchased Licenses page on your FoundryVTT account.
Substitute in your Timed URL in place of <url from website> (keep the quotation marks – " –
though!):
wget -O foundryvtt.zip "<url from website>"
unzip foundryvtt.zip
rm foundryvtt.zip
3.6.3. Configure PM2 to run Foundry and keep it running
Now you’re finally ready to launch Foundry! We’ll use PM2 to get it to run automatically in the background and keep running:
You can watch the logs for Foundry with PM2, too. It’s a good idea to take a quick peep at them to check it launched okay (press CTRL-C to exit):
pm2 logs 0
4. Start adventuring!
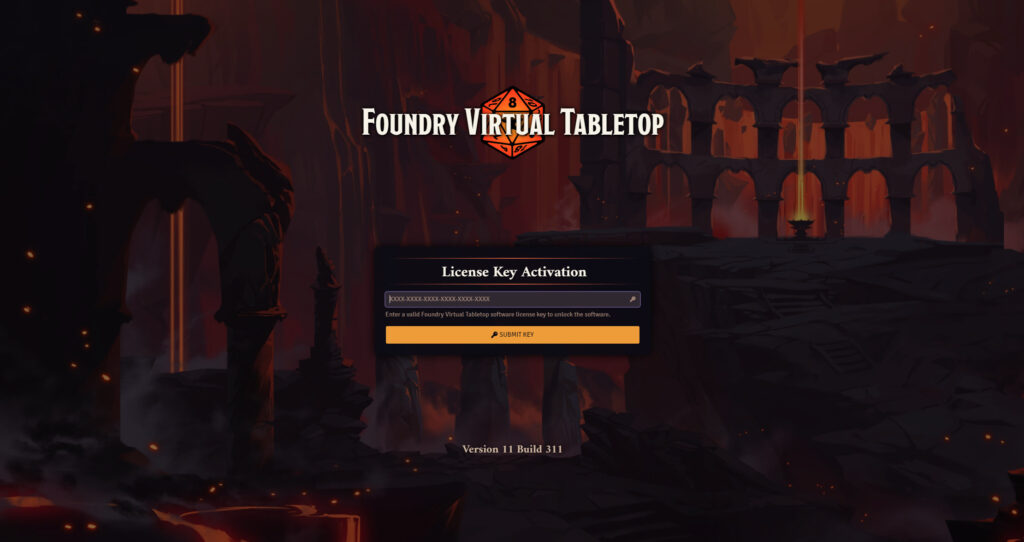
Point your web browser at your domain name (e.g. I might go to https://vtt.danq.me) and you should see Foundry’s first-load page, asking for your license key.
Provide your license key to get started, and then immediately change the default password: a new instance of Foundry has a blank default password, which means that
anybody on Earth can administer your server: get that changed to something secure!
Now you’re running on Foundry!
Footnotes
1Which currency you pay in, and therefore how much you pay, for a Foundry license depends on where in the world you are where
your VPN endpoint says you are. You might like to plan accordingly.
2 Running Foundry as root is dangerous, and you should consider the risks for yourself.
Adding a new user is relatively simple, but for a throwaway server used for a single game session and then destroyed, I wouldn’t bother. Specifically, the risk is that a vulnerability
in Foundry, if exploited, could allow an attacker to reconfigure any part of your new server, e.g. to host content of their choice or to relay spam emails. Running as a non-root user
means that an attacker who finds such a vulnerability can only trash your Foundry instance.
Earlier this year, for reasons of privacy/love of selfhosting, I moved the DanQ.me mailing list from Mailchimp to Listmonk (there’s a blog post about how I set it up), relaying
outbound messages via an SMTP server provided by my domain registrar, Gandi.
I assume that you knew that you can get an email, no more than once per day or once per week (your choice!) of what I get up to online, right? Email not your jam: there are plenty of other options too!
And because I learned a few things while doing so, I wrote this blog post so that next time I have to configure Postfix + DKIM, I’ll know where to find a guide. If it helps you in the meantime, that’s just a bonus.
If the first rule of computing is “never roll your own crypto” (based on Schneier’s Law), the second
rule might be “don’t run your own mailserver”. I don’t have a good picture to illustrate that, so here’s a photo of my dog playing tug-of-war.
Postfix
Running your own mailserver is a pain. I used to do it for all of my email, but – like many other nerds – when spam reached its peak and deliverability became an issue, I gave
up and oursourced it1.
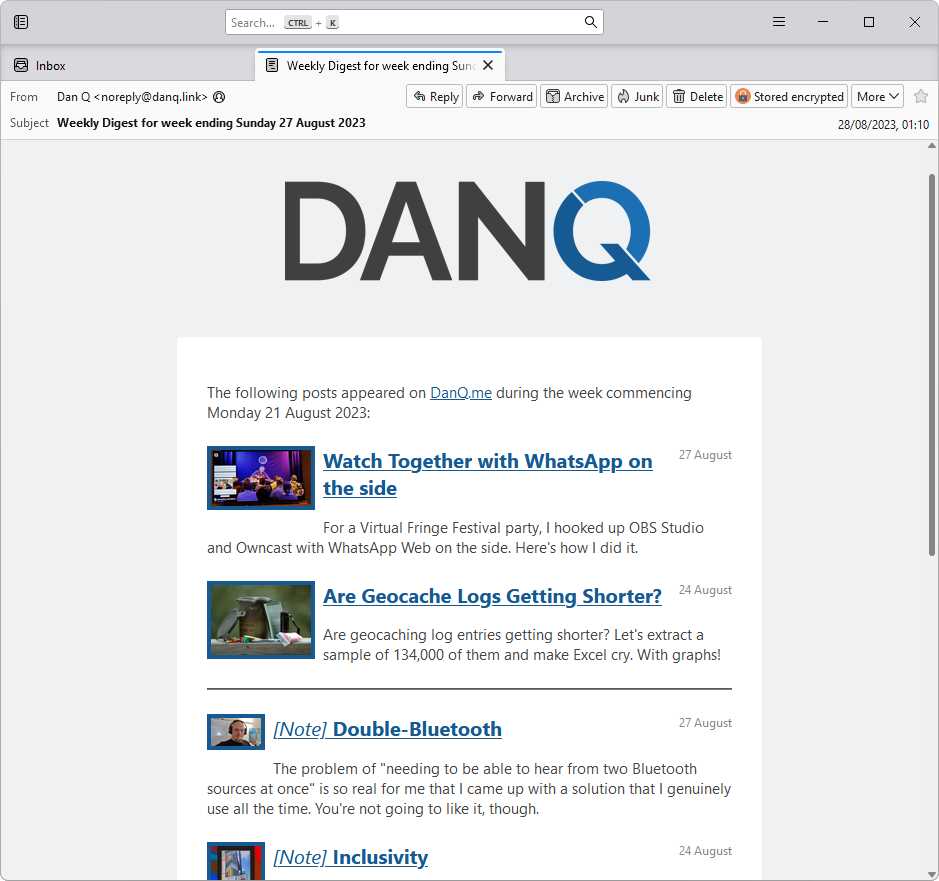
Fun fact: when I’m at my desktop, I use a classic desktop email application for my personal email, like it’s the 90s or something2.
Luckily, I don’t need it to do much. I just need a mail transfer agent with an (unauthenticated, but local-only) SMTP endpoint: something that Listmonk can dump emails into, which will then reach out to the mailservers representing each of the recipients and
relay them on. A default install of Postfix does all that out-of-the-box, so I ran sudo apt install postfix, accepted all the default
options, and put the details into Listmonk.
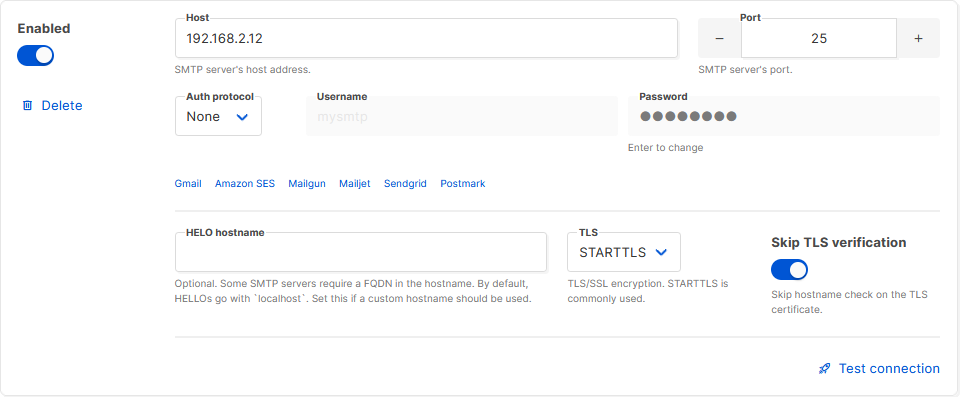
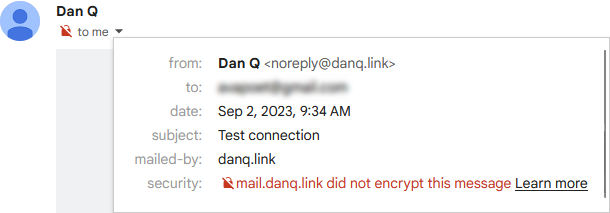
Listmonk makes adding an SMTP server very easy, and even includes a quick “test connection” link with which you can try
out your settings.
Next, I tweaked my DNS configuration to add an SPF record, and tested it.
This ought to have been enough to achieve approximate parity with what Gandi had been providing me with. Not bad.
You really can’t be doing without an SPF record as a minimum these days.
I sent a test email to a Gmail account, where I noticed two problems:
It turns out that since the last time I ran a mailserver “for real”, the use of TLS for inter-server communication has
become… basically mandatory. You don’t strictly have to do it, but if you don’t, some big email providers will put scary security warnings on your messages. This is a good thing.
The first problem was that Postfix on Debian isn’t configured by-default to use opportunistic TLS when talking to other
mailservers. That’s a bit weird, but I’m sure there’s a good reason for it. The solution was to add smtp_tls_security_level = may to my
/etc/postfix/main.cf.
The second problem was that without a valid DKIM signature on them, about half of my test emails were going straight to the
spam folder. Again, it seems that since the last time I seriously ran a mailserver 20 years ago, this has become something that isn’t strictly required… but your emails aren’t
going to get through if you don’t.
I’ve put it off this long, but I think it’s finally time for me to learn some practical DKIM.
Understanding DKIM
What’s DKIM, then?
I’ve already got an elementary understanding of how DKIM works, which I’ll summarise below.
A server that wants to send email from a domain generates a cryptographic keypair.
The public part of the key is published using DNS. The private part is kept securely on the server.
When the server relays mail on behalf of a user, it uses the private key to sign the message body and a stated subset of the headers3,
and attaches the signature as an email header.
When a receiving server (or, I suppose, a client) receives mail, it can check the signature by acquiring the public key via DNS and validating the signature.
In this way, a recipient can be sure that an email received from a domain was sent with the authorisation of the owner of that domain. Properly-implemented, this is a strong mitigation
against email spoofing.
OpenDKIM
To set up my new server to sign outgoing mail, I installed OpenDKIM and its keypair generator using sudo apt install opendkim
opendkim-tools. It’s configuration file at /etc/opendkim.conf needed the following lines added to it:
# set up a socket for Postfix to connect to:
Socket inet:12301@localhost

# set up a file to specify which IPs/hosts can send through us without authentication and get their messages signed:
ExternalIgnoreList      refile:/etc/opendkim/TrustedHosts
InternalHosts           refile:/etc/opendkim/TrustedHosts

# set up a file to specify which selector/domain are used to each incoming email address:
SigningTable            refile:/etc/opendkim/SigningTable

# set up a file to specify which signing key to use for each selector/domain:
KeyTable                refile:/etc/opendkim/KeyTable
Into /etc/opendkim/TrustedHosts I put a list of local IPs/domains that would have their emails signed by this server. Mine looks like this (in this example I’m using
example.com as my domain name, and default as the selector for it: the selector can be anything you like, it only matters if you’ve got multiple
mailservers signing mail for the same domain). Note that 192.168.0.0/16 is the internal subnet on which my sending VM will
run.
/etc/opendkim/SigningTable maps email addresses (I’m using a wildcard) to the subdomain whose TXT record will hold the public key for the signature. This also goes on to
inform the KeyTable which private key to use:
*@example.com default._domainkey.example.com
And then /etc/opendkim/KeyTable says where to find the private key for that:
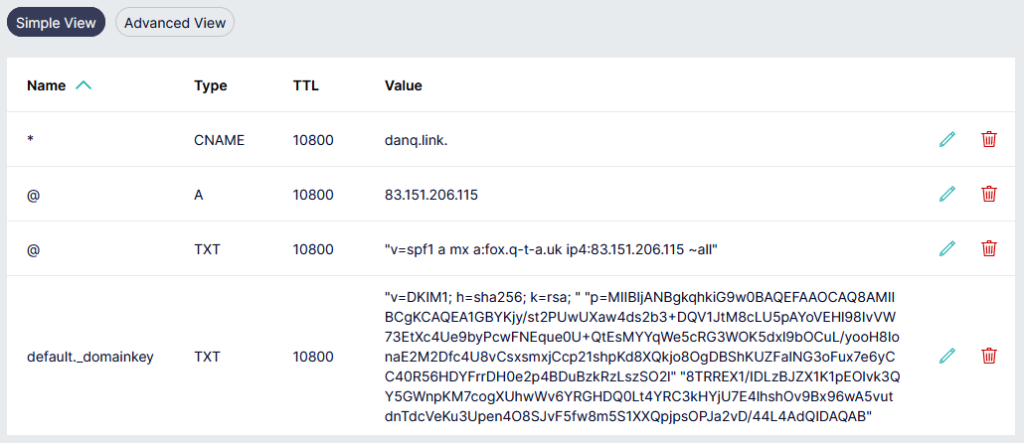
The public key needs publishing via DNS. Conveniently, when you create a keypair using its tools, OpenDKIM provides a sample (in
BIND-style) for you to copy-paste from or adapt: look in /etc/opendkim/keys/example.com/default.txt!
Gandi’s DNS “Simple View” is great for one-off and quick operations, but I really appreciate that they have a BIND-style syntax “Advanced View” for when I’m making bigger and
more-complex DNS configuration changes.
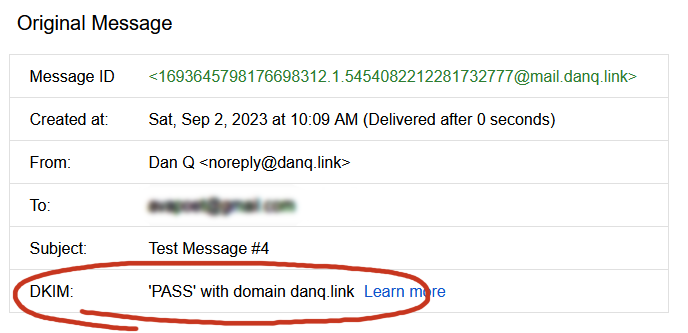
Once we’ve restarted both services (sudo service postfix restart; sudo service opendkim restart), we can test it!
Once the major email providers – who have the worst spam problem to deal with – say that your email signature looks good, you’re good.
So I learned something new today.
If you, too, love to spend your Saturday mornings learning something new, have a look at those subscription
options to decide how you’d like to hear about whatever I get up to next.
Footnotes
1 I still outsource my personal email, and I sing the praises of the excellent folks
behind ProtonMail.
2 My desktop email client also doubles as my newsreader, because, yes, of course
you can still find me on USENET. Which, by the way, is undergoing a mini-revival…
3 Why doesn’t DKIM sign
all the headers in an email? Because intermediary servers and email clients will probably add their own headers, thereby invalidating the signature! DKIM gets used to sign the From: header, for obvious reasons, and ought to be used for other headers whose tampering could be
significant such as the Date: and Subject:, but it’s really up to the signing server to choose a subset.
Today I wanted to write a script that I could execute from both *nix (using Bash or a similar shell) and on Windows (from a command prompt, i.e. a batch file). I found Max Norin’s solution which works, but has a few limitations, e.g. when run it outputs either the
word “off” when run in *nix or the word “goto” when run on Windows. There’s got to be a sneaky solution, right?
Here’s my improved version:
 1
 2
 3
 4
 5
 6
 7
 8
 9
10
11
12
@goto(){
# Linux code here
uname -o
}
@goto $@
exit
:(){
@echooffrem Windows script hereecho%OS%
Mine exploits the fact that batch files can prefix commands with @ to suppress outputting them as they execute. So @goto can be a valid function name in
bash/zsh etc. but is interpreted as a literal goto command in a Windows Command Prompt. This allows me to move the echo off command –
which only has meaning to Windows – into the Windows section of the script and suppress it with @.
The file above can be saved as e.g. myfile.cmd and will execute in a Windows Command Prompt (or in MS-DOS) or your favourite *nix OS. Works in MacOS/BSD too, although
obviously any more-sophisticated script is going to have to start working around the differences between GNU and non-GNU versions of core utilities, which is always a bit of a pain!
Won’t work in sh because you can’t define functions like that.
But the short of it is you can run this on a stock *nix OS and get:
$ ./myfile.cmd
GNU/Linux
And you can run it on Windows and get:
> .\myfile.cmd
Windows_NT
You can’t put a shebang at the top because Windows hates it, but there might be a solution using PowerShell scripts (which use
hashes for comments: that’s worth thinking about!). In any case: if the interpreter strictly matters you’ll probably want to shell to it on line 3 with e.g. bash -c.
Why would you want such a thing? I’m not sure. But there is is, if you do.
As you might know if you were paying close attention in Summer 2019, I run a “URL
shortener” for my personal use. You may be familiar with public URL shorteners like TinyURL
and Bit.ly: my personal URL shortener is basically the same thing, except that only
I am able to make short-links with it. Compared to public ones, this means I’ve got a larger corpus of especially-short (e.g. 2/3 letter) codes available for my personal use. It also
means that I’m not dependent on the goodwill of a free siloed service and I can add exactly the features I want to it.
Little wonder then that my link shortener sat so close to me on my ecosystem diagram the other year.
For the last nine years my link shortener has been S.2, a tool I threw together in Ruby. It stores URLs in a
sequentially-numbered database table and then uses the Base62-encoding of the primary key as the “code” part of the short URL. Aside from the fact that when I create a short link it shows me a QR code to I can
easily “push” a page to my phone, it doesn’t really have any “special” features. It replaced S.1, from which it primarily differed by putting the code at the end of the URL rather than as part of the domain name, e.g. s.danq.me/a0 rather than a0.s.danq.me: I made the switch
because S.1 made HTTPS a real pain as well as only supporting Base36 (owing to the case-insensitivity of domain names).
But S.2’s gotten a little long in the tooth and as I’ve gotten busier/lazier, I’ve leant into using or adapting open source tools more-often than writing my own from scratch. So this
week I switched my URL shortener from S.2 to YOURLS.
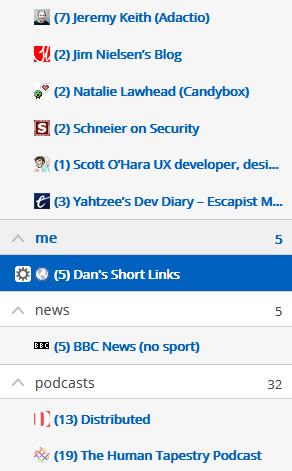
YOURLs isn’t the prettiest tool in the world, but then it doesn’t have to be: only I ever see the interface pictured above!
One of the things that attracted to me to YOURLS was that it had a ready-to-go Docker image. I’m not the biggest fan of Docker in general,
but I do love the convenience of being able to deploy applications super-quickly to my household NAS. This makes installing and maintaining my personal URL shortener much easier than it
used to be (and it was pretty easy before!).
Another thing I liked about YOURLS is that it, like S.2, uses Base62 encoding. This meant that migrating my links from S.2 into YOURLS could be done with a simple cross-database
INSERT... SELECT statement:
One of S.1/S.2’s features was that it exposed an RSS feed at a secret URL for my reader to ingest. This was great, because it meant I could “push” something to my RSS reader to read or repost to my blog later. YOURLS doesn’t have such a feature, and I couldn’t find anything in the (extensive) list of plugins that would do it for me. I needed to write my own.
In some ways, subscribing “to yourself” is a strange thing to do. In other ways… shut up, I’ll do what I like.
I could have written a YOURLS plugin. Or I could have written a stack of code in Ruby, PHP, Javascript or
some other language to bridge these systems. But as I switched over my shortlink subdomain s.danq.me to its new home at danq.link, another idea came to me. I
have direct database access to YOURLS (and the table schema is super simple) and the command-line MariaDB client can output XML… could I simply write an XML
Transformation to convert database output directly into a valid RSS feed? Let’s give it a go!
I wrote a script like this and put it in my crontab:
mysql --xml yourls -e \"SELECT keyword, url, title, DATE_FORMAT(timestamp, '%a, %d %b %Y %T') AS pubdate FROM yourls_url ORDER BY timestamp DESC LIMIT 30"\
| xsltproc template.xslt - \
| xmllint --format - \
> output.rss.xml
The first part of that command connects to the yourls database, sets the output format to XML, and executes an
SQL statement to extract the most-recent 30 shortlinks. The DATE_FORMAT function is used to mould the datetime into
something approximating the RFC-822 standard for datetimes as required by
RSS. The output produced looks something like this:
<?xml version="1.0"?><resultsetstatement="SELECT keyword, url, title, timestamp FROM yourls_url ORDER BY timestamp DESC LIMIT 30"xmlns:xsi="http://www.w3.org/2001/XMLSchema-instance"><row><fieldname="keyword">VV</field><fieldname="url">https://webdevbev.co.uk/blog/06-2021/perfect-is-the-enemy-of-good.html</field><fieldname="title"> Perfect is the enemy of good || Web Dev Bev</field><fieldname="timestamp">2021-09-26 17:38:32</field></row><row><fieldname="keyword">VU</field><fieldname="url">https://webdevlaw.uk/2021/01/30/why-generation-x-will-save-the-web/</field><fieldname="title">Why Generation X will save the web Hi, Im Heather Burns</field><fieldname="timestamp">2021-09-26 17:38:26</field></row><!-- ... etc. ... --></resultset>
We don’t see this, though. It’s piped directly into the second part of the command, which uses xsltproc to apply an XSLT to it. I was concerned that my XSLT
experience would be super rusty as I haven’t actually written any since working for my former employer SmartData back in around 2005! Back then, my coworker Alex and I spent many hours doing XML
backflips to implement a system that converted complex data outputs into PDF files via an XSL-FO intermediary.
I needn’t have worried, though. Firstly: it turns out I remember a lot more than I thought from that project a decade and a half ago! But secondly, this conversion from MySQL/MariaDB
XML output to RSS turned out to be pretty painless. Here’s the
template.xslt I ended up making:
<?xml version="1.0"?><xsl:stylesheetxmlns:xsl="http://www.w3.org/1999/XSL/Transform"version="1.0"><xsl:templatematch="resultset"><rssversion="2.0"xmlns:atom="http://www.w3.org/2005/Atom"><channel><title>Dan's Short Links</title><description>Links shortened by Dan using danq.link</description><link> [ MY RSS FEED URL ]</link><atom:linkhref=" [ MY RSS FEED URL ] "rel="self"type="application/rss+xml"/><lastBuildDate><xsl:value-ofselect="row/field[@name='pubdate']"/> UTC</lastBuildDate><pubDate><xsl:value-ofselect="row/field[@name='pubdate']"/> UTC</pubDate><ttl>1800</ttl><xsl:for-eachselect="row"><item><title><xsl:value-ofselect="field[@name='title']"/></title><link><xsl:value-ofselect="field[@name='url']"/></link><guid>https://danq.link/<xsl:value-ofselect="field[@name='keyword']"/></guid><pubDate><xsl:value-ofselect="field[@name='pubdate']"/> UTC</pubDate></item></xsl:for-each></channel></rss></xsl:template></xsl:stylesheet>
That uses the first (i.e. most-recent) shortlink’s timestamp as the feed’s pubDate, which makes sense: unless you’re going back and modifying links there’s no more-recent
changes than the creation date of the most-recent shortlink. Then it loops through the returned rows and creates an <item> for each; simple!
The final step in my command runs the output through xmllint to prettify it. That’s not strictly necessary, but it was useful while debugging and as the whole command takes
milliseconds to run once every quarter hour or so I’m not concerned about the overhead. Using these native binaries (plus a little configuration), chained together with pipes, had
already resulted in way faster performance (with less code) than if I’d implemented something using a scripting language, and the result is a reasonably elegant “scratch your
own itch”-type solution to the only outstanding barrier that was keeping me on S.2.
All that remained for me to do was set up a symlink so that the resulting output.rss.xml was accessible, over the web, to my RSS reader. I hope that next time I’m tempted to write a script to solve a problem like this I’ll remember that sometimes a chain of piped *nix
utilities can provide me a slicker, cleaner, and faster solution.
Update: Right as I finished writing this blog post I discovered that somebody had already solved this
problem using PHP code added to YOURLS; it’s just not packaged as a plugin so I didn’t see it earlier! Whether or not I
use this alternate approach or stick to what I’ve got, the process of implementing this YOURLS-database ➡ XML
➡ XSLT ➡ RSS chain was fun and
informative.
This is a basic Python shell (really, it’s a fancy wrapper over the system shell) that takes a task and asks OpenAI for what Linux bash command to run based on your description. For
safety reasons, you can look at the command and cancel before actually running it.
…
Of all the stupid uses of OpenAI’s GPT-3, this might be the most-amusing. It’s really interesting to see how close – sometimes spot-on – the algorithm comes to writing the right command
when you “say what you mean”. Also, how terribly, terribly ill-advised it would be to actually use this for real.
I am the original author of GNU grep.  I am also a FreeBSD user,
although I live on -stable (and older) and rarely pay attention
to -current.

However, while searching the -current mailing list for an unrelated
reason, I stumbled across some flamage regarding BSD grep vs GNU grep
performance.  You may have noticed that discussion too...
This post starts very geeky, but becomes about computer games later on. Feel free to scroll down three paragraphs if you like computer games but don’t like computer hardware
hacking.
My M3 Perfect and some related hardware arrived today. Basically, it’s a SD card
reader that plugs into a Game Boy Advance slot (which are found on not only the Game Boy Advance series but also the Nintendo DS). By itself, it allows a Nintendo DS (or a DS Lite, as
my new toy is) to play music, videos, etc. But combined with an Passcard (also arrived this morning), it allows backup games and homebrew software to be easily loaded onto the device.
Within minutes, I had DSLinux, a Linux distribution for the Nintendo DS, working. It felt immensely cool to be typing at a Bash shell using my DS stylus. I couldn’t get the wireless internet connection working, though – the drivers kept failing to load, which is
probably either a result of (a) the DS Lite possibly having different firmware for interfacing with the network subsystem or (b) the M3 Perfect I got is the SD card edition, rather than
the CF edition, which is better supported by DSLinux. I chose the SD card edition despite it being a few pounds more expensive
because it’s slightly smaller (and therefore doesn’t stick out of the side of my handheld in such an unslightly way as the CF one would have) and because I can potentially fit more onto
a SD card (although the only SD card I own is 1Gb, the same size as the largest CF card the M3 can take). In any case, both possibilities sound equally unlikely: further investigation
will ensure.
The ultimate aim of this little project is to get a graphical VNC client for the DS (take a look at
that screenshot!) running, or some other remote control, so I can take full control of my desktop PC,
wirelessly, from, like, my bed. Or from the couch. Or from and wireless internet hotspot anywhere that somebody hasn’t secured properly. Toy.
But the other benefit of this little purchase is the ability to, how shall we say, “try before I buy” Nintendo DS games. I’ve spent quite some time today playing the stunning Trauma Center: Under The Knife. It hasn’t been since Half-Life 2
that I’ve played a computer game that genuinely made me jump with fright.
This isn’t Theme Hospital. This is Life and Death (for those of you
too young to remember, this was a stunning late-80s “Sim Surgeon”). Starting as a junior surgeon, you’ll remove benign tumours, treat laceration injuries, and laser off polyps.
The whole things starts with a very “hold your hand” approach, but the learning curve is steep. Within 25 minutes of play you’ll be performing surgery within the chest cavity of car
crash victims when something goes wrong (their heart stops, or their symptoms severely exacerbate, or it turns out there’s something more seriously wrong with them) and you’ve got
nobody there to help you: you have to work alone.
It’s dark and cold and hard. Very hard. I struggled to keep up with the pace and had to re-attempt some of the levels (such as the brutal on early in the second chapter in which I had
to remove aneurisms from the arteries of the intestines, and they just kept exploding on me, showering blood everywhere and destabilising the patient’s condition) several times.
Nonetheless, I had great fun watching Claire replay those levels, on the edge of my seat whenever I knew something was about to go terribly
wrong. Contrary to the image Nintendo sometimes convey: this is not a game for kids.
Another game I’ve enjoyed trying out is Mario & Luigi: Partners In Time, which plays a lot like Paper Mario: The Thousand-Year Door, but with semi-independent simultaneous control over up to four (Mario, Luigi,
Mario’s younger self, Luigi’s younger self) different characters. Yes, at the same time. Yes, that fucks with your head. Quite quickly.
Then there’s Super Princess Peach, a platform game in which Peach uses the power of mood swings (I kid you not – she
fluctuates between singing, crying, and breathing fire, just like a real woman) in order to get her way. And Super Monkey Ball Touch & Roll, more stupid puzzle game fun…
It’s not all piracy (although at least a little bit ethically – we’ll buy legitimate copies of the good stuff, almost certainly including Trauma Center) of stuff I could have
bought at my local Game: I’ve also had a great deal of fun with Electroplankton, for which a release outside of Japan is still
promised, but sadly absent. Electroplankton is a software toy in the truest sense of the word. The player manipulates the movement of musical plankton in order to generate what can just
about be described as music. I came home and hooked it up to the stereo and Claire and I had great fun for some time, playing with the different plankton and trying to discover how they
all “worked”. And I’m also looking forward to giving some of the Naruto games (which’ll probably never
be released outside of Japan) a go.
Spent the last four days in Lancashire and elsewhere in the North of England, visiting my folks (among other things). Details follow…
Thursday 26th June 2003 Linux Expo 2003, Birmingham
Sorted out Claire’s bank, packed bags, and set off for Birmingham to the last day of Linux Expo 2003 at the National Exhibition Centre, to meet up with Gareth and some other geeks to
talk about a project on which my input could be valuable. Gareth is going to come over to Aberystwyth next weekend and we’ll knock together a prototype of the system we’ve suggested.
Claire got scared by the vast numbers of stereotypical geeks (and the distinct overdose of testosterone in the air – she was one of only three women in the whole place), and by the fact
that, unlike normal, she couldn’t understand one in three words spoken. I smiled. She’s got a little way to go to earn her geek stripes, yet.
Bon Jovi, Manchester
Arrived late at Old Trafford – missed the support group, but in time to try to find standing room before Bon Jovi came on-stage. All-in-all, a good concert: Claire was a little short
for standing on the pitch to have been a good idea, and the sound quality was a little below-par owing to a lack of adequate repeater speakers, and the only beer available was Budweiser
and Boddingtons, but it was still a pretty good gig. Went to a Manchester pub afterwards before catching a really, really late train home. Got to bed sometime after 3am.