My recent post How an RM Nimbus Taught Me a Hacker Mentality kickstarted several conversations, and I’ve enjoyed talking to people about the “hacker
mindset” (and about old school computers!) ever since.1
Thinking “like a hacker” involves a certain level of curiosity and creativity with technology. And there’s a huge overlap between that outlook and the attitude required to
be a security engineer.
By way of example: I wrote a post for a Web forum2
recently. A feature of this particular forum is that (a) it has a chat room, and (b) new posts are “announced” to the chat room.
It’s a cute and useful feature that the chat room provides instant links to new topics.
The title of my latest post contained a HTML tag (because that’s what the post was talking about). But when the post got “announced” to the chat room… the HTML tag seemed to have
disappeared!
And this is where “hacker curiosity” causes a person to diverge from the norm. A normal person would probably just say to themselves “huh, I guess the chat room doesn’t show HTML
elements in the subjects of posts it announces” and get on with their lives. But somebody with a curiosity for the technical, like me, finds themselves wondering exactly
what went wrong.
It took only a couple of seconds with my browser’s debug tools to discover that my HTML tag… had actually been rendered to the page! That’s not good: it means that, potentially, the
combination of the post title and the shoutbox announcer might be a vector for an XSS attack. If I wrote a post with a title of, say, <script
src="//example.com/some-file.js"></script>Benign title, then the chat room would appear to announce that I’d written a post called “Benign title”, but anybody viewing it
in the chat room would execute my JavaScript payload3.
I reached out to an administrator to let them know. Later, I delivered a proof-of-concept: to keep it simple, I just injected an <img> tag into a post title and, sure
enough, the image appeared right there in the chat room.
Injecting an 88×31 seemed like a less-disruptive proof-of-concept than, y’know, alert('xss'); or something!
This didn’t start out with me doing penetration testing on the site. I wasn’t looking to find a security vulnerability. But I spotted something strange, asked
“what can I make it do?”, and exercised my curiosity.
Even when I’m doing something more-formally, and poking every edge of a system to try to find where its weak points are… the same curiosity still sometimes pays dividends.
And that’s why you need that mindset in your security engineers. Curiosity, imagination, and the willingness to ask “what can I make it do?”. Because if you don’t find the loopholes,
the bad guys will.
Footnotes
1 It even got as far as the school run, where I ended up chatting to another parent about
the post while our kids waited to be let into the classroom!
2 Remember forums? They’re still around, and – if you find one with the right group of
people – they’re still delightful. They represent the slower, smaller communities of a simpler Web: they’re not like Reddit or Facebook where the algorithm will always find something
more to “feed” you; instead they can be a place where you can make real human connections online, so long as you can deprogram yourself of your need to have an endless-scroll of
content and you’re willing to create as well as consume!
3 This, in turn, could “act as” them on the forum, e.g. attempting to steal their
credentials or to make them post messages they didn’t intend to, for example: or, if they were an administrator, taking more-significant actions!
Samsung have been showing off pre-release versions of their new Galaxy S26 range. It’s all pretty same-old predictable
changes (and I’m still not really looking for anything to replace my now-five-year-old mobile anyway!), but one feature in particular – one that they’re not even mentioning in their
marketing copy – seemed interesting and innovative.
You know those polarising filters you can use to try to stop people shoulder-surfing? Samsung have come up with a software-controlled one.
Demos show the feature being used to black-out the screen at a 15°+ angle when entering a PIN or password, but also show how it can configured on an app-by-app basis to e.g. black out
notifications so that only the person right in front of the screen can see them.
I assume that this black magic is facilitated by an additional layer between the screen and the glass, performing per-pixel selective polarisation in the same way as a monochrome LCD
display might. But the fact that each pixel can now show two images – one to a user directly ahead, superimposed with another (monochrome) one to users with an offset
viewing angle, is what interests me: my long-cultivated “hacker mentality” wants to ask “what I can make that do?”
Does the API of this (of this or of any similar or future screens?) provide enough control to manipulate the new layer? And is its resolution identical to that of the underlying screen?
Could “spoilers”, instead of being folded-away behind a <details>/<summary> or ROT13-encoded, say “tilt to reveal” and provide
a physicality to the mechanism of exposure?
Could diagrams embed their own metadata annotations: look at a blueprint from the side to see descriptions, or tilt your phone to see the alt-text on an image?
Can the polarisation layer be expanded to provide a more-sophisticated privacy overlay, such as a fake notification in place of a real one, to act as a honeypot?
Is there sufficient control over the angle of differentiation that a future screen could use eye tracking to produce a virtual lenticular barrier, facilitating a novel kind of
autostereoscopic 3D display that works – like a hologram – from any viewing angle?
I doubt I’m buying one of these devices. But I’m very curious about all of these questions!
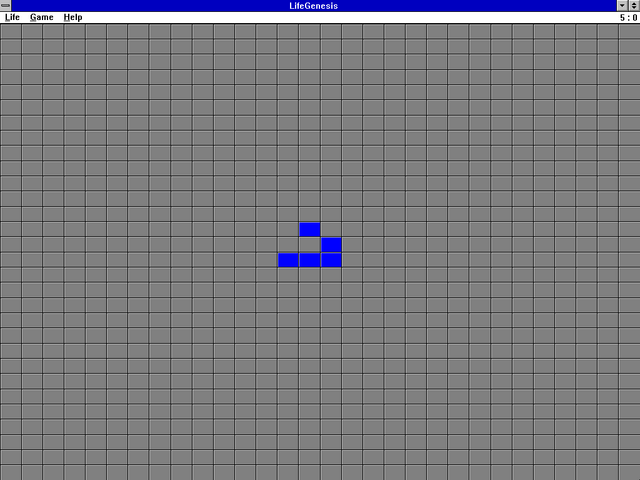
An RM Nimbus was not the first computer on which I played Game of Life1. But this glider is here symbolically, anyway.
I can trace my hacker roots back further than my first experience of using an RM
Nimbus M-Series in circa 19922.
But there was something particular about my experience of this popular piece of British edutech kit which provided me with a seminal experience that shaped my “hacker identity”. And
it’s that experience about which I’d like to tell you:
Shortly after I started secondary school, they managed to upgrade their computer lab from a handful of Nimbus PC-186s to a fancy new network of M-Series PC-386s. The school were clearly very proud of this cutting-edge new acquisition, and we watched the
teachers lay out the manuals and worksheets which smelled fresh and new and didn’t yet have their corners frayed nor their covers daubed in graffiti.
I only got to use the schools’ older computers – this kind! – once or twice before the new ones were delivered.
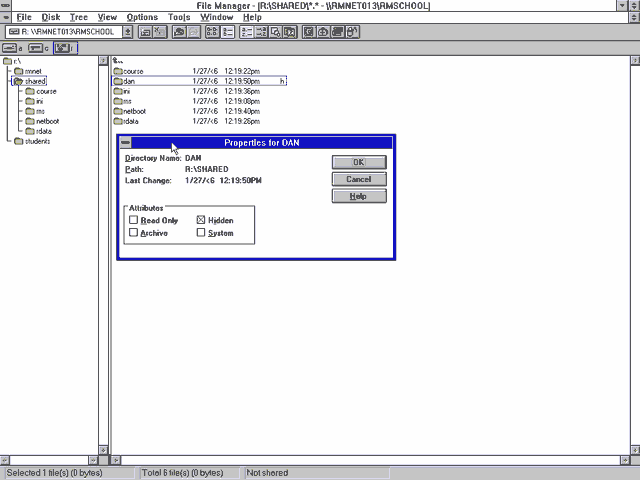
Program Manager
The new ones ran Windows 3 (how fancy!). Well… kind-of. They’d been patched with a carefully-modified copy of Program Manager that imposed a variety of limitations. For example, they had removed the File > Run… menu item, along
with an icon for File Manager, in order to restrict access to only the applications approved by the network administrator.
A special program was made available to copy files between floppy disks and the user’s network home directory. This allowed a student to take their work home with them if they wanted.
The copying application – whose interface was vastly inferior to File Manager‘s – was limited to only copying files with extensions in its allowlist. This meant that (given
that no tool was available that could rename files) the network was protected from anybody introducing any illicit file types.
Bring a .doc on a floppy? You can copy it to your home directory. Bring a .exe? You can’t even see it.
To young-teen-Dan, this felt like a challenge. What I had in front of me was a general-purpose computer with a limited selection of software but a floppy drive through which media could
be introduced. What could I make it do?
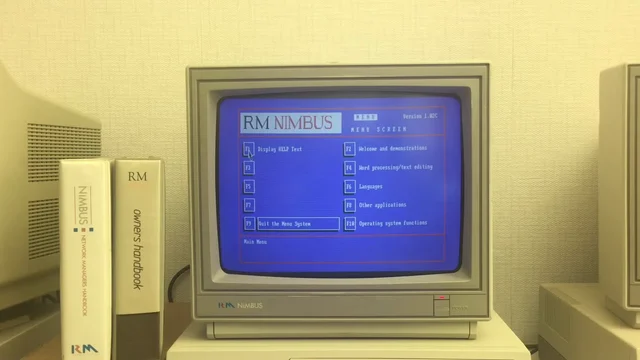
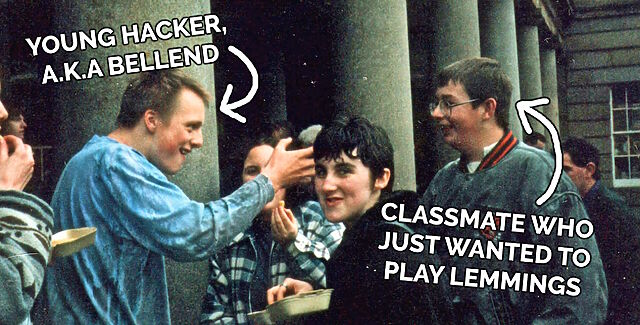
This isn’t my school’s computer lab circa mid-1990s (it’s this school) but it has absolutely the same
energy. Except that I think Solitaire was one of the applications that had been carefully removed from Program Manager.
Spoiler: eventually I ended up being able to execute pretty much anything I wanted, but we’ll get to that. The journey is the important part of the story. I didn’t start by asking “can
I trick this locked-down computer lab into letting my friends and I play Doom deathmatches on it?” I started by asking “what can I make it do?”; everything else built up over
time.
Recorder + Paintbrush made for an interesting way to use these basic and limited tools to produce animations. Like this one, except at school I’d have put more effort in4.
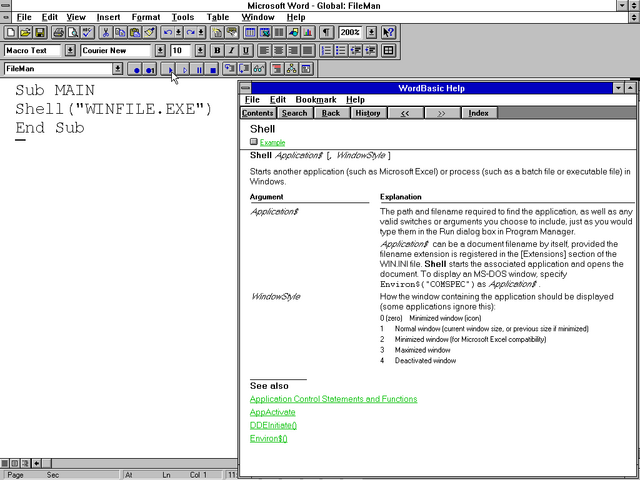
Microsoft Word
Then I noticed that Microsoft Word also had a macro recorder, but this one was scriptable using a programming language called WordBasic (a predecessor to Visual Basic for
Applications). So I pulled up the help and started exploring what it could do.
And as soon as I discovered the Shell function, I realised that
the limitations that were being enforced on the network could be completely sidestepped.
A Windows 3 computer that runs Word… can run any other executable it has access to. Thanks, macro editor.
Now that I could run any program I liked, I started poking the edges of what was possible.
Could I get a MS-DOS prompt/command shell? Yes, absolutely5.
Could I write to the hard disk drive? Yes, but any changes got wiped when the computer performed its network boot.
Could I store arbitrary files in my personal network storage? Yes, anything I could bring in on floppy disks6
could be persisted on the network server.
I didn’t have a proper LAN at home7
So I really enjoyed the opportunity to explore, unfettered, what I could get up to with Windows’ network stack.
The “WinNuke” NetBIOS remote-crash vulnerability was a briefly-entertaining way to troll classmates, but unlocking WinPopup/Windows Chat capability was ultimately more-rewarding.
File Manager
I started to explore the resources on the network. Each pupil had their own networked storage space, but couldn’t access one another’s. But among the directories shared between
all students, I found a directory to which I had read-write access.
I created myself a subdirectory and set the hidden bit on it, and started dumping into it things that I wanted to keep on the network8.
By now my classmates were interested in what I was achieving, and I wanted in the benefits of my success. So I went back to Word and made a document template that looked
superficially like a piece of coursework, but which contained macro code that would connect to the shared network drive and allow the user to select from a series of programs that
they’d like to run.
Gradually, compressed over a series of floppy disks, I brought in a handful of games: Commander Keen, Prince of Persia, Wing Commander, Civilization,
Wolfenstein 3D, even Dune II. I got increasingly proficient at modding games to strip out unnecessary content, e.g. the sound and music files9,
minimising the number of floppy disks I needed to ZIP (or ARJ!) content to before smuggling it in via my shirt pocket, always sure not to
be carrying so many floppies that it’d look suspicious.
The goldmine moment – for my friends, at least – was the point at which I found a way to persistently store files in a secret shared location, allowing me to help them run whatever
they liked without passing floppy disks around the classroom (which had been my previous approach).
In a particularly bold move, I implemented a simulated login screen which wrote the entered credentials into the shared space before crashing the computer. I left it running,
unattended, on computers that I thought most-likely to be used by school staff, and eventually bagged myself the network administrator’s password. I only used it twice: the first time,
to validate my hypothesis about the access levels it granted; the second, right before I finished school, to confirm my suspicion that it wouldn’t have been changed during my entire
time there10.
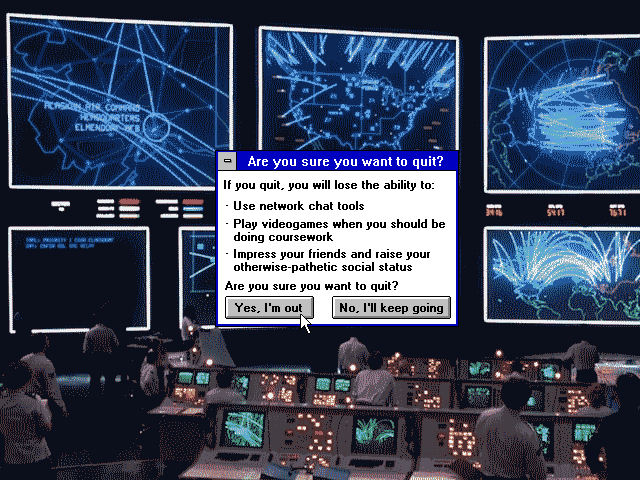
Are you sure you want to quit?
My single biggest mistake was sharing my new-found power with my classmates. When I made that Word template that let others run the software I’d introduced to the
network, the game changed.
When it was just me, asking the question what can I make it do?, everything was fun and exciting.
But now half a dozen other teens were nagging me and asking “can you make it do X?”
This wasn’t exploration. This wasn’t innovation. This wasn’t using my curiosity to push at the edges of a system and its restrictions! I didn’t want to find the exploitable boundaries
of computer systems so I could help make it easier for other people to do so… no: I wanted the challenge of finding more (and weirder) exploits!
I wanted out. But I didn’t want to say to my friends that I didn’t want to do something “for” them any more11.
I figured: I needed to get “caught”.
I considered just using graphics software to make these screenshots… but it turned out to be faster to spin up a network of virtual machines running Windows 3.11 and some basic tools.
I actually made the stupid imaginary dialog box you’re seeing.12
I chose… to get sloppy.
I took a copy of some of the software that I’d put onto the shared network drive and put it in my own home directory, this time un-hidden. Clearly our teacher was already suspicious and
investigating, because within a few days, this was all that was needed for me to get caught and disciplined13.
I was disappointed not to be asked how I did it, because I was sufficiently proud of my approach that I’d hoped to be able to brag about it to somebody who’d
understand… but I guess our teacher just wanted to brush it under the carpet and move on.
Aftermath
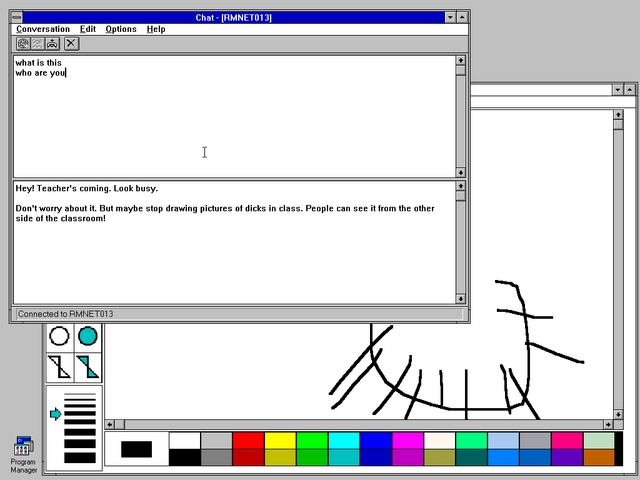
The school’s IT admin certainly never worked-out the true scope of my work. My “hidden” files remained undiscovered, and my friends were able to continue to use my special Word template
to play games that I’d introduced to the network14.
I checked, and the hidden files were still there when I graduated.
The warning worked: I kept my nose clean in computing classes for the remainder of secondary school. But I would’ve been happy to, anyway: I already felt like I’d “solved” the challenge
of turning the school computer network to my interests and by now I’d moved on to other things… learning how to reverse-engineer phone networks… and credit card processors… and
copy-protection systems. Oh, the stories I could tell15.
I “get” it that some of my classmates – including some of those pictured – were mostly interested in the results of my hacking efforts. But for me it always was – and still
is – about the journey of discovery.
But I’ll tell you what: 13-ish year-old me ought to be grateful to the RM Nimbus network at my school for providing an interesting system about which my developing “hacker brain” could
ask: what can I make it do?
Which remains one of the most useful questions with which to foster a hacker mentality.
Footnotes
1 I first played Game of Life on an Amstrad CPC464, or possibly a PC1512.
2 What is the earliest experience to which I can credit my “hacker mindset”?
Tron and WarGames might have played a part, as might have the
“hacking” sequence in Ferris Bueller’s Day Off. And there was the videogame Hacker and its sequel (it’s funny to
see their influence in modern games). Teaching myself to program so that I could make
text-based adventures was another. Dissecting countless obfuscated systems to see how they worked… that’s yet another one: something I did perhaps initially to cheat at games by
poking their memory addresses or hexediting their save games… before I moved onto reverse-engineering copy protection systems and working out how they could be circumvented… and then
later still when I began building hardware that made it possible for me to run interesting experiments on telephone networks.
Any of all of these datapoints, which took place over a decade, could be interpreted as “the moment” that I became a hacker! But they’re not the ones I’m talking about today.
Today… is the story of the RM Nimbus.
3 Whatever happened to Recorder? After it disappeared in Windows 95 I occasionally had
occasion to think to myself “hey, this would be easier if I could just have the computer watch me and copy what I do a few times.” But it was not to be: Microsoft decided that this
level of easy automation wasn’t for everyday folks. Strangely, it wasn’t long after Microsoft dropped macro recording as a standard OS feature that Apple decided that MacOS
did need a feature like this. Clearly it’s still got value as a concept!
4 Just to clarify: I put more effort in to making animations, which were not part of
my schoolwork back when I was a kid. I certainly didn’t put more effort into my education.
5 The computers had been configured to make DOS access challenging: a boot menu let you
select between DOS and Windows, but both were effectively nerfed. Booting into DOS loaded an RM-provided menu that couldn’t be killed; the MS-DOS prompt icon was absent from Program
Manager and quitting Windows triggered an immediate shutdown.
6 My secondary school didn’t get Internet access during the time I was enrolled there. I
was recently trying to explain to one of my kids the difference between “being on a network” and “having Internet access”, and how often I found myself on a network that wasn’t
internetworked, back in the day. I fear they didn’t get it.
7 I was in the habit of occasionally hooking up PCs together with null modem cables, but only much later on would I end up acquiring sufficient “thinnet”
10BASE2 kit that I could throw together a network for a LAN party.
8 Initially I was looking to sidestep the space limitation enforcement on my “home”
directory, and also to put the illicit software I was bringing in somewhere that could not be trivially-easily traced back to me! But later on this “shared” directory became the
repository from which I’d distribute software to my friends, too.
9 The school computer didn’t have soundcards and nobody would have wanted PC speakers
beeping away in the classroom while they were trying to play a clandestine videogame anyway.
10 The admin password was concepts. For at least four years.
11 Please remember that at this point I was a young teenager and so was pretty well
over-fixated on what my peers thought of me! A big part of the persona I presented was of somebody who didn’t care what others thought of him, I’m sure, but a mask that
doesn’t look like a mask… is still a mask. But yeah: I had a shortage of self-confidence and didn’t feel able to say no.
13 I was briefly alarmed when there was talk of banning me from the computer lab for
the remainder of my time at secondary school, which scared me because I was by now half-way through my
boring childhood “life plan” to become a computer programmer by what seemed to be the appropriate route, and I feared that not being able to do a GCSE in a CS-adjacent subject
could jeopardise that (it wouldn’t have).
14 That is, at least, my friends who were brave enough to carry on doing so after the
teacher publicly (but inaccurately) described my alleged offences, seemingly as a warning to others.
15 Oh, the stories I probably shouldn’t tell! But here’s a teaser: when I
built my first “beige box” (analogue phone tap hardware) I experimented with tapping into the phone line at my dad’s house from the outside. I carefully shaved off some of
the outer insulation of the phone line that snaked down the wall from the telegraph pole and into the house through the wall to expose the wires inside, identified each, and then
croc-clipped my box onto it and was delighted to discovered that I could make and receive calls “for” the house. And then, just out of curiosity to see what kinds of protections were
in place to prevent short-circuiting, I experimented with introducing one to the ringer line… and took out all the phones on the street. Presumably I threw a circuit breaker in the
roadside utility cabinet. Anyway, I patched-up my damage and – fearing that my dad would be furious on his return at the non-functioning telecomms – walked to the nearest functioning
payphone to call the operator and claim that the phone had stopped working and I had no idea why. It was fixed within three hours. Phew!
The secret order — issued under the U.K.’s Investigatory Powers Act 2016 (known as the Snoopers’ Charter) — aims to undermine an opt-in Apple feature that provides end-to-end encryption
(E2EE) for iCloud backups, called Advanced Data Protection. The encrypted backup feature only allows Apple customers to access their device’s information stored on iCloud — not
even Apple can access it.
…
Sigh. A continuation of a long-running saga of folks here in the UK attempting to make it easier for police to catch a handful of (stupid) criminals1…
at the expense of making millions of people more-vulnerable to malicious hackers2.
If we continue on this path, it’ll only be a short number of years before you see a headline about a national secret, stored by a government minister (in the kind of ill-advised manner
we know happens) on iCloud or similar and then stolen by a hostile foreign power who merely needed to bribe, infiltrate, or in the worst-case hack their way into Apple’s
datacentres. And it’ll be entirely our own fault.
Meanwhile the serious terrorist groups will continue to use encryption that isn’t affected by whatever “ban” the UK can put into place (Al Qaeda were known to have developed their own
wrapper around PGP, for example, decades ago), the child pornography rings will continue to tunnel traffic around whatever dark web platform they’ve made for themselves (I’m curious
whether they’re actually being smart or not, but that’s not something I even remotely want to research), and either will still only be caught when they get sloppy and/or as the
result of good old-fashioned police investigations.
Weakened and backdoored encryption in mainstream products doesn’t help you catch smart criminals. But it does help smart criminals to catch regular folks.
Footnotes
1 The smart criminals will start – or more-likely will already be using – forms of
encryption that aren’t, and can’t, be prevented by legislation. Because fundamentally, cryptography is just maths. Incidentally, I assume you know that you can send me encrypted email that nobody else can read?
I had a smug moment when I saw security researcher Rob Ricci and friends’ paper empirically analysing brute-force attacks against SSH “in the wild”.1 It turns out that putting all your SSH servers on “weird” port
numbers – which I’ve routinely done for over a decade – remains a pretty-effective way to stop all that unwanted traffic2,
whether or not you decide to enhance that with some fail2ban magic.
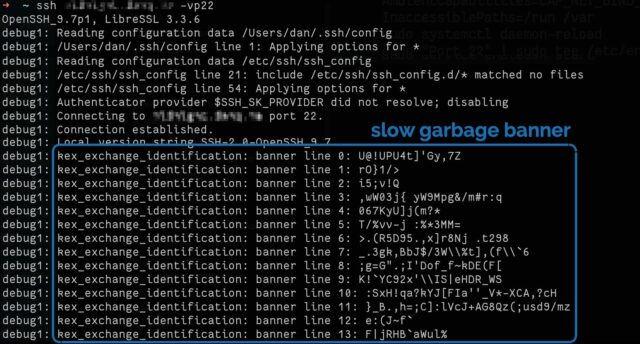
I was just setting up a new Debian 12 server when I learned about this. I’d already moved the SSH server port away from the default 224, so I figured
I’d launch Endlessh on port 22 to slow down and annoy scanners.
Installation wasn’t as easy as I’d hoped considering there’s a package. Here’s what I needed to do:
Move any existing SSH server to a different port, if you haven’t already, e.g. as shown in the footnotes.
change InaccessiblePaths=/run /var into InaccessiblePaths=/var
Reload the modified service: sudo systemctl daemon-reload
Configure Endlessh to run on port 22 rather than its default of 2222: echo "Port 22" | sudo tee /etc/endlessh/config
Start Endlessh: sudo service endlessh start
To test if it’s working, connect to your SSH server on port 22 with your client in verbose mode, e.g. ssh -vp22 example.com and look for banner lines full of random garbage
appearing at 10 second intervals.
It doesn’t provide a significant security, but you get to enjoy the self-satisfied feeling that you’re trolling dozens of opportunistic script kiddies a day.
Footnotes
1 It’s a good paper in general, if that’s your jam.
2 Obviously you gain very little security by moving to an unusual port number, given that
you’re already running your servers in “keys-only” (PasswordAuthentication no) configuration mode already, right? Right!? But it’s nice to avoid all the unnecessary
logging that wave after wave of brute-force attempts produce.
3 Which I can only assume is pronounced endle-S-S-H, but regardless of how it’s said out
loud I appreciate the wordplay of its name.
4 To move your SSH port, you might run something like echo "Port 12345" | sudo tee
/etc/ssh/sshd_config.d/unusual-port.conf and restart the service, of course.
I was browsing (BBC) Good Food today when I noticed something I’d not seen before: a “premium” recipe, available on their “app only”:
I clicked on the “premium” recipe and… it
looked just like any other recipe. I guess it’s not actually restricted after all?
Just out of curiosity, I fired up a more-vanilla web browser and tried to visit the same page. Now I saw an overlay and modal attempting1 to
restrict access to the content:
It turns out their entire effort to restrict access to their premium content… is implemented in client-side JavaScript. Even when I did see the overlay and not get access to
the recipe, all I needed to do was open my browser’s debugger and run document.body.classList.remove('tp-modal-open'); for(el of document.querySelectorAll('.tp-modal,
.tp-backdrop')) el.remove(); and all the restrictions were lifted.
What a complete joke.
Why didn’t I even have to write my JavaScript two-liner to get past the restriction in my primary browser? Because I’m running privacy-protector Ghostery, and one of the services Ghostery blocks by-default is one called Piano. Good Food uses Piano to segment their audience in your
browser, but they haven’t backed that by any, y’know, actual security so all of their content, “premium” or not, is available to anybody.
I’m guessing that Immediate Media (who bought the BBC Good Food brand a while back and have only just gotten around to stripping “BBC” out of
the name) have decided that an ad-supported model isn’t working and have decided to monetise the site a little differently2.
Unfortunately, their attempt to differentiate premium from regular content was sufficiently half-hearted that I barely noticed that, too, gliding through the paywall without
even noticing were it not for the fact that I wondered why there was a “premium” badge on some of their recipes.
You know what website I miss? OpenSourceFood.com. It went downhill and then died around 2016, but for a while it was excellent.
Recipes probably aren’t considered a high-value target, of course. But I can tell you from experience that sometimes companies make basically this same mistake with much
more-sensitive systems. The other year, for example, I discovered (and ethically disclosed) a fault in the implementation of the login forms of a major UK mobile network that meant that
two-factor authentication could be bypassed entirely from the client-side.
These kinds of security mistakes are increasingly common on the Web as we train developers to think about the front-end first (and sometimes, exclusively). We need to do
better.
Footnotes
1 The fact that I could literally see the original content behind the modal
was a bit of a giveaway that they’d only hidden it, not actually protected it in any way.
2 I can see why they’d think that: personally, I didn’t even know there were ads
on the site until I did the experiment above: turns out I was already blocking them, too, along with any anti-ad-blocking scripts that might have been running alongside.
I was contacted this week by a geocacher called Dominik who, like me, loves geocaching…. but hates it when the coordinates for a cache are hidden behind a virtual jigsaw puzzle.
A popular online jigsaw tool used by lazy geocache owners is Jigidi: I’ve come up with severaltechniques for bypassing their puzzles or at
least making them easier.
Not just any puzzle; the geocache used an ~1000 piece puzzle! Ugh!
I experimented with a few ways to work-around the jigsaw, e.g. dramatically increasing the “snap range” so dragging a piece any distance would result in it jumping to a
neighbour, and extracting original image URLs from localStorage. All were good, but none were
perfect.
For a while, making pieces “snap” at any range seemed to be the best hacky workaround.
Then I realised that – unlike Jigidi, where there can be a congratulatory “completion message” (with e.g. geocache coordinates in) – in JigsawExplorer the prize is seeing the
completed jigsaw.
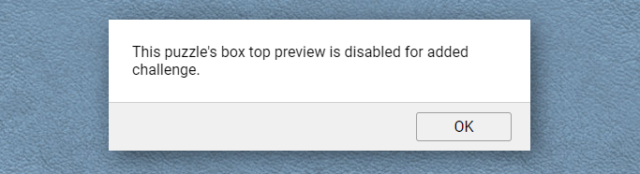
You can click a button to see the “box” of a jigsaw, but this can be disabled by the image uploader.
Let’s work on attacking that bit of functionality. After all: if we can bypass the “added challenge” we’ll be able to see the finished jigsaw and, therefore, the geocache
coordinates. Like this:
Hackaround
Here’s how it’s done. Or keep reading if you just want to follow the instructions!
Open a jigsaw and try the “box cover” button at the top. If you get the message “This puzzle’s box top preview is disabled for added challenge.”, carry on.
Open your browser’s debug tools (F12) and navigate to the Sources tab.
Find the jigex-prog.js file. Right-click and select Override Content (or Add Script Override).
In the overridden version of the file, search for the string – e&&e.customMystery?tt.msgbox("This puzzle's box top preview is disabled for added challenge."): –
this code checks if the puzzle has the “custom mystery” setting switched on and if so shows the message, otherwise (after the :) shows the box cover.
Carefully delete that entire string. It’ll probably appear twice.
Reload the page. Now the “box cover” button will work.
The moral, as always, might be: don’t put functionality into the client-side JavaScript if you don’t want the user to be able to bypass it.
Or maybe the moral is: if you’re going to make a puzzle geocache, put some work in and do something clever, original, and ideally with fieldwork rather than yet another low-effort
“upload a picture and choose the highest number of jigsaw pieces to cut it into from the dropdown”.
This post is also available as an article. So
if you'd rather read a conventional blog post of this content, you can!
This is a video version of my blog post, Length Extension Attack. In it, I talk through the theory of length extension
attacks and demonstrate an SHA-1 length extension attack against an (imaginary) website.
This post is also available as a video. If you'd
prefer to watch/listen to me talk about this topic, give it a look.
Prefer to watch/listen than read? There’s a vloggy/video version of this post in which I explain all the
key concepts and demonstrate an SHA-1 length extension attack against an imaginary site.
I understood the concept of a length traversal
attack and when/how I needed to mitigate them for a long time before I truly understood why they worked. It took until work provided me an opportunity to play with one in practice (plus reading Ron Bowes’ excellent article on the subject) before I really grokked it.
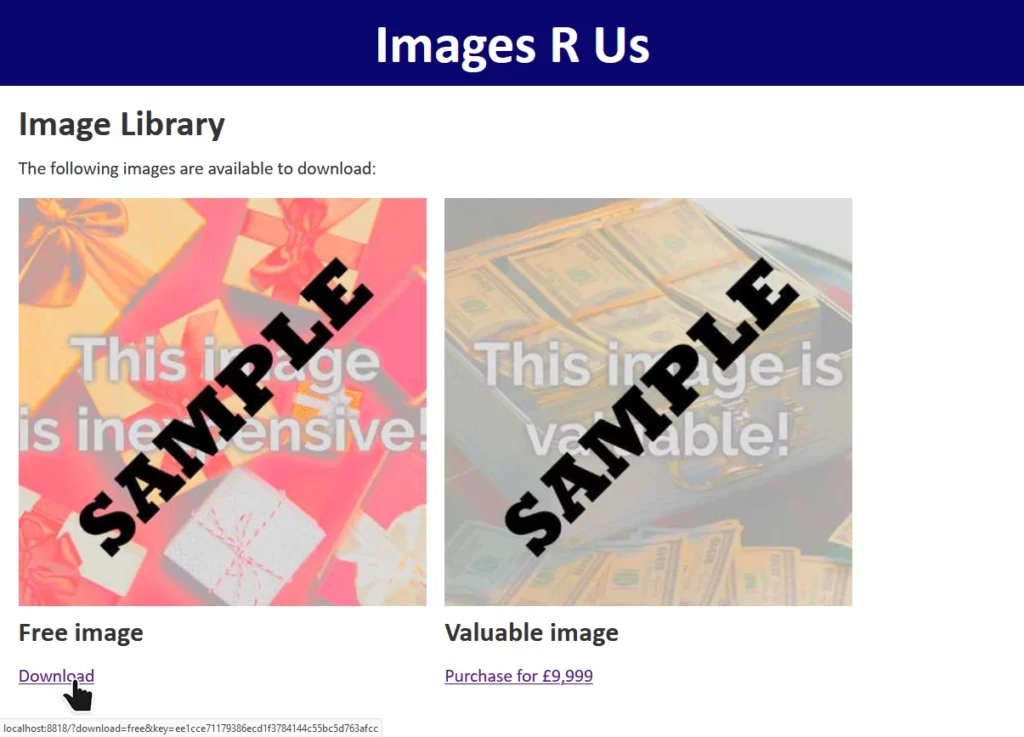
For the demonstration, I’ve built a skeletal stock photography site whose download links are protected by a hash of the link parameters, salted using a secret string stored securely
on the server. Maybe they let authorised people hotlink the images or something.
You can check out the code and run it using the instructions in the
repository if you’d like to play along.
Using hashes as message signatures
The site “Images R Us” will let you download images you’ve purchased, but not ones you haven’t. Links to the images are protected by a SHA-1 hash1, generated as follows:
The nature of hashing algorithms like SHA-1 mean that even a small modification to the inputs, e.g. changing one character in
the word “free”, results in a completely different output hash which can be detected as invalid.
When a “download” link is generated for a legitimate user, the algorithm produces a hash which is appended to the link. When the download link is clicked, the same process is followed
and the calculated hash compared to the provided hash. If they differ, the input must have been tampered with and the request is rejected.
Without knowing the secret key – stored only on the server – it’s not possible for an attacker to generate a valid hash for URL parameters of the attacker’s choice. Or is it?
Changing download=free to download=valuable invalidates the hash, and the request is denied.
Actually, it is possible for an attacker to manipulate the parameters. To understand how, you must first understand a little about how SHA-1 and its siblings actually work:
SHA-1‘s inner workings
The message to be hashed (SECRET_KEY + URL_PARAMS) is cut into blocks of a fixed size.2
The final block is padded to bring it up to the full size.3
A series of operations are applied to the first block: the inputs to those operations are (a) the contents of the block itself, including any padding, and (b) an initialisation
vector defined by the algorithm.4
The same series of operations are applied to each subsequent block, but the inputs are (a) the contents of the block itself, as before, and (b) the output of the previous
block. Each block is hashed, and the hash forms part of the input for the next.
The output of running the operations on the final block is the output of the algorithm, i.e. the hash.
SHA-1 operates on a single block at a time, but the output of processing each block acts as part of the input of the one that
comes after it. Like a daisy chain, but with cryptography.
In SHA-1, blocks are 512 bits long and the padding is a 1, followed by as many 0s as is necessary,
leaving 64 bits at the end in which to specify how many bits of the block were actually data.
Padding the final block
Looking at the final block in a given message, it’s apparent that there are two pieces of data that could produce exactly the same output for a given function:
The original data, (which gets padded by the algorithm to make it 64 bytes), and
A modified version of the data, which has be modified by padding it in advance with the same bytes the algorithm would; this must then be followed by an
additional block
A “short” block with automatically-added padding produces the same output as a full-size block which has been pre-populated with the same data as the padding would
add.5In the case where we insert our own “fake” padding data, we can provide more message data after the padding and predict the overall hash. We can do this because
we the output of the first block will be the same as the final, valid hash we already saw. That known value becomes one of the two inputs into the function for the block that
follows it (the contents of that block will be the other input). Without knowing exactly what’s contained in the message – we don’t know the “secret key” used to salt it – we’re
still able to add some padding to the end of the message, followed by any data we like, and generate a valid hash.
Therefore, if we can manipulate the input of the message, and we know the length of the message, we can append to it. Bear that in mind as we move on to the other half
of what makes this attack possible.
Parameter overrides
“Images R Us” is implemented in PHP. In common with most server-side scripting languages,
when PHP sees a HTTP query string full of key/value pairs, if
a key is repeated then it overrides any earlier iterations of the same key.
Many online sources say that this “last variable matters” behaviour is a fundamental part of HTTP, but it’s not: you can
disprove is by examining $_SERVER['QUERY_STRING'] in PHP, where you’ll find the entire query string.
You could even implement your own query string handler that instead makes the first instance of each key the canonical one, if you really wanted.6It’d be tempting to simply override the download=free parameter in the query string at “Images R Us”, e.g. making it
download=free&download=valuable! But we can’t: not without breaking the hash, which is calculated based on the entire query string (minus the &key=...
bit).
But with our new knowledge about appending to the input for SHA-1 first a padding string, then an extra block containing our
payload (the variable we want to override and its new value), and then calculating a hash for this new block using the known output of the old final block as the
IV… we’ve got everything we need to put the attack together.
Putting it all together
We have a legitimate link with the query string download=free&key=ee1cce71179386ecd1f3784144c55bc5d763afcc. This tells us that somewhere on the server, this is
what’s happening:
I’ve drawn the secret key actual-size (and reflected this in the length at the bottom). In reality, you might not know this, and some trial-and-error might be necessary.7If we pre-pad the string download=free with some special characters to replicate the padding that would otherwise be added to this final8 block, we can add a second block containing
an overriding value of download, specifically &download=valuable. The first value of download=, which will be the word free followed by
a stack of garbage padding characters, will be discarded.
And we can calculate the hash for this new block, and therefore the entire string, by using the known output from the previous block, like this:
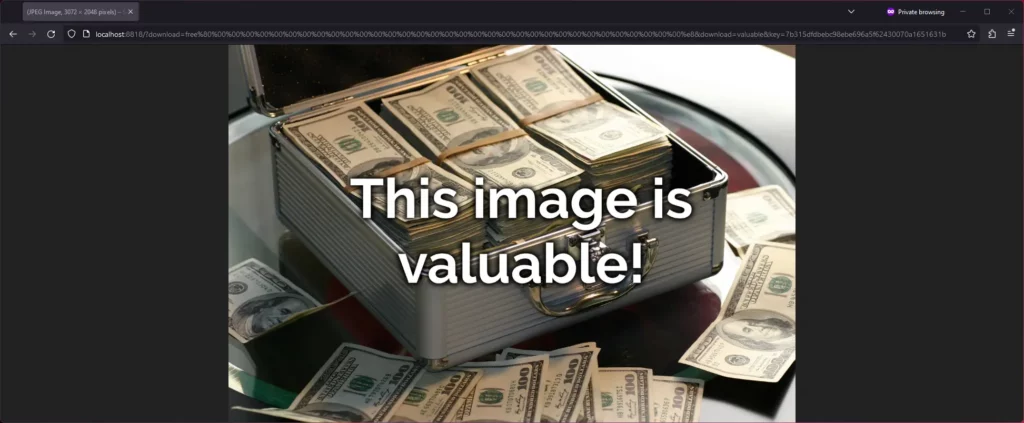
The URL will, of course, be pretty hideous with all of those special characters – which will require percent-encoding – on the end of the word ‘free’.
Doing it for real
Of course, you’re not going to want to do all this by hand! But an understanding of why it works is important to being able to execute it properly. In the wild, exploitable
implementations are rarely as tidy as this, and a solid comprehension of exactly what’s happening behind the scenes is far more-valuable than simply knowing which tool to run and what
options to pass.
That said: you’ll want to find a tool you can run and know what options to pass to it! There are plenty of choices, but I’ve bundled one called hash_extender into my example, which will do the job pretty nicely:
which algorithm to use (sha1), which can usually be derived from the hash length,
the existing data (download=free), so it can determine the length,
the length of the secret (16 bytes), which I’ve guessed but could brute-force,
the existing, valid signature (ee1cce71179386ecd1f3784144c55bc5d763afcc),
the data I’d like to append to the string (&download=valuable), and
the format I’d like the output in: I find html the most-useful generally, but it’s got some encoding quirks that you need to be aware of!
hash_extender outputs the new signature, which we can put into the key=... parameter, and the new string that replaces download=free, including
the necessary padding to push into the next block and your new payload that follows.
Unfortunately it does over-encode a little: it’s encoded all the& and = (as %26 and %3d respectively), which isn’t what we
wanted, so you need to convert them back. But eventually you end up with the URL:
http://localhost:8818/?download=free%80%00%00%00%00%00%00%00%00%00%00%00%00%00%00%00%00%00%00%00%00%00%00%00%00%00%00%00%00%00%00%00%00%00%e8&download=valuable&key=7b315dfdbebc98ebe696a5f62430070a1651631b.
Disclaimer: the image you get when you successfully exploit the test site might not actually be valuable.
And that’s how you can manipulate a hash-protected string without access to its salt (in some circumstances).
Mitigating the attack
The correct way to fix the problem is by using a HMAC in place
of a simple hash signature. Instead of calling sha1( SECRET_KEY . urldecode( $params ) ), the code should call hash_hmac( 'sha1', urldecode( $params ), SECRET_KEY
). HMACs are theoretically-immune to length extension attacks, so long as the output of the hash function used is
functionally-random9.
Ideally, it should also use hash_equals( $validDownloadKey, $_GET['key'] ) rather than ===, to mitigate the possibility of a timing attack. But that’s another story.
Footnotes
1 This attack isn’t SHA1-specific: it works just as well on many other popular hashing algorithms too.
2 SHA-1‘s blocks are 64 bytes
long; other algorithms vary.
3 For SHA-1, the padding bits
consist of a 1 followed by 0s, except the final 8-bytes are a big-endian number representing the length of the message.
4 SHA-1‘s IV is 67452301 EFCDAB89 98BADCFE 10325476 C3D2E1F0, which you’ll observe is little-endian counting from 0 to
F, then back from F to 0, then alternating between counting from 3 to 0 and C to F. It’s
considered good practice when developing a new cryptographic system to ensure that the hard-coded cryptographic primitives are simple, logical, independently-discoverable numbers like
simple sequences and well-known mathematical constants. This helps to prove that the inventor isn’t “hiding” something in there, e.g. a mathematical weakness that depends on a
specific primitive for which they alone (they hope!) have pre-calculated an exploit. If that sounds paranoid, it’s worth knowing that there’s plenty of evidence that various spy
agencies have deliberately done this, at various points: consider the widespread exposure of the BULLRUN programme and its likely influence on Dual EC
DRBG.
5 The padding characters I’ve used aren’t accurate, just representative. But there’s the
right number of them!
6 You shouldn’t do this: you’ll cause yourself many headaches in the long run. But you
could.
7 It’s also not always obvious which inputs are included in hash generation and how
they’re manipulated: if you’re actually using this technique adversarily, be prepared to do a little experimentation.
8 In this example, the hash operates over a single block, but the exact same principle
applies regardless of the number of blocks.
9 Imagining the implementation of a nontrivial hashing algorithm, the predictability of
whose output makes their HMAC vulnerable to a length extension attack, is left as an exercise for the reader.
A year and a half ago I came up with a technique for intercepting the “shuffle” operation
on jigsaw website Jigidi, allowing players to force the pieces to appear in a consecutive “stack” for ludicrously easy solving. I did this
partially because I was annoyed that a collection of geocaches near me used Jigidi puzzles as a barrier to their coordinates1…
but also because I enjoy hacking my way around artificially-imposed constraints on the Web (see, for example, my efforts last week to circumvent region-blocking on radio.garden).
My solver didn’t work for long: code changes at Jigidi’s end first made it harder, then made it impossible, to use the approach I suggested. That’s fine by me – I’d already got what I
wanted – but the comments thread on that post suggests that there’s
a lot of people who wish it still worked!2
And so I ignored the pleas of people who wanted me to re-develop a “Jigidi solver”. Until recently, when I once again needed to solve a jigsaw puzzle in order to find a geocache’s
coordinates.
Making A Jigidi Helper
Rather than interfere with the code provided by Jigidi, I decided to take a more-abstract approach: swapping out the jigsaw’s image for one that would be easier.
This approach benefits from (a) having multiple mechanisms of application: query interception, DNS hijacking, etc., meaning that if one stops working then another one can be easily
rolled-out, and (b) not relying so-heavily on the structure of Jigidi’s code (and therefore not being likely to “break” as a result of future upgrades to Jigidi’s platform).
It’s not as powerful as my previous technique – more a “helper” than a “solver” – but it’s good enough to shave at least half the time off that I’d otherwise spend solving a Jigidi
jigsaw, which means I get to spend more time out in the rain looking for lost tupperware. (If only geocaching were even the weirdest of my hobbies…)
How To Use The Jigidi Helper
To do this yourself and simplify your efforts to solve those annoying “all one colour” or otherwise super-frustrating jigsaw puzzles, here’s what you do:
Visit a Jigidi jigsaw. Do not be logged-in to a Jigidi account.
Open your browser’s debug tools (usually F12). In the Console tab, paste it and press enter. You can close your debug tools again (F12) if you like.
Press Jigidi’s “restart” button, next to the timer. The jigsaw will restart, but the picture will be replaced with one that’s easier-to-solve than most, as described below.
Once you solve the jigsaw, the image will revert to normal (turn your screen around and show off your success to a friend!).
What makes it easier to solve?
The replacement image has the following characteristics that make it easier to solve than it might otherwise be:
Every piece has written on it the row and column it belongs in.
Every “column” is striped in a different colour.
Striped “bands” run along entire rows and columns.
To solve the jigsaw, start by grouping colours together, then start combining those that belong in the same column (based on the second digit on the piece). Join whole or partial
columns together as you go.
I’ve been using this technique or related ones for over six months now and no code changes on Jigidi’s side have impacted upon it at all, so it’s probably got better longevity than the
previous approach. I’m not entirely happy with it, and you might not be either, so feel free to fork my code and improve it: the legiblity of the numbers is sometimes suboptimal, and
the colour banding repeats on larger jigsaws which I’d rather avoid. There’s probably also potential to improve colour-recognition by making the colour bands span the gaps
between rows or columns of pieces, too, but more experiments are needed and, frankly, I’m not the right person for the job. For the second time, I’m going to abandon a tool
that streamlines Jigidi solving because I’ve already gotten what I needed out of it, and I’ll leave it up to you if you want to come up with an improvement and share it with the
community.
Footnotes
1 As I’ve mentioned before, and still nobody believes me: I’m not a fan of jigsaws! If you
enjoy them, that’s great: grab a bucket of popcorn and a jigsaw and go wild… but don’t feel compelled to share either with me.
2 The comments also include asuper-helpful person called Rich who’s been manually
solving people’s puzzles for them, and somebody called Perdita
who “could be my grandmother” (except: no) with whom I enjoyed a
conversation on- and off-line about the ethics of my technique. It’s one of the most-popular comment threads my blog has ever seen.
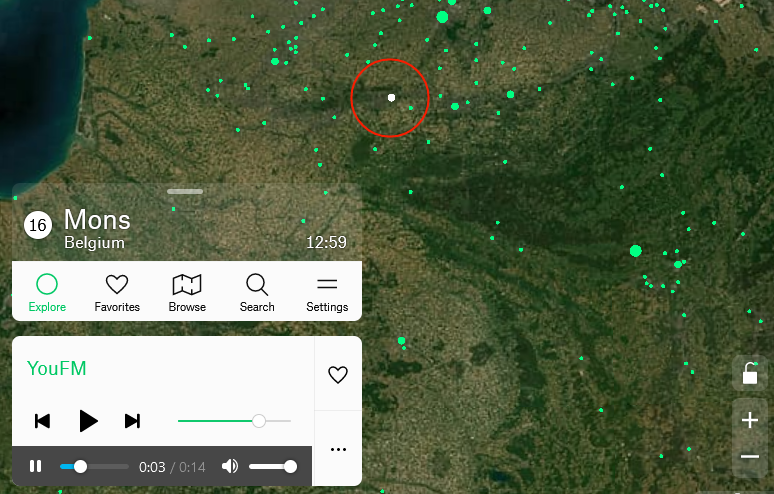
I must be the last person on Earth to have heard about radio.garden (thanks
Pepsilora!), a website that uses a “globe” interface to let you tune in to radio stations around the globe. But I’d only used it for a couple of minutes before I discovered that
there are region restrictions in place. Here in the UK, and perhaps elsewhere, you can’t listen to stations in other countries without
using a VPN or similar tool… which might introduce a different region’s restrictions!
Install this userscript;
it’s hacky – I threw it together in under half an hour – but it seems to work!
My approach is super lazy and simply injects a second audio player – which ignores region restrictions – below the original.
How does this work and how did I develop it?
For those looking to get into userscripting, here’s a quick tutorial on what I did to develop this bypass.
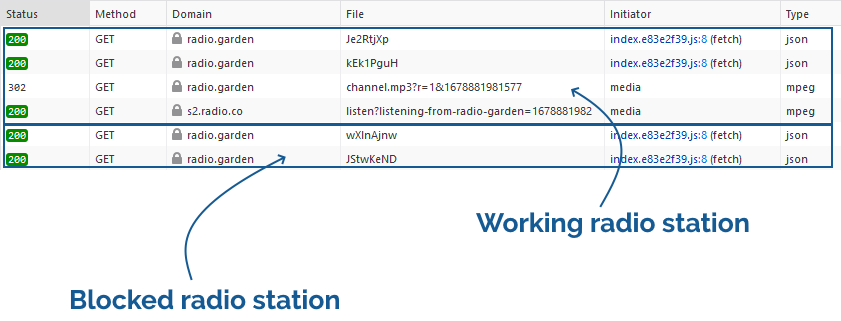
First, I played around with radio.garden for a bit to get a feel for what it was doing. I guessed that it must be tuning into a streaming URL when you select a radio station, so I opened by browser’s debugger on the Network tab and looked at what happened when I clicked on a “working”
radio station, and how that differed when I clicked on a “blocked” one:
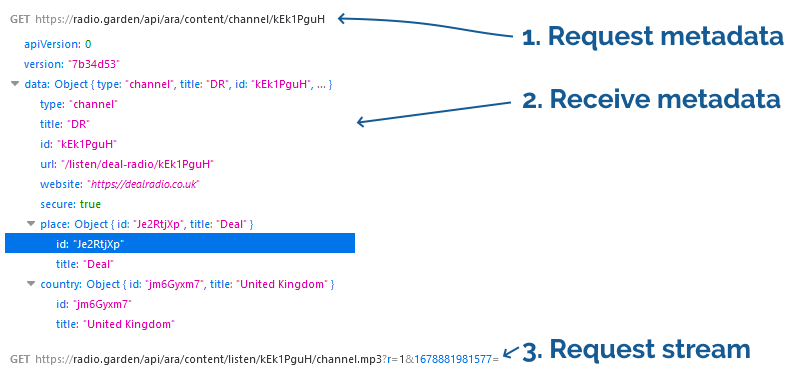
When connecting to a station, a request is made for some JSON that contains station metadata. Then, for a working
station, a request is made for an address like /api/ara/content/listen/[ID]/channel.mp3. For a blocked station, this request isn’t made.
I figured that the first thing I’d try would be to get the [ID] of a station that I’m not permitted to listen to and manually try the URL to see if it was actually blocked, or merely not-being-loaded. Looking at a working station, I first found the ID in the
JSON response and I was about to extract it when I noticed that it also appeared in the request for the
JSON: that’s pretty convenient!
My hypothesis was
that the “blocking” is entirely implemented in the front-end: that the JavaScript code that makes the pretty bits work is looking at the “country” data that’s returned and using that to
decide whether or not to load the audio stream. That provides many different ways to bypass it, from manipulating the JavaScript to remove that functionality, to altering the
JSON response so that every station appears to be in the user’s country, to writing some extra code that intercepts the
request for the metadata and injects an extra audio player that doesn’t comply with the regional restrictions.
But first I needed to be sure that there wasn’t some actual e.g. IP-based blocking on the streams. To do this, first I took the
/api/ara/content/listen/[ID]/channel.mp3 address of a known-working station and opened it in VLC using Media
> Open Network Stream…. That worked. Then I did the same thing again, but substituted the [ID] part of the address with the ID of a “blocked” station.
VLC happily started spouting French to me: the bypass would, in theory, work!
Next, I needed to get that to work from within the site itself. It’s implemented in React, which is a pig to inject code into because it uses horrible identifiers for
DOM elements. But of course I knew that there’d be this tell-tale fetch request for the station metadata that I
could tap into, so I used this technique to override the native fetch method and
replace it with my own “wrapper” that logged the stream address for any radio station I clicked on. I tested the addresses this produced using my browser.
That all worked nicely, so all I needed to do now was to use those addresses rather than simply logging them. Rather that get into the weeds reverse-engineering the built-in
player, I simply injected a new <audio> element after it and pointed it at the correct address, and applied a couple of CSS tweaks to make it fit in nicely.
The only problem was that on UK-based radio stations I’d now hear a slight echo, because the original player was still working. I
could’ve come up with an elegant solution to this, I’m sure, but I went for a quick-and-dirty hack: I used res.json() to obtain the body of the metadata response… which
meant that the actual code that requested it would no longer be able to get it (you can only decode the body of a fetch response once!). radio.garden’s own player treats this as an
error and doesn’t play that radio station, but my new <audio> element still plays it perfectly well.
It’s not pretty, but it’s functional. You can read the finished source code on Github. I don’t anticipate
that I’ll be maintaining this script so if it stops working you’ll have to fix it yourself, and I have no intention of “finishing” it by making it nicer or prettier. I just wanted to
share in case you can learn anything from my approach.
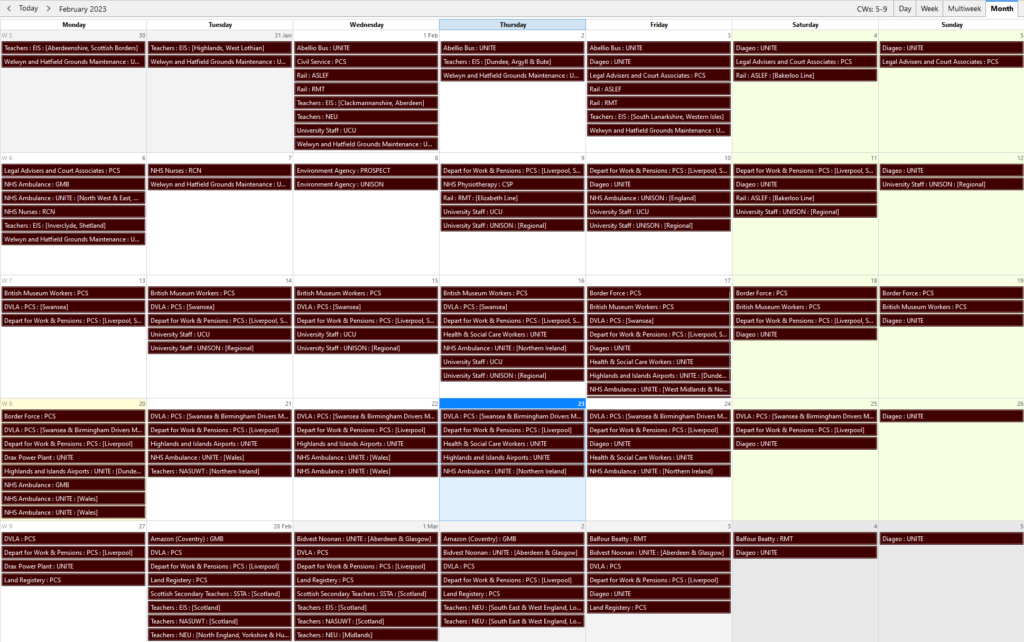
My work colleague Simon was looking for a way to add all of the
upcoming UK strike action to their calendar, presumably so they know when not to try to catch a bus or require an ambulance or maybe
just so they’d know to whom they should be giving support on any particular day. Thom was able to suggest a
few places to see lists of strikes, such as this BBC News page and the comprehensive strikecalendar.co.uk, but neither provided a handy machine-readable feed.
Gosh, there’s a lot of strikes going on. ✊
If only they knew somebody who loves an excuse to throw a screen-scraper together. Oh wait, that’s me!
I threw together a 36-line Ruby program that extracts all the data from strikecalendar.co.uk and outputs an
.ics file. I guess if you wanted you could set it up to automatically update the file a couple of times a day and host it at a URL that people can subscribe to; that’s an exercise left for the reader.
If you just want a one-off import based on the state-of-play right now, though, you can save this .ics file to your computer
and import it to your calendar. Simple.
I’ve been playing with a Flic Hub LR and some Flic 2 buttons. They’re “smart home” buttons, but for me they’ve got a killer selling point: rather than
locking you in to any particular cloud provider (although you can do this if you want), you can directly program the hub. This means you can produce smart integrations
that run completely within the walls of your house.
Here’s some things I’ve been building:
Prerequisite: Flic Hub to Huginn connection
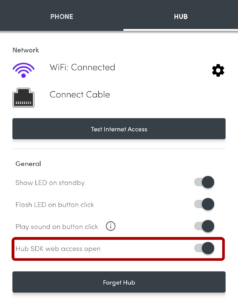
Step 1. Enable SDK access. Check!
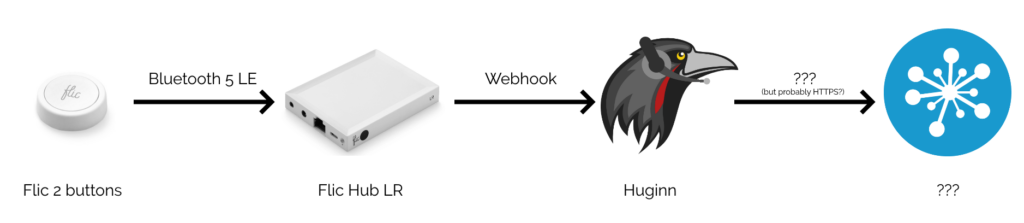
I run a Huginn instance on our household NAS. If
you’ve not come across it before, Huginn is a bit like an open-source IFTTT: it’s got a steep
learning curve, but it’s incredibly powerful for automation tasks. The first step, then, was to set up my Flic Hub LR to talk to Huginn.
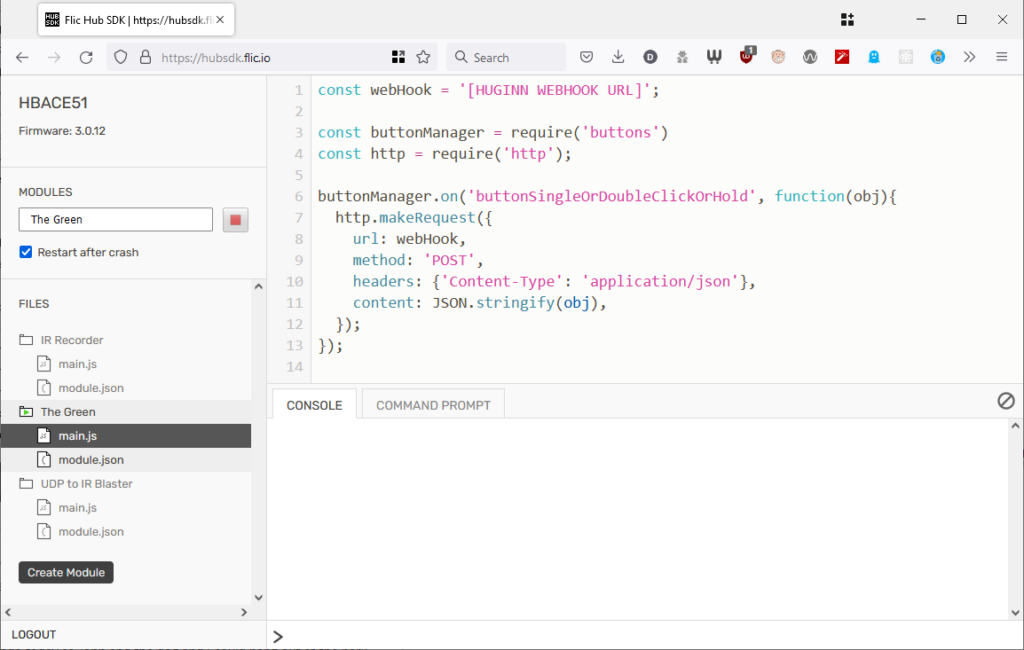
Checking ‘Restart after crash’ seems to help ensure that the script re-launches after e.g. a power cut. Need
the script?
This was pretty simple: all I had to do was switch on “Hub SDK web access open” for the hub using the Flic app,
then use the the web SDK to add this script to the hub. Now whenever a
button was clicked, double-clicked, or held down, my Huginn installation would receive a webhook ping.
Depending on what you have Huginn do “next”, this kind of set-up works completely independently of “the cloud”. (Your raven can fly into the clouds if you really want.)
For convenience, I have all button-presses sent to the same Webhook, and use Trigger Agents to differentiate between buttons and press-types. This means I can re-use
functionality within Huginn, e.g. having both a button press and some other input trigger a particular action.
You’ve Got Mail!
By our front door, we have “in trays” for each of Ruth, JTA and I, as well as one for the
bits of Three Rings‘ post that come to our house. Sometimes post sits in the in-trays for a long time because people don’t think to check
them, or don’t know that something new’s been added.
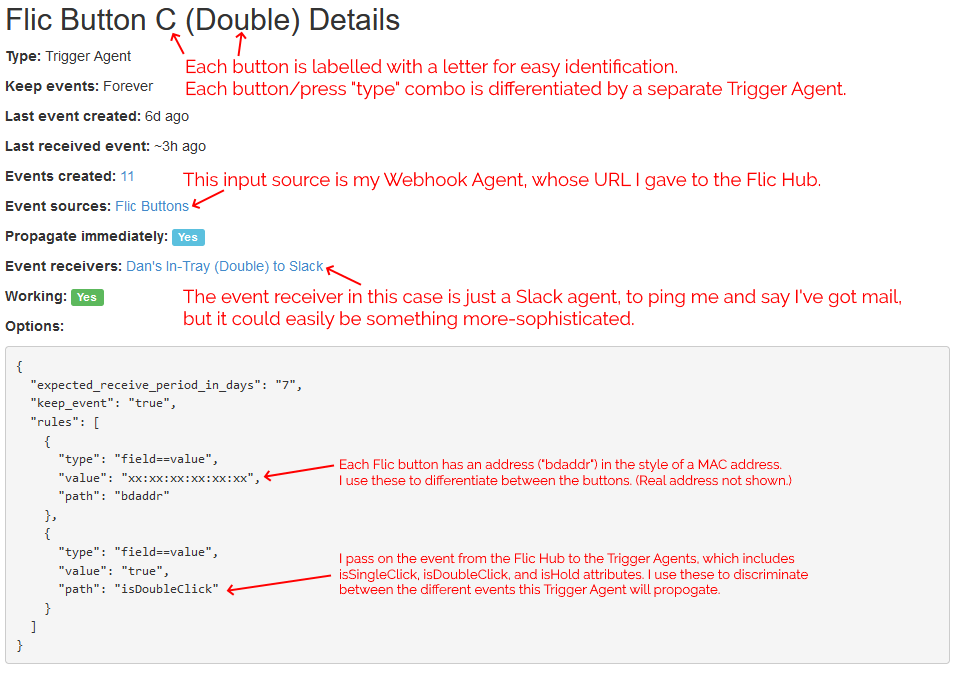
I configured Huginn with a Trigger Agent to receive events from my webhook and filter down to just single clicks on specific buttons. The events emitted by these triggers are used to
notify in-tray owners.
Once you’ve made three events for your first button, you can copy-paste from then on.
In my case, I’ve got pings being sent to mail recipients via Slack, but I could equally well be integrating to other (or additional) endpoints or even
performing some conditional logic: e.g. if it’s during normal waking hours, send a Pushbullet notification to the recipient’s phone, otherwise
send a message to an Arduino to turn on an LED strip along the top of the recipient’s in-tray.
I’m keeping it simple for now. I track three kinds of events (click = “post in your in-tray”, double-click = “I’ve cleared my in-tray”, hold = “parcel wouldn’t fit in your in-tray: look
elsewhere for it”) and don’t do anything smarter than send notifications. But I think it’d be interesting to e.g. have a counter running so I could get a daily reminder (“There
are 4 items in your in-tray.”) if I don’t touch them for a while, or something?
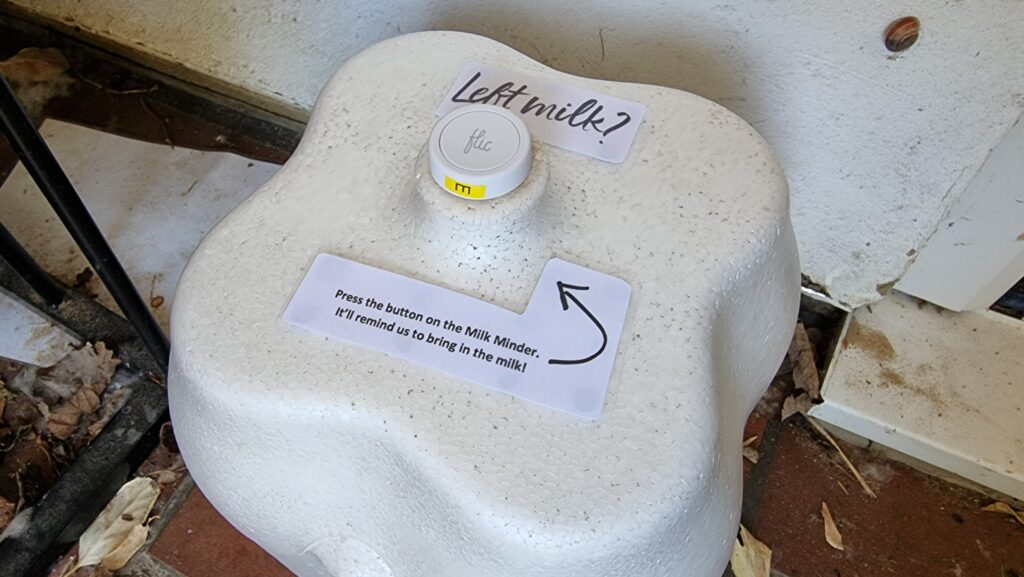
Remember the Milk!
Following the same principle, and with the hope that the Flic buttons are weatherproof enough to work in a covered outdoor area, I’ve fitted one… to the top of the box our milkman
delivers our milk into!
The handle on the box was almost exactly the right size to stick a Flic button to! But it wasn’t flat enough until I took a file to it.
Most mornings, our milkman arrives by 7am, three times a week. But some mornings he’s later – sometimes as late as 10:30am, in extreme cases. If he comes during the school run the milk
often gets forgotten until much later in the day, and with the current weather that puts it at risk of spoiling. Ironically, the box we use to help keep the milk cooler for longer on
the doorstep works against us because it makes the freshly-delivered bottles less-visible.
Now that I had the technical infrastructure already in place, honestly the hardest part of this project was matching the font used in Milk &
More‘s logo.
I’m yet to see if the milkman will play along and press the button when he drops off the milk, but if he does: we’re set! A second possible bonus is that the kids love doing anything
that allows them to press a button at the end of it, so I’m optimistic they’ll be more-willing to add “bring in the milk” to their chore lists if they get to double-click the button to
say it’s been done!
Future Plans
I’m still playing with ideas for the next round of buttons. Could I set something up to streamline my work status, so my colleagues know when I’m not to be disturbed, away from my desk,
or similar? Is there anything I can do to simplify online tabletop roleplaying games, e.g. by giving myself a desktop “next combat turn” button?
My Flic Hub is mounted behind a bookshelf in the living room, with only its infrared transceiver exposed. 20p for scale: we don’t keep a 20p piece stuck to the side of the bookcase
all the time.
I’m quite excited by the fact that the Flic Hub can interact with an infrared transceiver, allowing it to control televisions and similar devices: I’d love to be able to use the volume
controls on our media centre PC’s keyboard to control our TV’s soundbar: and because the Flic Hub can listen for UDP packets, I’m hopeful that something as simple as AutoHotkey can make this possible.
Or perhaps I could make a “universal remote” for our house, accessible as a mobile web app on our internal Intranet, for those occasions when you can’t even be bothered to stand up to
pick up the remote from the other sofa. Or something that switched the TV back to the media centre’s AV input when consoles were powered-down, detected by their network activity? (Right
now the TV automatically switches to the consoles when they’re powered-on, but not back again afterwards, and it bugs me!)
It feels like the only limit with these buttons is my imagination, and that’s awesome.