The video below is presented in portrait orientation, because your screen is taller than it is wide.
The video below is presented in landscape orientation, because your screen is wider than it is tall.
The video below is presented in square orientation (the Secret Bonus Square Video!), because your screen has approximately the same width as as its height. Cool!
This is possible (with a single <video> element, and without any Javascript!) thanks to some cool HTML features you might not be aware of, which I’ll briefly explain
in the video. Or scroll down for the full details.
Variable aspect-ratio videos in pure HTML
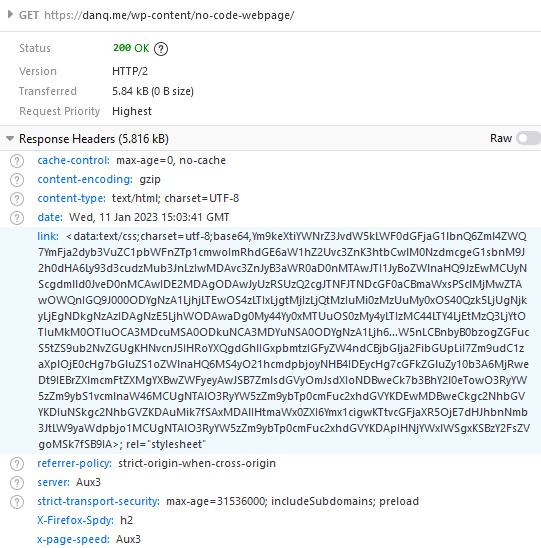
I saw a 2023 blog post by Scott Jehl about how he helped Firefox 120 (re)gain support
for the <source media="..."> attribute. Chrome added support later that year,
and Safari already had it. This means that it’s pretty safe to do something like this:
<video controls>
  <source src="squareish.mp4"
        media="(min-aspect-ratio: 0.95) and (max-aspect-ratio: 1.05)" />
  <source src="portrait.mp4"
        media="(orientation: portrait)" />
  <source src="landscape.mp4" />
</video>
squareish.mp4 which is shown to people on “squareish” viewports, failing that portrait.mp4 which is shown to
people whose viewports are taller than wide, and failing that landscape.mp4 which is shown to anybody else.
That’s broadly-speaking how the video above is rendered. No JavaScript needed.
Browsers only handle media queries on videos when they initially load, so you can’t just tip your phone over or resize the window: you’ll need to reload the page, too. But it works! Give it a go: take a look at the video in both portrait and landscape modes and let me know what you think1.
Adding adaptive bitrate streaming with HLS
Here’s another cool technology that you might not have realised you could “just use”: adaptive bitrate streaming with HLS!
You’ve used adaptive bitrate streaming before, though you might not have noticed it. It’s what YouTube, Netflix, etc. are doing when your network connection degrades and you quickly get dropped-down, mid-video, to a lower-resolution version2.
Turns out you can do it on your own static hosting, no problem at all. I used this guide (which has a great description of the parameters used) to help me:
ffmpeg -i landscape.mp4 \
       -filter_complex "[0:v]split=3[v1][v2][v3]; [v1]copy[v1out]; [v2]scale=w=1280:h=720[v2out]; [v3]scale=w=640:h=360[v3out]" \
       -map "[v1out]" -c:v:0 libx264 -x264-params "nal-hrd=cbr:force-cfr=1" -b:v:0 5M -maxrate:v:0 5M -minrate:v:0 5M -bufsize:v:0 10M -preset slow -g 48 -sc_threshold 0 -keyint_min 48 \
       -map "[v2out]" -c:v:1 libx264 -x264-params "nal-hrd=cbr:force-cfr=1" -b:v:1 3M -maxrate:v:1 3M -minrate:v:1 3M -bufsize:v:1 3M -preset slow -g 48 -sc_threshold 0 -keyint_min 48 \
       -map "[v3out]" -c:v:2 libx264 -x264-params "nal-hrd=cbr:force-cfr=1" -b:v:2 1M -maxrate:v:2 1M -minrate:v:2 1M -bufsize:v:2 1M -preset slow -g 48 -sc_threshold 0 -keyint_min 48 \
       -map a:0 -c:a:0 aac -b:a:0 96k -ac 2 \
       -map a:0 -c:a:1 aac -b:a:1 96k -ac 2 \
       -map a:0 -c:a:2 aac -b:a:2 48k -ac 2 \
       -f hls -hls_time 2 -hls_playlist_type vod -hls_flags independent_segments -hls_segment_type mpegts \
       -hls_segment_filename landscape_%v/data%02d.ts \
       -master_pl_name landscape.m3u8 \
       -var_stream_map "v:0,a:0 v:1,a:1 v:2,a:2" landscape_%v.m3u8
landscape.mp4 into three different resolutions: the original “v1” (1920×1080, in my case, with 96kbit audio), “v2” (1280×720, with
96kbit audio), and “v3” (640×360, with 48kbit audio), each with a resolution-appropriate maximum bitrate, and forced keyframes every 48th frame. Then it breaks each of those into HLS
segments (.ts files) and references them from a .m3u8 playlist.
The output from this includes:
- Master playlist
landscape.m3u8, which references the other playlists with reference to their resolution and bandwidth, so that browsers can make smart choices, - Playlists
landscape_0.m3u8(“v1”),landscape_1.m3u8(“v2”), etc., each of which references the “parts” of that video, - Directories
landscape_0/,landscape_1/etc., each of which contain -
data00.ts,data01.ts, etc.: the actual “chunks” that contain the video segments, which can be downloaded independently by the browser as-needed
Bringing it all together
We can bring all of that together, then, to produce a variable-aspect, adaptive bitrate, HLS-streamed video player… in pure HTML and suitable for static hosting:
<video controls>
  <source src="squareish.m3u8"
         type="application/x-mpegURL"
        media="(min-aspect-ratio: 0.95) and (max-aspect-ratio: 1.05)" />

  <source src="portrait.m3u8"
         type="application/x-mpegURL"
        media="(orientation: portrait)" />

  <source src="landscape.m3u8"
         type="application/x-mpegURL" />
</video>
That’ll “just work” in Safari and a handful of mobile browsers… but won’t display anything for most desktop browsers. Boo!
One solution is to also provide the standard .mp4 files as an alternate <source>, and that’s fine I guess, but you lose the benefit of HLS (and
you have to store yet more files). But there’s a workaround:
Polyfill full functionality for all browsers
If you’re willing to use a JavaScript polyfill, you can make the code above work on virtually any device. I gave this a go, here, by:
- Including the polyfill hls.js, and
- Adding some JavaScript code that detects affected `<video>` elements and applying the fix if necessary:
// Find all <video>s which have HLS sources:
for( hlsVideo of document.querySelectorAll('video:has(source[type="application/x-mpegurl"]), video:has(source[type="vnd.apple.mpegurl"])') ) {
  // If the browser has native support, do nothing:
  if( hlsVideo.canPlayType('application/x-mpegurl') || hlsVideo.canPlayType('application/vnd.apple.mpegurl') ) continue;

  // If hls.js can't help fix that, do nothing:
  if ( ! Hls.isSupported() ) continue;

  // Find the best source based on which is the first one to match any applicable CSS media queries
  const bestSource = Array.from(hlsVideo.querySelectorAll('source')).find(source=>window.matchMedia(source.media).matches)

  // Use hls.js to attach the best source:
  const hls = new Hls();
  hls.loadSource(bestSource.src);
  hls.attachMedia(hlsVideo);
}
<video> depend on JavaScript, but if that’s the route you want to go down while we wait for HLS support to become
more widespread (rather than adding different-typed sources) then that’s fine, I guess.
This was a fun dive into some technologies I’ve not had the chance to try before. A fringe benefit of being a generalist full-stack developer is that when you’re “between jobs” you get to play with all the cool things when you’re brushing up your skills before your next big challenge!
(Incidentally: if you think you might be looking to employ somebody like me, my CV is over there!)