Ever wondered why Oxford’s area code is 01865? The story is more-complicated than you’d think.
As a child, I was told that city STD codes were usually associated to the letters that appear on some telephones… but that
wouldn’t make any sense for Oxford’s code!
I’ll share the story on my blog, of course. But before then, I’ll be telling it from the stage of the Jericho Tavern at 21:15 on Wednesday 17 April as
my third(?) appearance at Oxford Geek Nights! So if you’re interested in learning about some of the quirks of UK telephone numbering
history, I can guarantee that this party’s the only one to be at that Wednesday night!
Not your jam? That’s okay: there’s plenty of more-talented people than I who’ll be speaking, about subjects as diverse as quantum computing with QATboxen, bringing your D&D experience to stakeholder management (!), video games
without screens, learnings from the Horizon scandal, and whatever Freyja Domville means by The Unreasonable Effectiveness of the Scientific Method (but I’m seriously excited by that title).
Anyway: I hope you’ll be coming along to Oxford Geek Nights 57 next month, if not to hear me witter on about the
fossils in our telecommunications networks then to enjoy a beer and hear from the amazing speakers I’ll be sharing the stage with. The event’s always a blast, and I’m looking forward to
seeing you there!
There are two junctions at which I can join the A40 trunk road from my house. When I drive East, I use the Easternmost of the two; when I drive West, I use the Westernmost; but I almost
never drive the stretch of road between them!
A few years ago I generated heatmaps of my movements based on my long-running personal location log and, indeed, it shows a “cool spot” along this
section of road too:
Found by the geohound and I after a brief battle with the first stinging nettles of the season. Owie! She and I came over from Stanton Harcourt this morning – from which we see plenty
of Brize Nortons’ Hercules! – because many of our favourite local walks are waterlogged. Things are somewhat drier underfoot here, but after our walk through the fields the pup and I
are still rather muddy! TFTC.
The pup and I unearthed a few likely hiding places without success here. Not sure what we’ve missed: feels like we lifted every hint item in the vicinity!
QEF for the geopup and I on this strangely springlike morning. Cache container is damaged almost beyond recognition, as others have
observed, and is desperately in need of replacement. TFTC.
In August, I celebrated my blog – with its homepage weighing-in at a total of just 481kb – being admitted to Kev Quirk‘s 512kb club. 512kb club celebrates websites (often personal sites) whose homepage are neither “ultra minimal”
or “link pages” but have a total size, including all assets, of under half a megabyte. It’s about making a commitment to a leaner, more-efficient Web.
My relatively-heavyweight homepage only just slipped in under the line. But, feeling inspired perhaps by some performance enhancements I’ve been planning this week at work, I
decided to try to shave a little more off:
Now, at ~234kb, danq.me just beats the excellent gomakethings.com (it’s all those heavyweight fonts, Chris!).
Here’s what I changed:
The “recent article” tiles are dynamically sized based on their number, type, and the visitor’s screen resolution. But apart from the top one they’re almost never very large. Using
thumbnail images for the non-first tile shaved off almost 160kb.
You can see the difference, but it’s still acceptable to look at, I think.
Not space-saving, but while I was in there I ensured that the first tile’s image – which almost-certainly comprises part of the Largest
Contentful Paint – is never delivered with loading="lazy".
I was providing a shortcut icon in .ico format (<link rel="shortcut icon" href="https://bcdn.danq.me/_q23t/icons/favicon-16-32-48-64-128.ico" />),
which is pretty redundant nowadays because all modern browsers (and even IE11)
support .png icons. I was already providing.png and .svg versions, but it turns out that some browsers favour the one with the
(harmful?) rel="shortcut icon" over rel="icon" if both are present, and .ico
files are – being based on Windows Bitmaps – horrendously inefficient.
By getting under the 250kb threshold, I’ve jumped up a league from Blue Team to Orange Team, so that’s nice too. I can’t see a meaningful
path from where I’m at to Green Team (under 100kb) though, so this level might have to suffice.
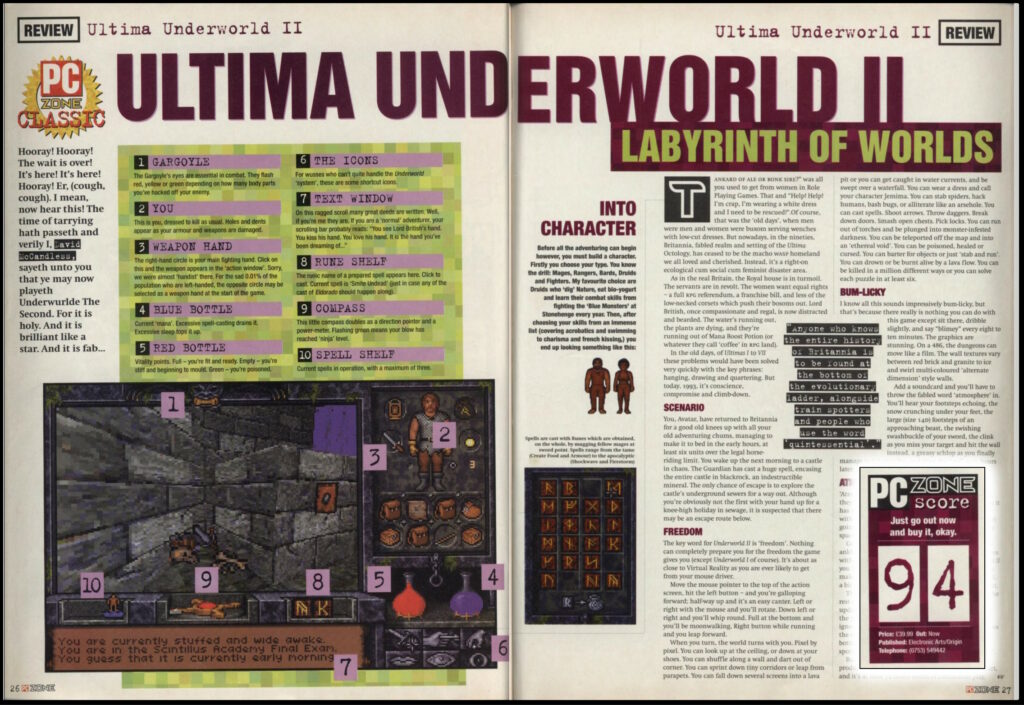
My favourite video game Easter egg is found in Ultima Underworld II: Labyrinth of Worlds1.
Released early in 1993 after missing a target of Christmas 19922,
it undersold despite being almost universally well-received by reviewers3.
I don’t know how print magazine video game reviews read today, but back in the early 90s they seemed to be frivolous and flippant approximately 100% of the time.
Developed by Looking Glass Technologies, it used an enhanced version of the engine they’d used for the game’s prequel a year earlier4.
The engine is particularly cool for it’s time; it’s sometimes compared to Wolfenstein5, but
that’s not entirely fair… on Wolfenstein! The original version of Underworld‘s 3D engine predated Wolfenstein… and yet supported several features that
Wolfenstein lacked, like the ability for the player to look up and down and jump over chasms, for example.
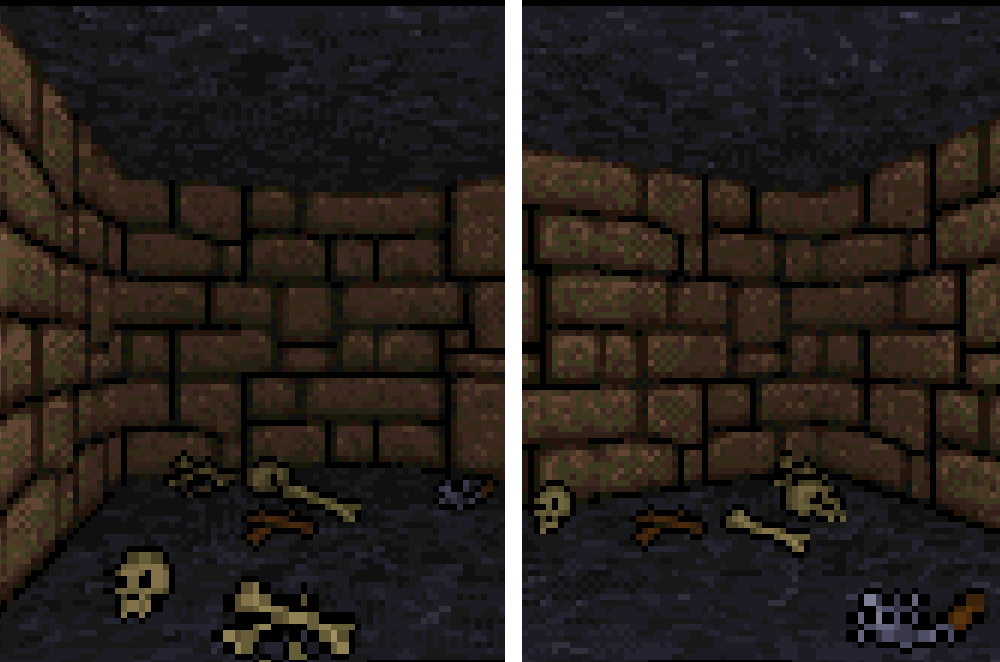
Move around and you’ll see the 3D walls shift to your new perspective, but you’ll always see the same side of the 2D objects on the floor. Turn as you might, you’ll never see the back
of that skull!
The team’s expertise and code would eventually be used to produce System Shock in 1994. The team’s producer, Warren Spector,
would eventually draw from his experience of the Ultima Underworld games when he went on to make Thief: The Dark Project and Deus Ex.
But the technology of Ultima Underworld II and its prequel aren’t as interesting as its approach to storytelling and gameplay. They’re:
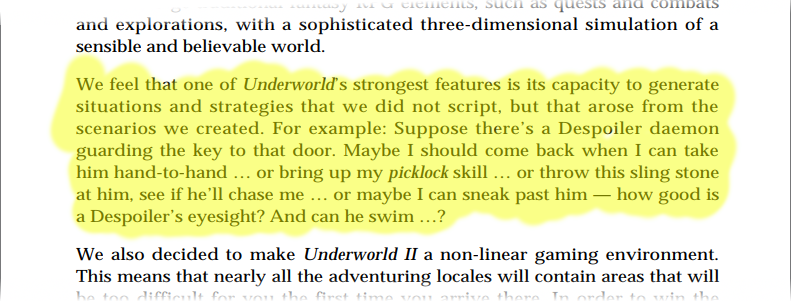
Underworld II encourages lateral thinking and provides multiple solutions to many challenges, perhaps best-described by this section in the Designers’ Notes page at the back
of the manual.
What’s being described there is what we’d now call emergent gameplay, and while it wasn’t completely new in 19937 it was still uncommon enough to be
noteworthy.
The Easter Egg
The Ultima series are riddled with Easter eggs, but my favourite is one that I feel is well-hidden, beautiful… and heavily
laden with both fan service and foreshadowing!
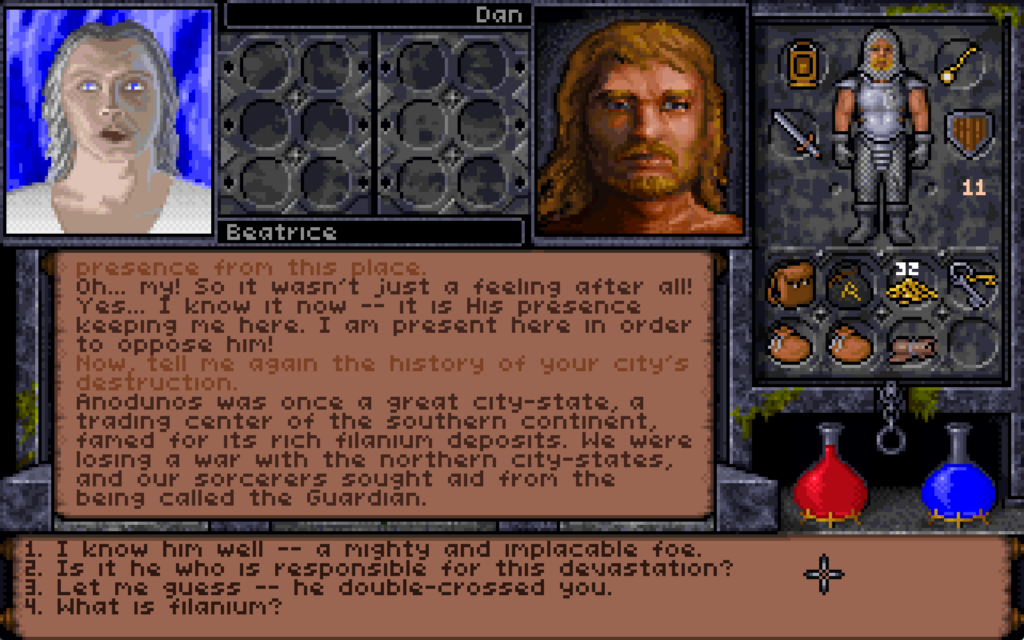
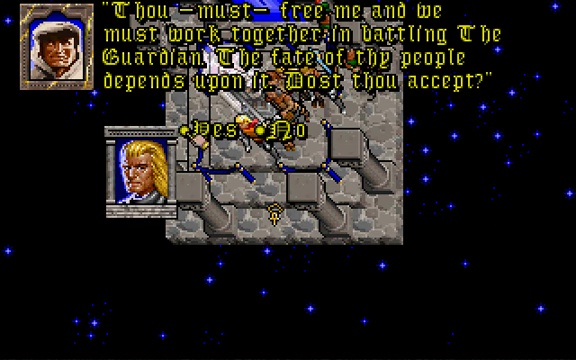
The third of the interdimensional planes the Avatar visits in the game contains a city frozen solid by the Guardian’s magic.
To find the Easter egg, you must first travel to Anodunos. This city was once the capital of a tropical city-state which had become allied to the Guardian, the the principal antagonist
of Ultima VII through IX.
After the city’s major, Beatrice, attempted to put an end to the red titan’s growing demands, the Guardian cursed the city fountain to radiate out a magical cold that eventually froze
the entire settlement under a cave of ice.
Mayor Beatrice lives on here, as a ghost. While she’s a great source of information about the ice caverns as a whole and has information highly useful to the primary quest, that’s not
the thing we’re interested in right now.
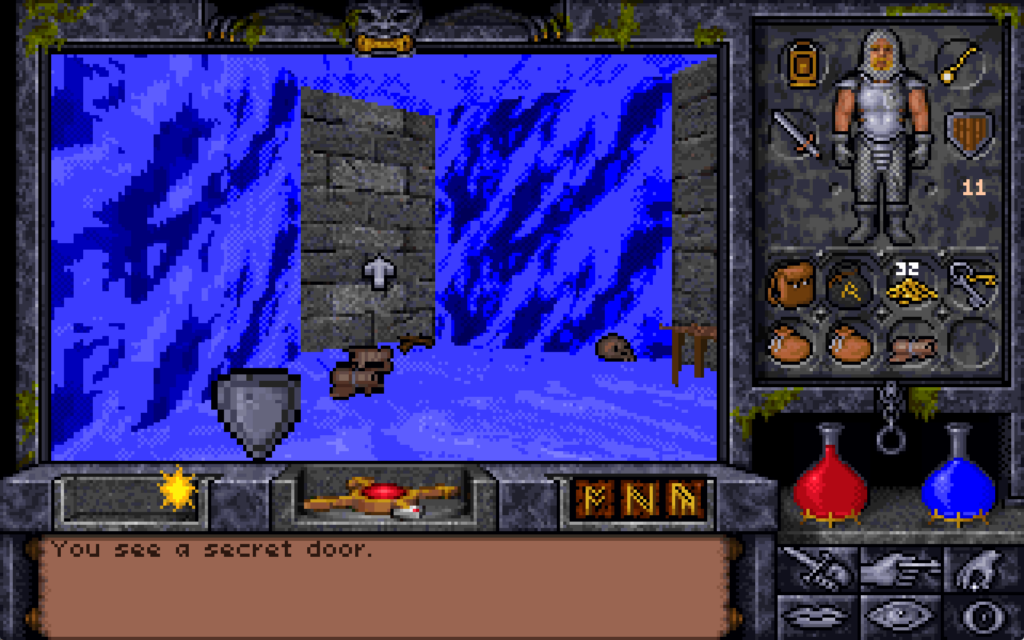
On the Eastern bank of the city’s river we find the remnants of the workshop of the magician Alorik, and in it – if we look in the right place8
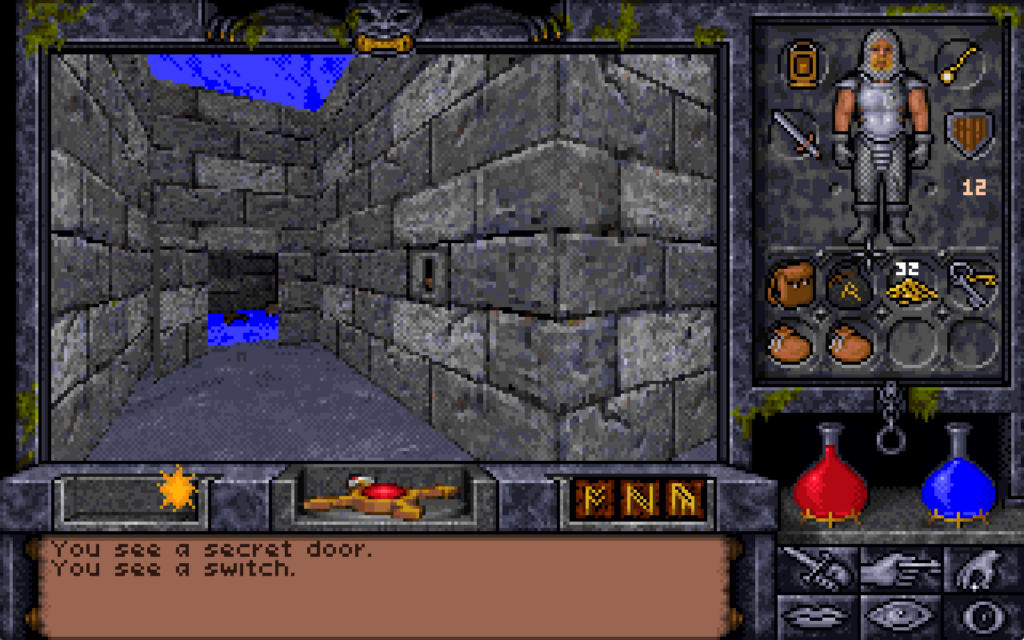
– a secret door. We can’t open it though: unusually for a secret door in this game, it’s locked.
In the original, unpatched release of the game, you couldn’t even cast the “open” spell on it to unlock it: the only way through was to use a powerful late-game spell like “portal” to
teleport to the other side.
I didn’t even find this chamber on my first playthrough of the game. It was only on my second, while using the Map Area spell to help me to draw accurate maps of the entire game world,
that I found the room… and even then I spent some time hunting for a switch on the “outside” before eventually giving up and teleporting into the secret room.
Once you’re on the other side, there’s a switch. I guess it’s a Alorik’s panic room?
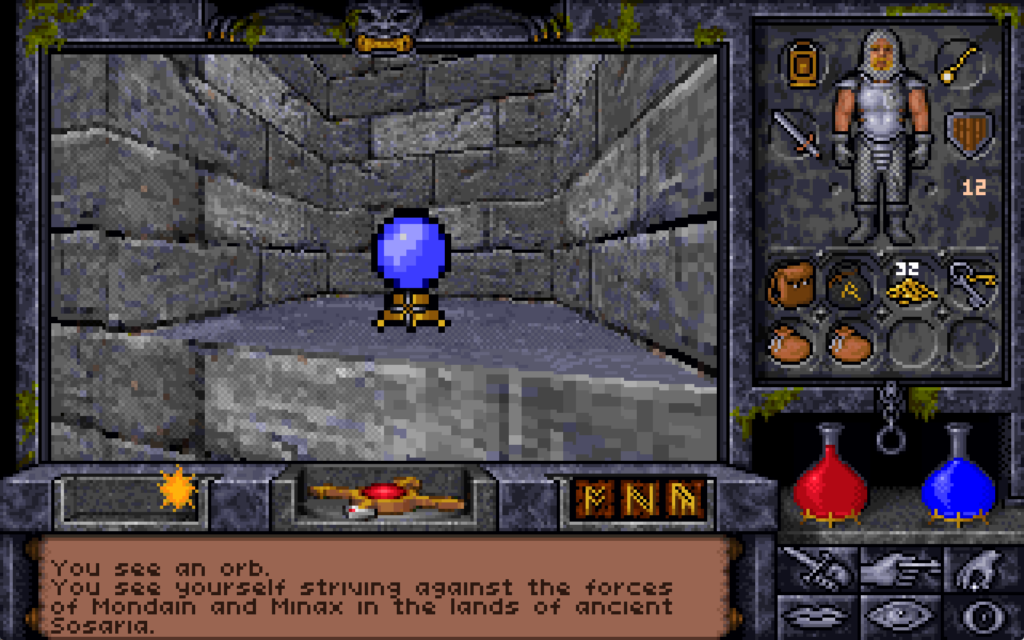
There’s valuable treasure here including a sceptre of mana restoration, a “grav” runestone (probably still easier to get than the one at the Scintillus Academy), but what’s most
interesting is the crystal ball, which the player can look into to see a vision of another place and, in the case of this orb, another time.
The first time you look into it, you’re told:
You see yourself striving against the forces of Mondain and Minax in the lands of ancient Sosaria.9
Mondain and Minax are the antagonists in Ultima I and Ultima II. We’re seeing the earliest parts of the player character’s adventures.
It’s long been argued that the “Stranger” – the protagonist of Ultima I through Ultima III – is a different person to the Avatar of Ultima IV but I feel
like this vision is canonical proof that they’re supposed to be interpreted as being the same person…
If we look into the crystal ball a second time:
You see yourself climbing to the peak of Olympus Mons on the planet Mars.
This is a reference to the plot of Ultima: Worlds of Adventure 2: Martian Dreams… which is a… weird choice of game to reference.
In my mind, a more logical leap forward in time might have been to jump to Ultima IV10, in which the protagonist
first becomes the Avatar of the Eight Virtues and the Hero of Britannia. Martian Dreams is… a sequel to a spinoff of Ultima VI. So why pick that?
Little-known and oft-forgotten, Martian Dreams is apparently nonetheless a source of pride for the real Spector.
Martian Dreams starts with a friend of the Avatar’s from Earth facilitating the Avatar and their companions to set out on an adventure to the planet Mars. That friend is called
Dr. Spector, obviously named for Warren Spector, who helped develop Ultima VI and, of
course, this game. This usual choice of vision of the past is a cryptic nod to the producer of Underworld II.
Let’s look again:
You see yourself in the Deep Forest, speaking with the peace-loving simian race of Emps.
This one’s a reference to Ultima VII, the game whose story immediately precedes this one. The Deep Forest seems an strange part of the adventure to choose, though. The Avatar
goes to the Deep Forest where, via some emps and then a wisp are eventually lead to the Time Lord11.
The Time Lord provides a whole heap of exposition and clues that the Avatar needs to eventually close the Black Gate and win the game.
Tardis noises intensify.
Do these references serve to hint that this crystal ball, too, is a source of exposition and guidance? Let’s see what it says next.
You see yourself peering into a crystal ball.
I remember the moment I first saw this happen in the game: serious chills! You’ve just found a long-lost, centuries-buried secret chamber, in which there’s a crystal ball. You peer into
it and observe a series of moments from throughout your life. You continue to watch, and eventually you see yourself, staring into the crystal ball: you’re seeing the present. So what’s
next?
Alorik’s crystal ball from Ultima Underworld II and the mural of G’mork from The NeverEnding Story totally have the same energy.
If you look again, you’re asking to see… the unwritten future:
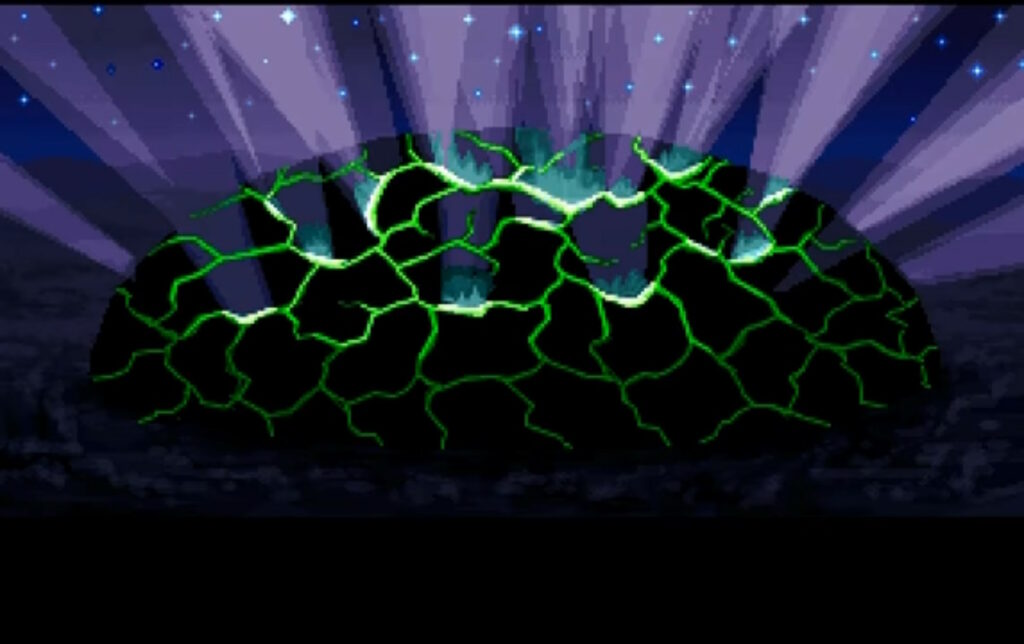
You see yourself winding a great war horn in the throne room of Castle British.
To save Britannia in Ultima Underworld II, the Avatar needs to exploit symmetries implicit in The Guardian’s spellcasting to travel to eight different parallel worlds, find a
place from which His power stems, dispel it, encase themselves in a shell of basilisk oil-infused magic mud, immerse themselves in lava to bake it on, find a magic sigil, consume a
djinn… it’s a whole thing. But ultimately it all leads to a climactic end scene in which the Avatar raises a horn retrieved from the Tomb of Praecor Loth and blows it to shatter a dome
of blackrock.
If you happen to find this clue on your first playthrough, it’s helpful exposition.
But that’s the end of this game, right? How can we possibly peer into the orb again?
You see yourself sailing through majestic pillars cropping up out of the sea, on a voyage of discovery.
What’s being described there is the opening scene from the next game in the series, the as-yet-unreleased Ultima VII Part 2: Serpent Isle!
Serpent Isle begins with the Avatar and their companions sailing out to some special pillars in pursuit of a bad guy.
This vision is a teaser of what’s to come. That’s just… magical, for both the character and the player.
The character uses fortune-telling magic to see their future, but the player is also seeing their future: if they’re playing Ultima Underworld II at or close to its
release date, or they’re playing through the games in chronological order, they’re in a literal sense being shown what comes next in their life. That’s really cool.12
Let’s look again:
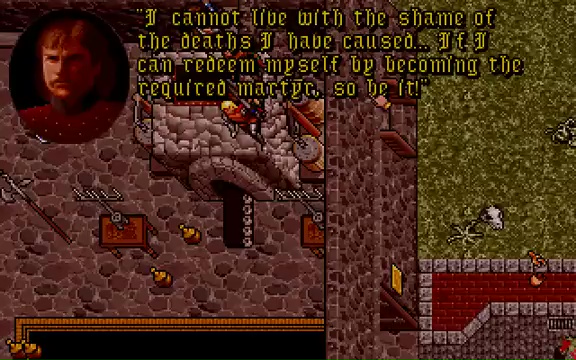
You see the obscure form of an old and dear friend, as he sacrifices his life for the good of all.
Some time after the party arrives on Serpent Isle, the Avatar’s companions are possessed by the Banes of Chaos and go on a murderous rampage. Later, there’s a ritual that will save the
world, but at the cost of the death of one of the heroes. The Avatar is willing to make the ultimate sacrifice, but in the end Sir Dupre takes his place, unwilling to live within
himself after seeing the carnage he has wrought.
The death of Sir Dupre, who first appeared way back in Ultima II, is somewhat undercut by his resurrection in Ultima IX. But perhaps you’ll let me pretend for a
paragraph longer that Ultima IX doesn’t exist, okay?
At the end of Serpent Isle, the Avatar is plucked out of space and time and deposited into Pagan, The Guardian’s home base. The plot of Ultima VIII and Ultima
IX revolve around the Avatar working to return to a radically-changed Britannia, attempting to fight The Guardian and bring to an end the Age of Armageddon, and ultimately
merging and become one with Him before vanishing completely from the world.
I don’t disagree with how Ultima IX got to where it was going, but I don’t like the route it took to get there. Or the hilariously-terrible bugs.
Which is why it’s perhaps quite fitting that if the Avatar in Underworld II looks into the orb one final time, they’re told…
You see nothing.
That’s it. That’s the end.
The end of the vision, certainly, but also: a vision of the end.
Depending on how you count the Ultima games13, this is the 13th of 17 in the series. We’re approaching the
final chapter, and this Easter egg foreshadows that finale.
I feel hugely privileged that I got to experience it “organically”, by accident, as its authors presumably intended, back in 1993. But it also makes me happy to be able to share the
story of it with you14.
If you haven’t seen it yet, you might enjoy watching the vlog version of this post, through which my enthusiasm for the topic might be more-palpable.
Footnotes
1 I’ve doubtless mentioned Ultima Underworld II before: for example both it and
Ultima VII, as well as NetHack (mentioned elsewhere in this post) made it into my 2007 list of top 10 computer games that stole my life.
3 It suffered perhaps for the time of year it was released, but perhaps also for the fact
that 1993 was a big year for video games and it was competing with The 7th Guest, Star Wars: Rebel Assault, Return to Zork , Myst, Disney’s
Aladdin and, of course – later in the year – Doom.
4 Director/designer Paul Neurath apparently sang the praises of his team for improving
texture mapping and viewport size constraints, and he’s right: they’re a huge improvement on Underworld I‘s. Neurath would later go on create the crowdfunded “spiritual
successor” Underworld Ascendant, which was critically panned, which just goes to show that sometimes it’s better to get a tight
team together and make it “until it’s done” than to put your half-baked idea on Kickstarter and hope you can work it out what you’re making before the money runs out.
5 Like Wolfenstein, the engine uses a mixture of software-rendered 3D (for walls
and furniture) overlaid with traditionally-produced sprites (for characters and items).
6 All executed over a year before the release of the very first Elder Scrolls
game. Just sayin’.
7 That king of emergent gameplay NetHack was showcasing emergent gameplay in
a fantasy roleplaying game way back in the 1980s!
8 An interesting quirk of the game was that if you turned the graphics settings down to
their lowest, secret doors would become just as visible as regular doors. If you’re sure there is one but you can’t quite find it, tweaking your graphics settings is much easier than
casting a spell!
9 Do you like the “in the style of Underworld II” scrolls I’ve used in this post?
I’ve made available the source code you need
if you want to use them yourself.
10Ultima IV is my personal favourite Ultima game, but I see the
argument of people who claim that Ultima VII is the best of the series.
11 The Time Lord turns up throughout the game series. Way back in Ultima III,
he appears in the Dungeon of Time where he provides a clue essential to defeating Exodus, and he appears or is referenced in most games from Ultima VII onwards. He doesn’t
seem to appear in Ultima IV through Ultima VI, except… in Ultima IX, which wouldn’t be released until six years after Underworld II, it’s revealed
that the Time Lord is the true identity of the seer Hawkwind… who provided the same kind of exposition and guidance in Ultima IV!
12 How did the Underworld II team know with such certainty what was being
planned for Serpent Isle? At some point in 1992 project director Jeff George left Origin Studios and was replaced by lead designer Bill Armintrout, and the role of producer was assigned to… Warren Spector again! For some time, Spector was involved with both
projects, providing an easy conduit for inter-team leaks.
13 How you count Ultima games and what specifically should be counted is a
source of controversy in fan circles.
14 I’m sure many people reading this will have heard me talk about this particular
Easter egg in-person before, over the last couple of decades. Some of you might even have heard me threaten to write a blog post about it, someday. Well: now I have. Tada! It only
took me thirty years after experiencing it to write about it here, which is still faster than some things I’ve blogged about!
Yesterday, I wrote the stupidest bit of CSS of my entire career.
Two new visual elements and one textual one will make it clear where a product’s placement in the marketplace is sponsored.
Owners of online shops powered by WooCommerce can optionally “connect” their stores back to Woo.com. This enables them to manage their subscriptions to
any extensions they use to enhance their store1. They can also browse a
marketplace of additional extensions they might like to consider, which is somewhat-tailored to them based on e.g. their geographical location2
In the future, we’ll be adding sponsored products to the marketplace listing, but we want to be transparent about it so yesterday I was working on some code that would determine from
the appropriate API whether an extension was sponsored and then style it differently to make this clear. I took
a look at the proposal from the designer attached to the project, which called for
the word “Sponsored” to appear alongside the name of the extension’s developer,
a stripe at the top in the brand colour of the extension, and
a strange green blob alongside it
That third thing seemed like an odd choice, but I figured that probably I just didn’t have the design or marketing expertise to understand it, and I diligently wrote some appropriate code.3
I even attached to my PR a video demonstrating how my code reviewers could test it without spoofing actual sponsored
extensions.
After some minor tweaks, my change was approved. The designer even swung by and gave it a thumbs-up. All I needed to do was wait for the automated end-to-end tests to complete, and I’d
be able to add it to WooCommerce ready to be included in the next-but-one release. Nice.
In the meantime, I got started on my next bit of work. This one also included some design work by the same designer, and wouldn’t you know it… this one also had a little green
blob on it?
I’m almost embarrassed to admit that my first thought was that this must be part of some wider design strategy to put little green blobs everywhere.
Then it hit me. The blobs weren’t part of the design at all, but the designer’s way of saying “look at this bit, it’s important!”. Whoops!
So I got to rush over to my (already-approved, somehow!) changeset and rip out
the offending CSS: the stupidest bit of CSS of my entire career.
Not bad code per se, but reasonable code resulting from a damn-stupid misinterpretation of a designer’s wishes. Brilliant.
3 A fun side-effect of working on open-source software is that my silly mistake gets
immortalised somewhere where you can go and see it any time you like!
Having lost the (stupid, proprietary) charging cable for my smartwatch, and not been able to find it for several days, I’ve undertaken the magical ritual that’s most-certain to make it
reappear: ordering a replacement one.
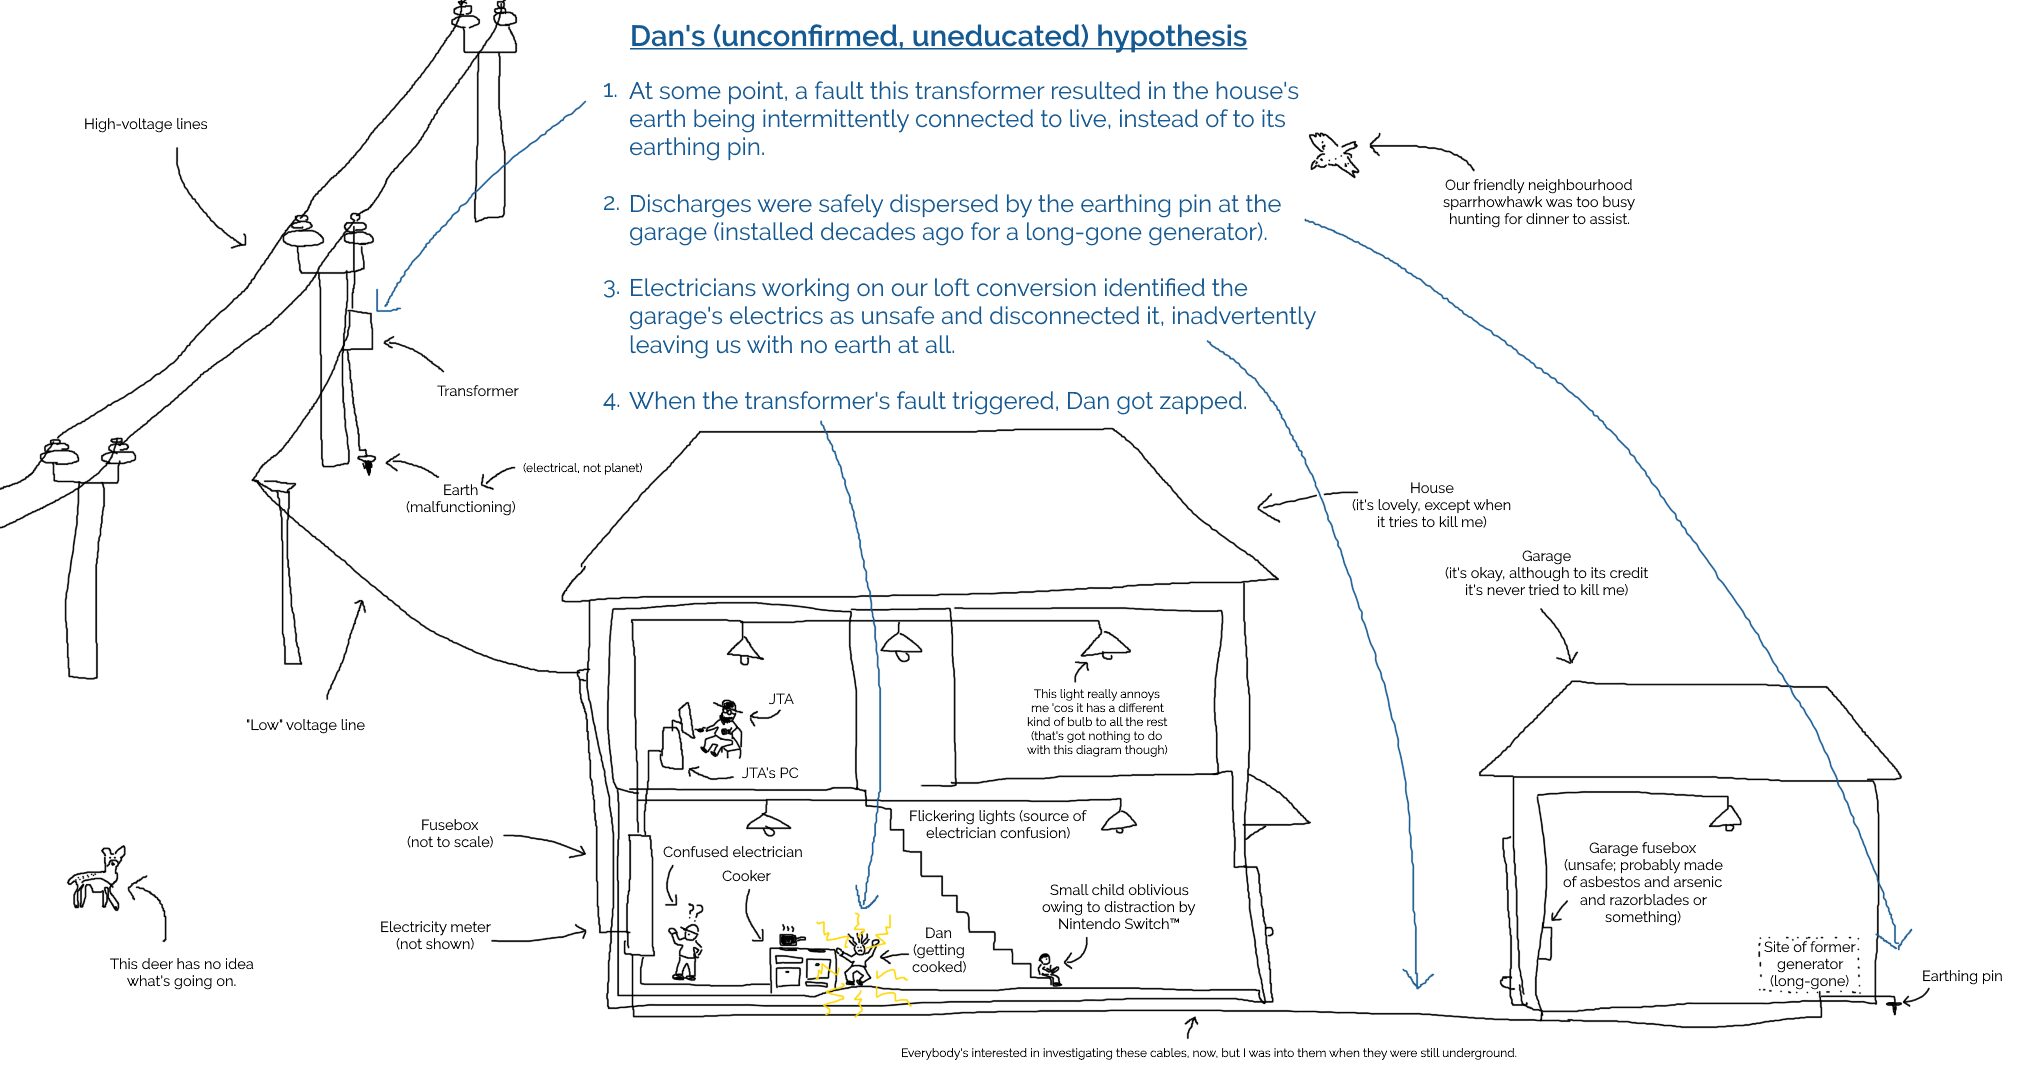
This week, I received a ~240V AC electric shock. I can’t recommend it.
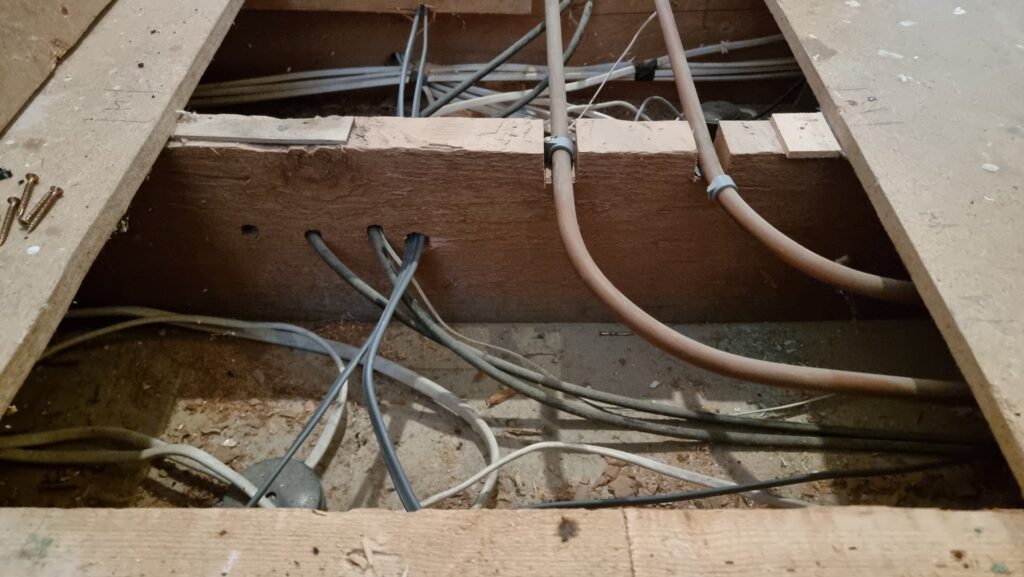
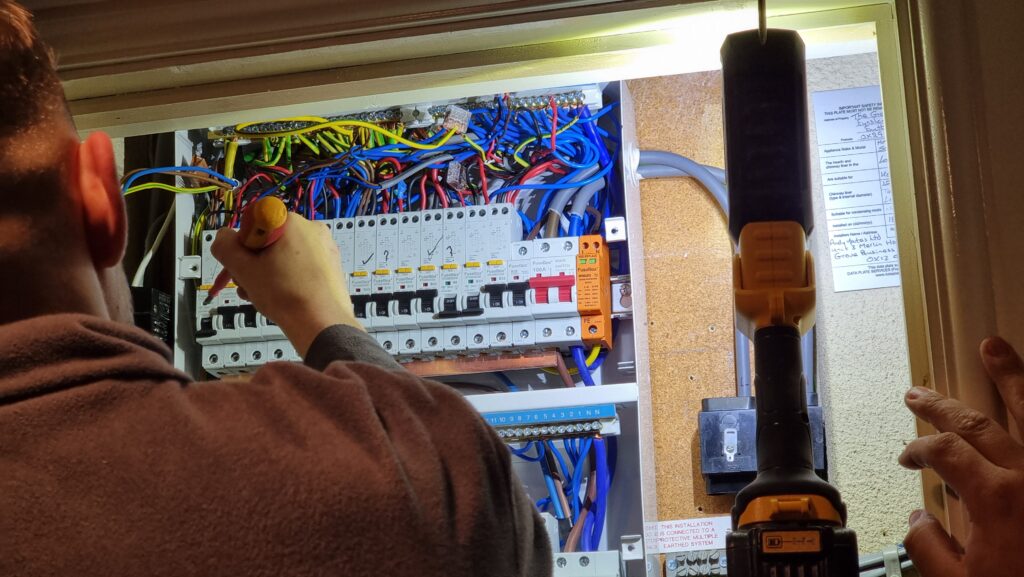
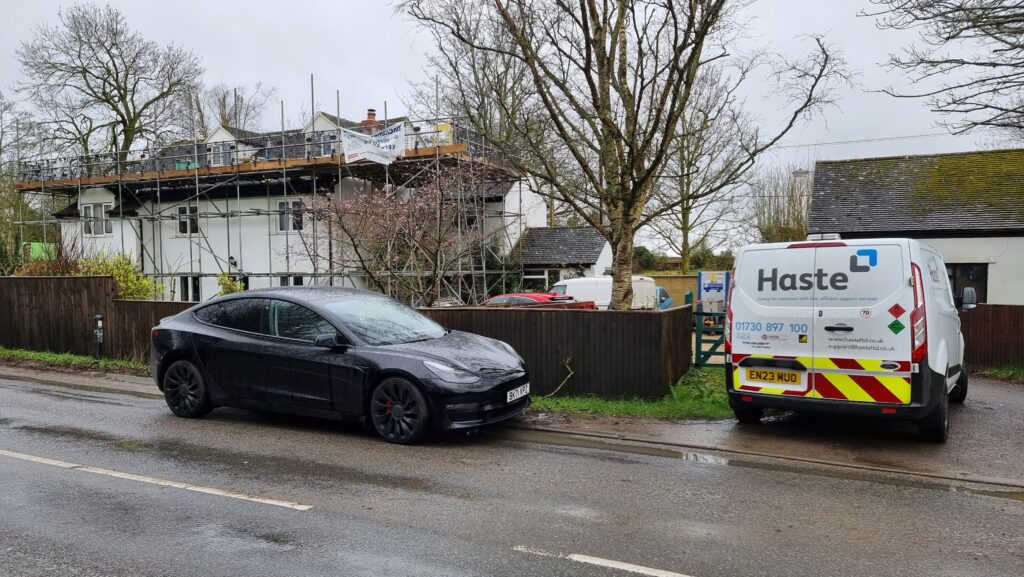
As you may have guessed based on photos in previous posts, our house is currently wrapped in a convenient climbing frame scaffolding.
We’re currently having our attic converted, so we’ve had some electricians in doing the necessary electrical wiring. Shortly after they first arrived they discovered that our existing electrics were pretty catastrophic, and needed to make a few changes including a new fusebox and disconnecting the
hilariously-unsafe distribution board in the garage.
The owner before last of our house worked for SSEN and did all of his own wiring, and left us a rats’ nest
of spaghetti wiring that our electricians described as being unlike anything they’d ever seen before. Also a literal rats’ nest under the decking, but we got rid of that already.
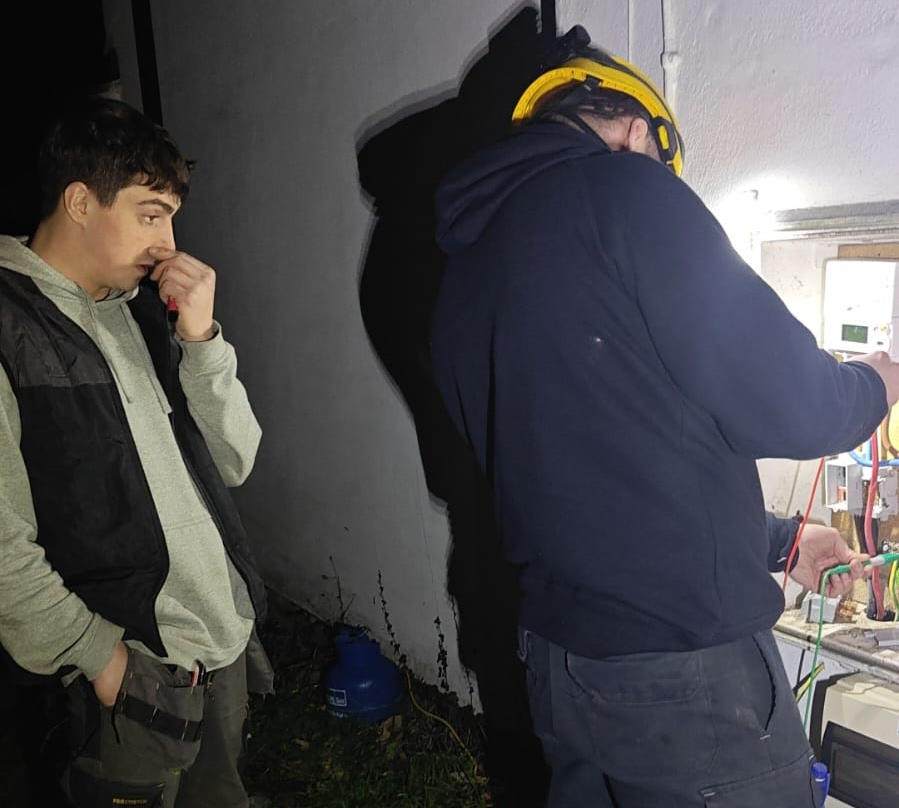
After connecting everything new up they began switching everything back on and testing the circuits… and we were surprised to hear arcing sounds and see all the lights flickering.
The electricians switched everything off and started switching breakers back on one at a time to try to identify the source of the fault, reasonably assuming that something was shorting
somewhere, but no matter what combination of switches were enabled there always seemed to be some kind of problem.
You know those escape room puzzles where you have to get the right permutation of switch combinations? This was a lot less fun than that.
Noticing that the oven’s clock wasn’t just blinking 00:00 (as it would after a power cut) but repeatedly resetting itself to 00:00, I pointed this out to the electricians as an
indicator that the problem was occurring on their current permutation of switches, which was strange because it was completely different to the permutation that had originally exhibited
flickering lights.
I reached over to point at the oven, and the tip of my finger touched the metal of its case…
Blam! I felt a jolt through my hand and up my arm and uncontrollably leapt backwards across the room, convulsing as I fell to the floor. I gestured to the cooker and
shouted something about it being live, and the electricians switched off its circuit and came running with those clever EM-field sensor
pens they use.
Somehow the case of the cooker was energised despite being isolated at the fusebox? How could that be?
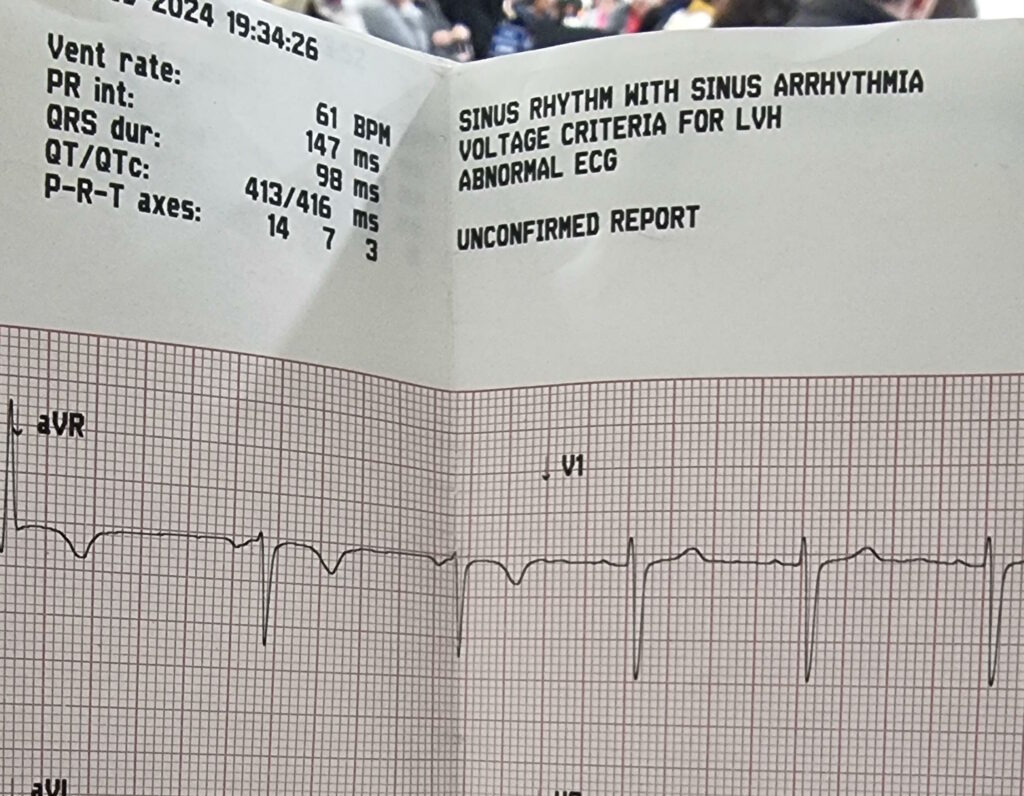
Buy one ECG appointment. Get a free partial chest-shaving free!
I missed the next bits of the diagnosis of our electrical system because I was busy getting my own diagnosis: it turns out that if you get a mains electric shock – even if you’re
conscious and mobile – the NHS really want you to go to A&E.
At my suggestion, Ruth delivered me to the Minor Injuries unit at our nearest hospital (I figured that what I had wasn’t that
serious, and the local hospital generally has shorter wait times!)… who took one look at me and told me that I ought to be at the emergency department of the bigger hospital over the
way.
The first hospital were kind enough to hook me up to an ECG before sending me on to the A&E department. It indicated possible cardiac arrhythmia in the sinus node – basically: my heart’s natural pacemaker was firing somewhat
irregularly – which is kinda what you’d expect from an AC zap.
Off at the “right” hospital I got another round of ECG tests, some blood tests (which can apparently be used to diagnose muscular
damage: who knew?), and all the regular observations of pulse and blood pressure and whatnot that you might expect.
And then, because let’s face it I was probably in better condition than most folks being dropped off at A&E, I was left to
chill in a short stay ward while the doctors waited for test results to come through.
Apparently our electricity meter blew itself up somewhere along the way, leaving us with even less of a chance to turn the power back on again.
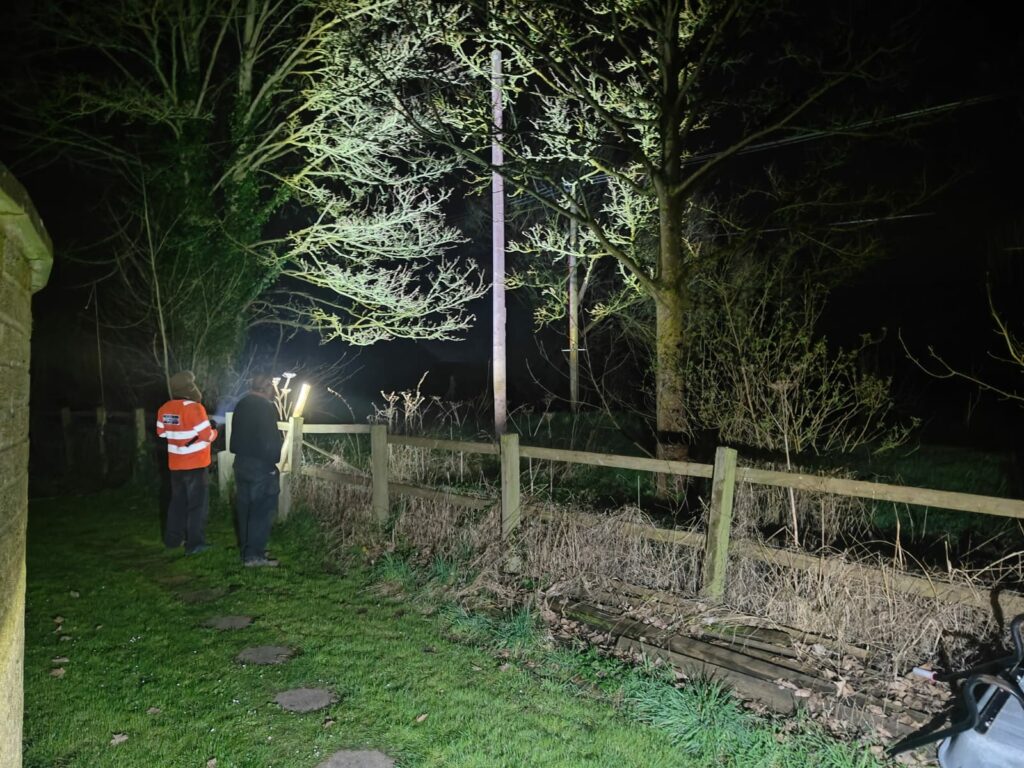
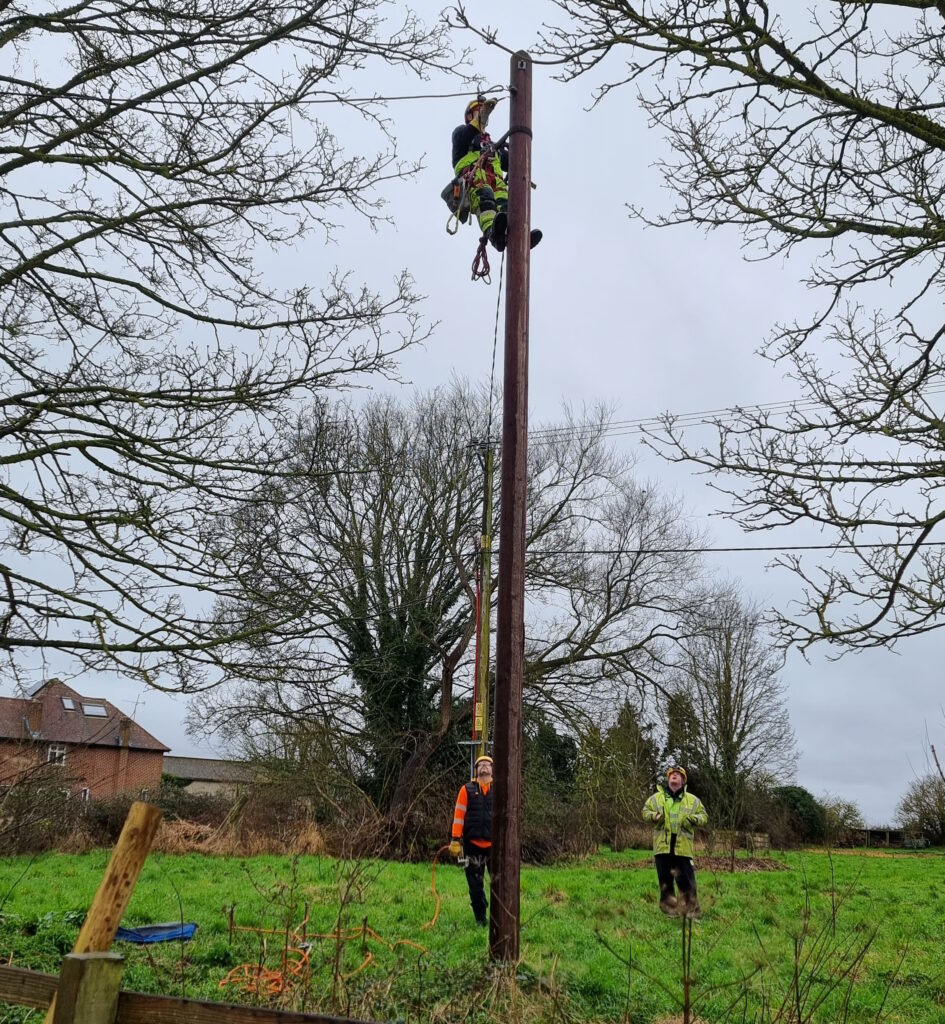
Meanwhile, back at home our electricians had called-in SSEN, who look after the grid in our area. It turns
out that the problem wasn’t directly related to our electrical work at all but had occurred one or two pylons “upstream” from our house. A fault on the network had, from the sounds of
things, resulted in “live” being sent down not only the live wire but up the earth wire too.
That’s why appliances in the house were energised even with their circuit breakers switched-off: they were connected to an earth that was doing pretty-much the opposite of what an earth
should: discharging into the house!
For the next day or so, a parade of linesmen climbed up and down all the pylons in the field behind our house, hunting for the source of the problem.
It seems an inconceivable coincidence to me that a network fault might happen to occur during the downtime during which we happened to have electricians working, so I find myself
wondering if perhaps the network fault had occurred some time ago but only become apparent/dangerous as a result of changes to our household configuration.
I’m no expert, but I sketched a diagram showing how such a thing might happen (click to
embiggen). I’ll stress that I don’t know for certain what went wrong: I’m just basing this on what I’ve been told my SSEN plus a little speculation:
By the time I was home from the hospital the following day, our driveway was overflowing with the vehicles of grid engineers to the point of partially blocking the main street outside
(which at least helped ensure that people obeyed our new 20mph limit for a change).
We weren’t even able to get our own car onto our driveway when we got back from the hospital.
Two and a half days later, I’m back at work and mostly recovered. I’ve still got some discomfort in my left hand, especially if I try to grip anything tightly, but I’m definitely moving
in the right direction.
It’s actually more-annoying how much my chest itches from having various patches of hair shaved-off to make it possible to hook up ECG electrodes!
The actual conversation at this point seemed to consist of the guy at the top of the pole confirming that yes, he really had disconnected the live wire from our house, and
one at the bottom saying he can’t have because he’s still seeing electricity flowing. Makes sense now, doesn’t it?
Anyway, the short of it is that I recommend against getting zapped by the grid. If it had given me superpowers it might have been a different story, but I guess it just gave me
sore muscles and a house with a dozen non-working sockets.
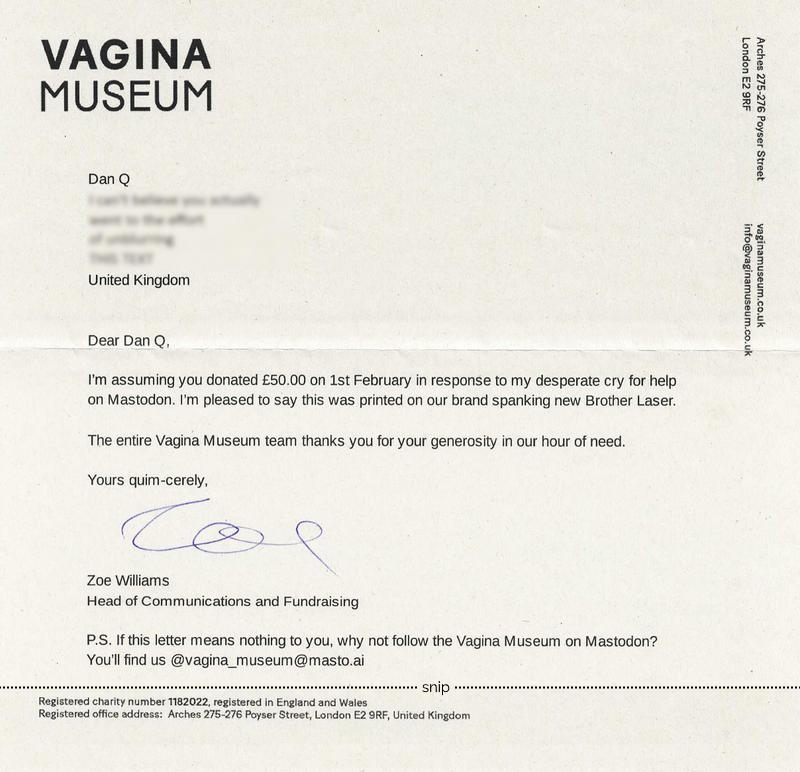
A lovely letter from the Vagina Museum – which I’ve not had the opportunity to visit yet – came through my letterbox:
“Yours quim-cerely,” doesn’t appear in any style guide but is now the best sign-off in any letter I’ve ever received.
This moment of joy was kick-started when I casually dropped in on a conversation about printer recommendations. I’ve got a big
ol’ Brother printer here, and it’s great, not least because even though it’s got a tonne of features like duplexing and (double-sided) scanning and photocopying and it’s even
got a fax machine built in for some reason… it doesn’t try to be any more “smart” than it needs to be. It doesn’t talk to Alexa or order itself more toner (it even gets-by with knockoff
toner!) or try to do anything well… except print things, which it does wonderfully.
For this and other reasons I recommended they buy a Brother.
Then, alongside some other Fediversians, I chipped in to help them buy one.
Totally worth it for the letter alone. Now I just need to find an excuse to visit an exhibition!
First, bees had to push a blue lever that was blocking a red lever… too complex for a bee to solve on its own. So scientists trained some bees by offering separate rewards for the
first and second steps.
These trained bees were then paired with bees who had never seen the puzzle, and the reward for the first step was removed.
Some of the untrained bees were able to learn both steps of the puzzle by watching the trained bees, without ever receiving a reward for the first step.
…
This news story is great for two reasons.
Firstly, it’s a really interesting experimental result. Just when you think humankind’s learned everything they ever will about the humble bumblebee (humblebee?), there’s something more
to discover.
That a bee can be trained to solve a complex puzzle by teaching it to solve each step independently and then later combining the steps isn’t surprising. But that these trained bees can
pass on their knowledge to their peers (bee-ers?); who can then, one assumes, pass it on to yet other bees. Social learning.
Which, logically, means that a bee that learns to solve the two-lever puzzle second-hand would have a chance of solving an even more-complex three-lever puzzle; assuming such a thing is
within the limits of the species’ problem-solving competence (I don’t know for sure whether they can do this, but I’m a firm bee-lever).
But the second reason I love this story is that it’s a great metaphor in itself for scientific progress. The two-lever problem is, to an untrained bee, unsolvable. But
if it gets a low-effort boost (a free-bee, as it were) by learning from those that came before it, it can make a new discovery.
(I suppose the secret third reason the news story had me buzzing was that I appreciated the opportunities for puns that it presented. But you already knew that I larva pun, right?)