Just wanted to share with you something I found ages ago but only just got around to mentioning – Julia Evans‘ (of Wizard Zines fame) Debugging Mysteries:
Each mystery is a Twine-powered “choose your own adventure” game in which you must diagnose the kind of issue that a software developer might, for
real. I think these are potentially excellent tools for beginner programmers, not just because they provide some information about the topic of each, but because they encourage
cultivating a mindset of the kind of thinking that’s required to get to the bottom of gnarly problems.
I swear that I used to be good at Mastermind when I was a kid. But now, when it’s my turn to break
the code that one of our kids has chosen, I fail more often than I succeed. That’s no good!
If you didn’t have me pegged as a board gamer… where the hell have you been?
Mastermind and me
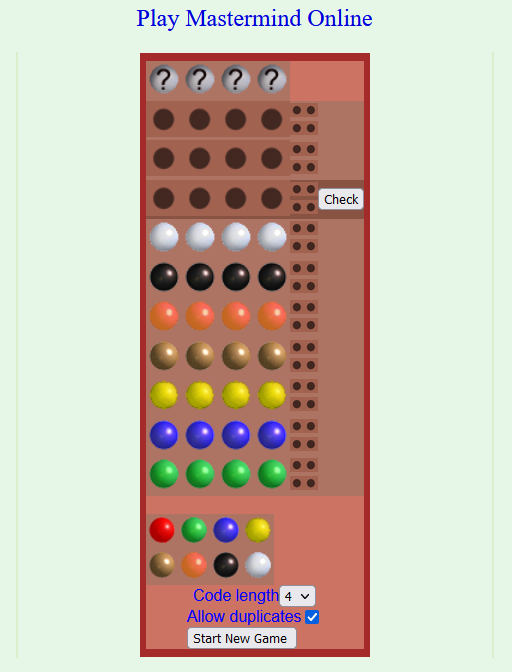
Maybe it’s because I’m distracted; multitasking doesn’t help problem-solving. Or it’s because we’re “Super” Mastermind, which differs from the one I had as a child in that
eight (not six) peg colours are available and secret codes are permitted to have duplicate peg colours. These changes increase the possible permutations from 360 to 4,096, but the
number of guesses allowed only goes up from 8 to 10. That’s hard.
The set I had as a kid was like this, I think. Photo courtesy ZeroOne; CC-BY-SA license.
Hey, that’s an idea. Let’s crack the code… by writing some code!
This online edition plays a lot like the version our kids play, although the peg colours are different. Next guess should be an
easy solve!
Representing a search space
The search space for Super Mastermind isn’t enormous, and it lends itself to some highly-efficient computerised storage.
There are 8 different colours of peg. We can express these colours as a number between 0 and 7, in three bits of binary, like this:
Decimal
Binary
Colour
0
000
Red
1
001
Orange
2
010
Yellow
3
011
Green
4
100
Blue
5
101
Pink
6
110
Purple
7
111
White
There are four pegs in a row, so we can express any given combination of coloured pegs as a 12-bit binary number. E.g. 100 110 111 010 would represent the
permutation blue (100), purple (110), white (111), yellow (010). The total search space, therefore, is the range of numbers from
000000000000 through 111111111111… that is: decimal 0 through 4,095:
Decimal
Binary
Colours
0
000000000000
Red, red, red, red
1
000000000001
Red, red, red, orange
2
000000000010
Red, red, red, yellow
…………
4092
111111111100
White, white, white, blue
4093
111111111101
White, white, white, pink
4094
111111111110
White, white, white, purple
4095
111111111111
White, white, white, white
Whenever we make a guess, we get feedback in the form of two variables: each peg that is in the right place is a bull; each that represents a peg in the secret code but
isn’t in the right place is a cow (the names come from Mastermind’s precursor, Bulls & Cows). Four bulls
would be an immediate win (lucky!), any other combination of bulls and cows is still valuable information. Even a zero-score guess is valuable- potentially very valuable! – because it
tells the player that none of the pegs they’ve guessed appear in the secret code.
If one of Wordle‘s parents was Scrabble, then this was the other. Just ask its Auntie Twitter.
Solving with Javascript
The latest versions of Javascript support binary literals and bitwise operations, so we can encode and decode between arrays of four coloured pegs (numbers 0-7) and the number 0-4,095
representing the guess as shown below. Decoding uses an AND bitmask to filter to the requisite digits then divides by the order of magnitude. Encoding is just a reduce
function that bitshift-concatenates the numbers together.
/** * Decode a candidate into four peg values by using binary bitwise operations. */function decodeCandidate(candidate){
return [
(candidate &0b111000000000) /0b001000000000,
(candidate &0b000111000000) /0b000001000000,
(candidate &0b000000111000) /0b000000001000,
(candidate &0b000000000111) /0b000000000001
];
}
/** * Given an array of four integers (0-7) to represent the pegs, in order, returns a single-number * candidate representation. */function encodeCandidate(pegs) {
return pegs.reduce((a, b)=>(a <<3) + b);
}
With this, we can simply:
Produce a list of candidate solutions (an array containing numbers 0 through 4,095).
Choose one candidate, use it as a guess, and ask the code-maker how it scores.
Eliminate from the candidate solutions list all solutions that would not score the same number of bulls and cows for the guess that was made.
Repeat from step #2 until you win.
Step 3’s the most important one there. Given a function getScore( solution, guess ) which returns an array of [ bulls, cows ] a given guess would
score if faced with a specific solution, that code would look like this (I’m convined there must be a more-performant way to eliminate candidates from the list with XOR
bitmasks, but I haven’t worked out what it is yet):
/** * Given a guess (array of four integers from 0-7 to represent the pegs, in order) and the number * of bulls (number of pegs in the guess that are in the right place) and cows (number of pegs in the * guess that are correct but in the wrong place), eliminates from the candidates array all guesses * invalidated by this result. Return true if successful, false otherwise. */function eliminateCandidates(guess, bulls, cows){
const newCandidatesList = data.candidates.filter(candidate=>{
const score = getScore(candidate, guess);
return (score[0] == bulls) && (score[1] == cows);
});
if(newCandidatesList.length ==0) {
alert('That response would reduce the candidate list to zero.');
returnfalse;
}
data.candidates = newCandidatesList;
chooseNextGuess();
returntrue;
}
I continued in this fashion to write a full solution (source code). It uses ReefJS for
component rendering and state management, and you can try it for yourself right in your web browser. If you
play against the online version I mentioned you’ll need to transpose the colours in your head: the physical version I play with the
kids has pink and purple pegs, but the online one replaces these with brown and black.
Testing the solution
Let’s try it out against the online version:
As expected, my code works well-enough to win the game every time I’ve tried, both against computerised and in-person opponents. So – unless you’ve been actively thinking about the
specifics of the algorithm I’ve employed – it might surprise you to discover that… my solution is very-much a suboptimal one!
My code has only failed to win a single game… and that turned out to because my opponent, playing overexcitedly, cheated in the third turn. To be fair, my code didn’t lose
either, though: it identified that a mistake must have been made and we declared the round void when we identified the problem.
My solution is suboptimal
A couple of games in, the suboptimality of my solution became pretty visible. Sure, it still won every game, but it was a blunt instrument, and anybody who’s seriously thought about
games like this can tell you why. You know how when you play e.g. Wordle (but not in “hard mode”) you sometimes want to type in a word that can’t possibly be the
solution because it’s the best way to rule in (or out) certain key letters? This kind of strategic search space bisection reduces the mean number of guesses you need to solve the
puzzle, and the same’s true in Mastermind. But because my solver will only propose guesses from the list of candidate solutions, it can’t make this kind of improvement.
My blog post about Break Into Us used a series of visual metaphors to show search space dissection, including this one. If you missed
it, it might be worth reading.
Search space bisection is also used in my adverserial hangman game, but in this case the aim is to split the search space in such a way that no
matter what guess a player makes, they always find themselves in the larger remaining portion of the search space, to maximise the number of guesses they have to make. Y’know, because
it’s evil.
A great first guess, assuming you’re playing against a random code and your rules permit the code to have repeated colours, is a “1122” pattern.
There are mathematically-derived heuristics to optimise Mastermind strategy. The first
of these came from none other than Donald Knuth (legend of computer science, mathematics, and pipe organs) back in 1977. His solution,
published at probably the height of the game’s popularity in the amazingly-named Journal of Recreational Mathematics, guarantees a solution to the six-colour version of the
game within five guesses. Ville [2013] solved an
optimal solution for a seven-colour variant, but demonstrated how rapidly the tree of possible moves grows and the need for early pruning – even with powerful modern computers – to
conserve memory. It’s a very enjoyable and readable paper.
But for my purposes, it’s unnecessary. My solver routinely wins within six, maybe seven guesses, and by nonchalantly glancing at my phone in-between my guesses I can now reliably guess
our children’s codes quickly and easily. In the end, that’s what this was all about.
Today I wanted to write a script that I could execute from both *nix (using Bash or a similar shell) and on Windows (from a command prompt, i.e. a batch file). I found Max Norin’s solution which works, but has a few limitations, e.g. when run it outputs either the
word “off” when run in *nix or the word “goto” when run on Windows. There’s got to be a sneaky solution, right?
Here’s my improved version:
 1
 2
 3
 4
 5
 6
 7
 8
 9
10
11
12
@goto(){
# Linux code here
uname -o
}
@goto $@
exit
:(){
@echooffrem Windows script hereecho%OS%
Mine exploits the fact that batch files can prefix commands with @ to suppress outputting them as they execute. So @goto can be a valid function name in
bash/zsh etc. but is interpreted as a literal goto command in a Windows Command Prompt. This allows me to move the echo off command –
which only has meaning to Windows – into the Windows section of the script and suppress it with @.
The file above can be saved as e.g. myfile.cmd and will execute in a Windows Command Prompt (or in MS-DOS) or your favourite *nix OS. Works in MacOS/BSD too, although
obviously any more-sophisticated script is going to have to start working around the differences between GNU and non-GNU versions of core utilities, which is always a bit of a pain!
Won’t work in sh because you can’t define functions like that.
But the short of it is you can run this on a stock *nix OS and get:
$ ./myfile.cmd
GNU/Linux
And you can run it on Windows and get:
> .\myfile.cmd
Windows_NT
You can’t put a shebang at the top because Windows hates it, but there might be a solution using PowerShell scripts (which use
hashes for comments: that’s worth thinking about!). In any case: if the interpreter strictly matters you’ll probably want to shell to it on line 3 with e.g. bash -c.
Why would you want such a thing? I’m not sure. But there is is, if you do.
Prior to 2018, Three Rings had a relatively simple approach to how it would use pronouns when referring to volunteers.
If the volunteer’s gender was specified as a “masculine” gender (which particular options are available depends on the volunteer’s organisation, but might include “male”, “man”, “cis
man”, and “trans man”), the system would use traditional masculine pronouns like “he”, “his”, “him” etc.
If the gender was specified as a “feminine” gender (e.g .”female”, “woman”, “cis women”, “trans woman”) the system would use traditional feminine pronouns like “she”, “hers”, “her” etc.
For any other answer, no specified answer, or an organisation that doesn’t track gender, we’d use singular “they” pronouns. Simple!
This selection was reflected throughout the system. Three Rings might say:
They have done 7 shifts by themselves.
She verified her email address was hers.
Would you like to sign him up to this shift?
Unfortunately, this approach didn’t reflect the diversity of personal pronouns nor how they’re applied. It didn’t support volunteer whose gender and pronouns are not
conventionally-connected (“I am a woman and I use ‘them/they’ pronouns”), nor did it respect volunteers whose pronouns are not in one of these three sets (“I use ze/zir pronouns”)… a
position it took me an embarrassingly long time to fully comprehend.
So we took a new approach:
The New Way
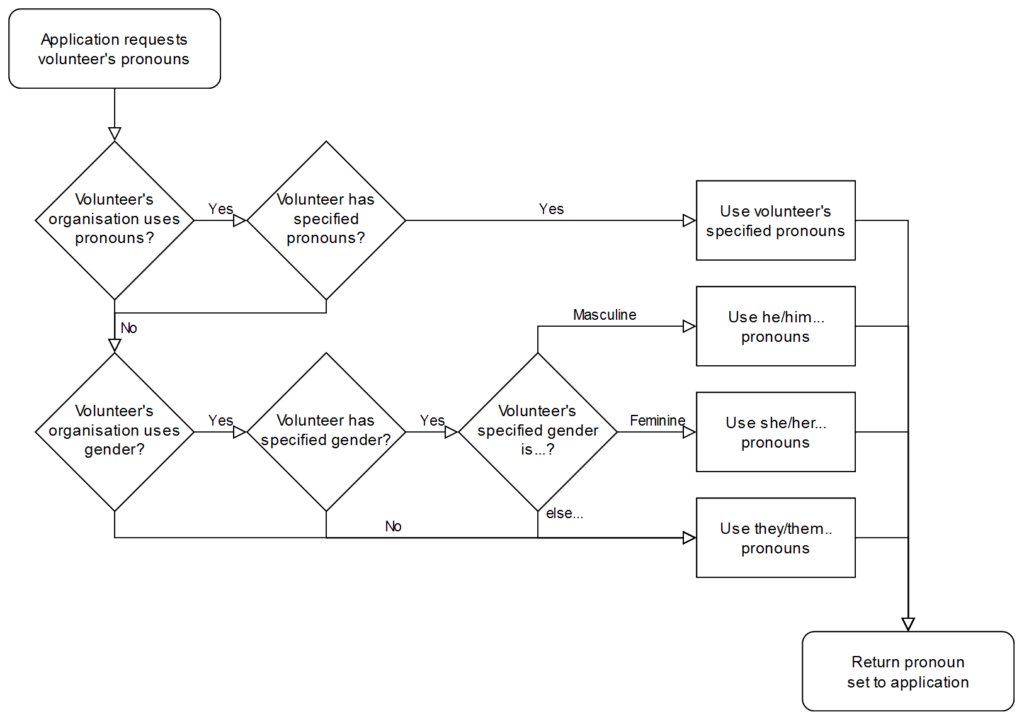
From 2018 we allowed organisations to add a “Pronouns” property, allowing volunteers to select from 13 different pronoun sets. If they did so, we’d use it; failing that we’d continue to
assume based on gender if it was available, or else use the singular “they”.
The process has some further complexities to cover the fact that we say “they are” but “he is“, but this broadly covers it.
Let’s take a quick linguistics break
Three Rings‘ pronoun field always shows five personal pronouns, separated by slashes, because you can’t necessarily derive one from another. That’s one for each of
five types:
the subject, used when the person you’re talking about is primary argument to a verb (“he called”),
object, for when the person you’re talking about is the secondary argument to a transitive verb (“he called her“),
dependent possessive, for talking about a noun that belongs to a person (“this is their shift”),
independent possessive, for talking about something that belongs to a person potentially would an explicit noun (“this is theirs“), and the
reflexive (and intensive), two types which are generally the same in English, used mostly in Three Rings when a person is both the subject
and indeirect of a verb (“she signed herself up to a shift”).
Let’s see what those look like – here are the 13 pronoun sets supported by Three Rings at the time of writing:
Subject
Object
Possessive
Reflexive/intensive
Dependent
Independent
he
him
his
himself
she
her
hers
herself
they
them
their
theirs
themselves
e
em
eir
eirs
emself
ey
eirself
hou
hee
hy
hine
hyself
hu
hum
hus
humself
ne
nem
nir
nirs
nemself
per
pers
perself
thon
thons
thonself
ve
ver
vis
verself
xe
xem
xyr
xyrs
xemself
ze
zir
zirs
zemself
That’s all data-driven rather than hard-coded, by the way, so adding additional pronoun sets is very easy for our developers. In fact, it’s even possible for us to apply an additional
“override” on an individual, case-by-case basis: all we need to do is specify the five requisite personal pronouns, separated by slashes, and Three Rings understands how to use
them.
Writing code that respects pronouns
Behind the scenes, the developers use a (binary-gendered, for simplicity) convenience function to produce output, and the system corrects for the pronouns appropriate to the volunteer
in question:
<%=@volunteer.his_her.capitalize %>
account has been created for
<%=@volunteer.him_her %>
so
<%=@volunteer.he_she %>
can now log in.
The code above will, dependent on the pronouns specified for the volunteer @volunteer, output something like:
His account has been created for him so he can now log in.
Her account has been created for her so she can now log in.
Their account has been created for them so they can now log in.
Eir account has been created for em so ey can now log in.
Etc.
We’ve got extended functions to automatically detect cases where the use of second person pronouns might be required (“Your account has been created for
you so you can now log in.”) as well as to help us handle the fact that we say “they are” but
“he/she/ey/ze/etc. is“.
It’s all pretty magical and “just works” from a developer’s perspective. I’m sure most of our volunteer developers don’t think about the impact of pronouns at all when they code; they
just get on with it.
Is that a complete solution?
Does this go far enough? Possibly not. This week, one of our customers contacted us to ask:
Is there any way to give the option to input your own pronouns? I ask as some people go by she/them or he/them and this option is not included…
You can probably see what’s happened here: some organisations have taken our pronouns property – which exists primarily to teach the system itself how to talk about volunteers – and are
using it to facilitate their volunteers telling one another what their pronouns are.
What’s the difference? Well:
When a human discloses that their pronouns are “she/they” to another human, they’re saying “You can refer to me using either traditional feminine pronouns (she/her/hers etc.)
or the epicene singular ‘they’ (they/their/theirs etc.)”.
But if you told Three Rings your pronouns were “she/her/their/theirs/themselves”, it would end up using a mixture of the two, even in the same sentence! Consider:
She has done 7 shifts by themselves.
She verified her email address was theirs.
That’s some pretty clunky English right there! Mixing pronoun sets for the same person within a sentence is especially ugly, but even mixing them within the same page can cause
confusion. We can’t trivially meet this customer’s request simply by adding new pronoun sets which mix things up a bit! We need to get smarter.
A Newer Way?
Ultimately, we’re probably going to need to differentiate between a more-rigid “what pronouns should Three Rings use when talking about you” and a more-flexible, perhaps
optional “what pronouns should other humans use for you”? Alternatively, maybe we could allow people to select multiple pronoun sets to display but Three Rings would
only use one of them (at least, one of them at a time!): “which of the following sets of pronouns do you use: select as many as apply”?
Even after this, there’ll always be more work to do.
For instance: I’ve met at least one person who uses no pronouns! By this, they actually
mean they use no third-person personal pronouns (if they actually used no pronouns they wouldn’t say “I”, “me”, “my”, “mine” or “myself” and wouldn’t
want others to say “you”, “your”, “yours” and “yourself” to them)! Semantics aside… for these people Three Ringsshould use the person’s name rather than a
pronoun.
Maybe we can get there one day.
Three Rings is already capable of supporting people who use no pronouns, but we don’t yet have a user interface to help them specify this! Maybe it’d look like this?
But so long as Three Rings continues to remain ahead of the curve in its respect for and understanding of pronoun use then I’ll be happy.
Our mission is to focus on volunteers and make volunteering easier. At the heart of that mission is treating volunteers with
respect. Making sure our system embraces the diversity of the 65,000+ volunteers who use it by using pronouns correctly might be a small part of that, but it’s a part of it, and I for
one am glad we make the effort.
As you might know if you were paying close attention in Summer 2019, I run a “URL
shortener” for my personal use. You may be familiar with public URL shorteners like TinyURL
and Bit.ly: my personal URL shortener is basically the same thing, except that only
I am able to make short-links with it. Compared to public ones, this means I’ve got a larger corpus of especially-short (e.g. 2/3 letter) codes available for my personal use. It also
means that I’m not dependent on the goodwill of a free siloed service and I can add exactly the features I want to it.
Little wonder then that my link shortener sat so close to me on my ecosystem diagram the other year.
For the last nine years my link shortener has been S.2, a tool I threw together in Ruby. It stores URLs in a
sequentially-numbered database table and then uses the Base62-encoding of the primary key as the “code” part of the short URL. Aside from the fact that when I create a short link it shows me a QR code to I can
easily “push” a page to my phone, it doesn’t really have any “special” features. It replaced S.1, from which it primarily differed by putting the code at the end of the URL rather than as part of the domain name, e.g. s.danq.me/a0 rather than a0.s.danq.me: I made the switch
because S.1 made HTTPS a real pain as well as only supporting Base36 (owing to the case-insensitivity of domain names).
But S.2’s gotten a little long in the tooth and as I’ve gotten busier/lazier, I’ve leant into using or adapting open source tools more-often than writing my own from scratch. So this
week I switched my URL shortener from S.2 to YOURLS.
YOURLs isn’t the prettiest tool in the world, but then it doesn’t have to be: only I ever see the interface pictured above!
One of the things that attracted to me to YOURLS was that it had a ready-to-go Docker image. I’m not the biggest fan of Docker in general,
but I do love the convenience of being able to deploy applications super-quickly to my household NAS. This makes installing and maintaining my personal URL shortener much easier than it
used to be (and it was pretty easy before!).
Another thing I liked about YOURLS is that it, like S.2, uses Base62 encoding. This meant that migrating my links from S.2 into YOURLS could be done with a simple cross-database
INSERT... SELECT statement:
One of S.1/S.2’s features was that it exposed an RSS feed at a secret URL for my reader to ingest. This was great, because it meant I could “push” something to my RSS reader to read or repost to my blog later. YOURLS doesn’t have such a feature, and I couldn’t find anything in the (extensive) list of plugins that would do it for me. I needed to write my own.
In some ways, subscribing “to yourself” is a strange thing to do. In other ways… shut up, I’ll do what I like.
I could have written a YOURLS plugin. Or I could have written a stack of code in Ruby, PHP, Javascript or
some other language to bridge these systems. But as I switched over my shortlink subdomain s.danq.me to its new home at danq.link, another idea came to me. I
have direct database access to YOURLS (and the table schema is super simple) and the command-line MariaDB client can output XML… could I simply write an XML
Transformation to convert database output directly into a valid RSS feed? Let’s give it a go!
I wrote a script like this and put it in my crontab:
mysql --xml yourls -e \"SELECT keyword, url, title, DATE_FORMAT(timestamp, '%a, %d %b %Y %T') AS pubdate FROM yourls_url ORDER BY timestamp DESC LIMIT 30"\
| xsltproc template.xslt - \
| xmllint --format - \
> output.rss.xml
The first part of that command connects to the yourls database, sets the output format to XML, and executes an
SQL statement to extract the most-recent 30 shortlinks. The DATE_FORMAT function is used to mould the datetime into
something approximating the RFC-822 standard for datetimes as required by
RSS. The output produced looks something like this:
<?xml version="1.0"?><resultsetstatement="SELECT keyword, url, title, timestamp FROM yourls_url ORDER BY timestamp DESC LIMIT 30"xmlns:xsi="http://www.w3.org/2001/XMLSchema-instance"><row><fieldname="keyword">VV</field><fieldname="url">https://webdevbev.co.uk/blog/06-2021/perfect-is-the-enemy-of-good.html</field><fieldname="title"> Perfect is the enemy of good || Web Dev Bev</field><fieldname="timestamp">2021-09-26 17:38:32</field></row><row><fieldname="keyword">VU</field><fieldname="url">https://webdevlaw.uk/2021/01/30/why-generation-x-will-save-the-web/</field><fieldname="title">Why Generation X will save the web Hi, Im Heather Burns</field><fieldname="timestamp">2021-09-26 17:38:26</field></row><!-- ... etc. ... --></resultset>
We don’t see this, though. It’s piped directly into the second part of the command, which uses xsltproc to apply an XSLT to it. I was concerned that my XSLT
experience would be super rusty as I haven’t actually written any since working for my former employer SmartData back in around 2005! Back then, my coworker Alex and I spent many hours doing XML
backflips to implement a system that converted complex data outputs into PDF files via an XSL-FO intermediary.
I needn’t have worried, though. Firstly: it turns out I remember a lot more than I thought from that project a decade and a half ago! But secondly, this conversion from MySQL/MariaDB
XML output to RSS turned out to be pretty painless. Here’s the
template.xslt I ended up making:
<?xml version="1.0"?><xsl:stylesheetxmlns:xsl="http://www.w3.org/1999/XSL/Transform"version="1.0"><xsl:templatematch="resultset"><rssversion="2.0"xmlns:atom="http://www.w3.org/2005/Atom"><channel><title>Dan's Short Links</title><description>Links shortened by Dan using danq.link</description><link> [ MY RSS FEED URL ]</link><atom:linkhref=" [ MY RSS FEED URL ] "rel="self"type="application/rss+xml"/><lastBuildDate><xsl:value-ofselect="row/field[@name='pubdate']"/> UTC</lastBuildDate><pubDate><xsl:value-ofselect="row/field[@name='pubdate']"/> UTC</pubDate><ttl>1800</ttl><xsl:for-eachselect="row"><item><title><xsl:value-ofselect="field[@name='title']"/></title><link><xsl:value-ofselect="field[@name='url']"/></link><guid>https://danq.link/<xsl:value-ofselect="field[@name='keyword']"/></guid><pubDate><xsl:value-ofselect="field[@name='pubdate']"/> UTC</pubDate></item></xsl:for-each></channel></rss></xsl:template></xsl:stylesheet>
That uses the first (i.e. most-recent) shortlink’s timestamp as the feed’s pubDate, which makes sense: unless you’re going back and modifying links there’s no more-recent
changes than the creation date of the most-recent shortlink. Then it loops through the returned rows and creates an <item> for each; simple!
The final step in my command runs the output through xmllint to prettify it. That’s not strictly necessary, but it was useful while debugging and as the whole command takes
milliseconds to run once every quarter hour or so I’m not concerned about the overhead. Using these native binaries (plus a little configuration), chained together with pipes, had
already resulted in way faster performance (with less code) than if I’d implemented something using a scripting language, and the result is a reasonably elegant “scratch your
own itch”-type solution to the only outstanding barrier that was keeping me on S.2.
All that remained for me to do was set up a symlink so that the resulting output.rss.xml was accessible, over the web, to my RSS reader. I hope that next time I’m tempted to write a script to solve a problem like this I’ll remember that sometimes a chain of piped *nix
utilities can provide me a slicker, cleaner, and faster solution.
Update: Right as I finished writing this blog post I discovered that somebody had already solved this
problem using PHP code added to YOURLS; it’s just not packaged as a plugin so I didn’t see it earlier! Whether or not I
use this alternate approach or stick to what I’ve got, the process of implementing this YOURLS-database ➡ XML
➡ XSLT ➡ RSS chain was fun and
informative.
tl;dr? Just want instructions on how to solve Jigidi puzzles really fast with the help of your browser’s dev tools? Skip to that bit.
This approach doesn’t work any more. Want to see one that still does (but isn’t quite so automated)? Here you go!
I don’t enjoy jigsaw puzzles
I enjoy geocaching. I don’t enjoy jigsaw puzzles. So mystery caches that require you to solve an online jigsaw puzzle in order to get the coordinates really
don’t do it for me. When I’m geocaching I want to be outdoors exploring, not sitting at my computer gradually dragging pixels around!
Many of these mystery caches use Jigidi to host these jigsaw puzzles. An earlier version of Jigidi was auto-solvable with a userscript, but the service has continued to be developed and evolve and the current version works quite hard to
make it hard for simple scripts to solve. For example, it uses a WebSocket connection to telegraph back to the server how pieces are moved around and connected to one another and the
server only releases the secret “you’ve solved it” message after it detects that the pieces have been arranged in the appropriate relative configuration.
If there’s one thing I enjoy more than jigsaw puzzles – and as previously established there are about a billion things I enjoy more than jigsaw puzzles – it’s reverse-engineering a
computer system to exploit its weaknesses. So I took a dive into Jigidi’s client-side source code. Here’s what it does:
Get from the server the completed image and the dimensions (number of pieces).
Cut the image up into the appropriate number of pieces.
Shuffle the pieces.
Establish a WebSocket connection to keep the server up-to-date with the relative position of the pieces.
Start the game: the player can drag-and-drop pieces and if two adjacent pieces can be connected they lock together. Both pieces have to be mostly-visible (not buried under other
pieces), presumably to prevent players from just making a stack and then holding a piece against each edge of it to “fish” for its adjacent partners.
I spent some time tracing call stacks to find this line… only to discover that it’s one of only four lines to actually contain the word “shuffle” and I could have just searched for
it…
Looking at that process, there’s an obvious weak point – the shuffling (point 3) happens client-side, and before the WebSocket sync begins. We could override the
shuffling function to lay the pieces out in a grid, but we’d still have to click each of them in turn to trigger the connection. Or we could skip the shuffling entirely and just leave
the pieces in their default positions.
An unshuffled jigsaw appears as a stack, as if each piece from left to right and then top to bottom were placed one at a time into a pile.
And what are the default positions? It’s a stack with the bottom-right jigsaw piece on the top, the piece to the left of it below it, then the piece to the left of that and son on
through the first row… then the rightmost piece from the second-to-bottom row, then the piece to the left of that, and so on.
That’s… a pretty convenient order if you want to solve a jigsaw. All you have to do is drag the top piece to the right to join it to the piece below that. Then move those two to the
right to join to the piece below them. And so on through the bottom row before moving back – like a typewriter’s carriage return – to collect the second-to-bottom row and so on.
How can I do this?
If you’d like to cheat at Jigidi jigsaws, this approach works as of the time of writing. I used Firefox, but the same basic approach should work with virtually any modern desktop web
browser.
Go to a Jigidi jigsaw in your web browser.
Pop up your browser’s developer tools (F12, usually) and switch to the Debugger tab. Open the file game/js/release.js and uncompress it by pressing the
{} button, if necessary.
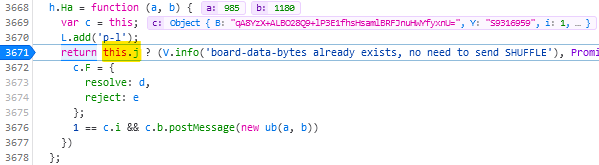
Find the line where the code considers shuffling; right now for me it’s like 3671 and looks like this:
return this.j ? (V.info('board-data-bytes already exists, no need to send SHUFFLE'), Promise.resolve(this.j)) : new Promise(function (d, e) {
I spent some time tracing call stacks to find this line… only to discover that it’s one of only four lines to actually contain the word “shuffle” and I could have just searched
for it…
Set a breakpoint on that line by clicking its line number.
Restart the puzzle by clicking the restart button to the right of the timer. The puzzle will reload but then stop with a “Paused on breakpoint” message. At this point the
application is considering whether or not to shuffle the pieces, which normally depends on whether you’ve started the puzzle for the first time or you’re continuing a saved puzzle from
where you left off.
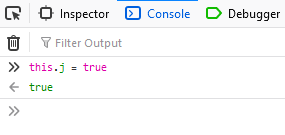
In the developer tools, switch to the Console tab.
Type: this.j = true (this ensures that the ternary operation we set the breakpoint on will resolve to the true condition, i.e. not shuffle the pieces).
Press the play button to continue running the code from the breakpoint. You can now close the developer tools if you like.
Solve the puzzle as described/shown above, by moving the top piece on the stack slightly to the right, repeatedly, and then down and left at the end of each full row.
Update 2021-09-22:Abraxas observes that Jigidi have changed
their code, possibly in response to this shortcut. Unfortunately for them, while they continue to perform shuffling on the client-side they’ll always be vulnerable to this kind of
simple exploit. Their new code seems to be named not release.js but given a version number; right now it’s 14.3.1977. You can still expand it in the same way,
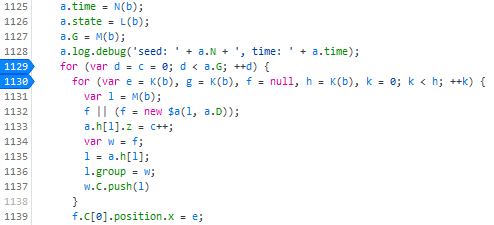
and find the shuffling code: right now for me this starts on line 1129:
Put a breakpoint on line 1129. This code gets called twice, so the first time the breakpoint gets hit just hit continue and play on until the second time. The second time it gets hit,
move the breakpoint to line 1130 and press continue. Then use the console to enter the code d = a.G and continue. Only one piece of jigsaw will be shuffled; the rest will
be arranged in a neat stack like before (I’m sure you can work out where the one piece goes when you get to it).
Update 2023-03-09: I’ve not had time nor inclination to re-“break” Jigidi’s shuffler, but on the rare ocassions I’ve
needed to solve a Jigidi, I’ve come up with a technique that replaces a jigsaw’s pieces with ones that each
show the row and column number they belong to, as well as colour-coding the rows and columns and drawing horizontal and vertical bars to help visual alignment. It makes the process
significantly less-painful. It’s still pretty buggy code though and I end up tweaking it each and every time I use it, but it certainly works and makes jigsaws that lack clear visual
markers (e.g. large areas the same colour) a lot easier.
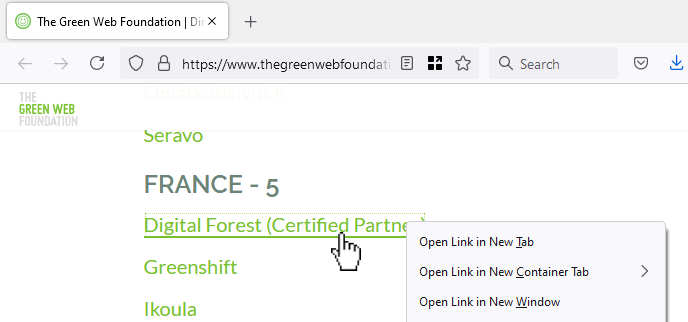
Here’s a perfect example I bumped into earlier this week, courtesy of The Green Web Foundation. This looks like a
hyperlink… but if you open it in a new tab/window, you see a page (not even a 404 page!) with the text “It looks like nothing was found at this location.”
In the site shown in the screenshot above, the developer took something the web gave them for free (a hyperlink), threw it away (by making it a link-to-nowhere), and rebuilt its
functionality with Javascript (without thinking about the fact that you can do more with hyperlinks than click them: you can click-and-drag them, you can bookmark them, you can share
them, you can open them in new tabs etc.). Ugh.
Something you can clearly type a numeric day, month and year into is best.
Three dropdowns are slightly worse, but at least if you use native HTML <select> elements keyboard
users can still “type” to filter.
Everything else – including things that look like <select>s but are really funky React <div>s, is pretty terrible.
Calendars can be great for choosing your holiday date range. But pressing “Prev” ~480 times to get to my month of birth isn’t good. Also: what’s with the time “sliders”? (Yes, I know I’ve implemented these myself, in the past, and I’m sorry.)
People designing webforms that require me to enter my birthdate:
I am begging you: just let me type it in.
Typing it in is 6-8 quick keystrokes. Trying to navigate a little calendar or spinny wheels back to the 1970s is time-consuming, frustrating and unnecessary.
They’re right. Those little spinny wheels are a pain in the arse if you’ve got to use one to go back 40+ years.
These things are okay (I guess) on mobile/touchscreen devices, though I’d still prefer the option to type in my date of birth. But send one to my desktop and I will
curse your name.
Can we do worse?
If there’s one thing we learned from making the worst volume control in the world, the other
year, it’s that you can always find a worse UI metaphor. So here’s my attempt at making a date of birth field that’s somehow
even worse than “date spinners”:
My datepicker implements a game of “higher/lower”. Starting from bounds specified in the HTML code and a random guess, it
narrows-down its guess as to what your date of birth is as you click the up or down buttons. If you make a mistake you can start over with the restart button.
Amazingly, this isn’t actually the worst datepicker into which I’ve entered my date of birth! It’s cognitively challenging compared to most, but it’s relatively fast at
narrowing down the options from any starting point. Plus, I accidentally implemented some good features that make it better than plenty of the datepickers out there:
It’s progressively enhanced – if the Javascript doesn’t load, you can still enter your date of birth in a sensible way.
Because it leans on a <input type="date"> control, your browser takes responsibility for localising, so if you’re from one of those weird countries that prefers
mm-dd-yyyy then that’s what you should see.
It’s moderately accessible, all things considered, and it could easily be improved further.
It turns out that even when you try to make something terrible, so long as you’re building on top of the solid principles the web gives you for free, you can accidentally end
up with something not-so-bad. Who knew?
Among Twitter’s growing list of faults over the years are various examples of its increasing divergence from open Web standards and developer-friendly endpoints. Do you remember when
you used to be able to subscribe to somebody’s feed by RSS? When you could see who follows somebody without first logging in?
When they were still committed to progressive enhancement and didn’t make your browser download ~5MB of Javascript or else not show any content whatsoever? Feels like a long time ago,
now.
For one of the most-popular 50 websites in the world, this score is frankly shameful.
But those complaints aside, the thing that bugged me most this week was how much harder they’ve made it to programatically get access to things that are publicly accessible via web
pages. Like avatars, for example!
If you’re a human and you want to see the avatar image associated with a given username, you can go to twitter.com/that-username and – after you’ve waited
a bit for all of the mandatory JavaScript to download and run (I hope you’re not on a metered connection!) – you’ll see a picture of the user, assuming they’ve uploaded one and not made
their profile private. Easy.
If you’re a computer and you want to get the avatar image, it used to be just as easy; just go to
twitter.com/api/users/profile_image/that-username and you’d get the image. This was great if you wanted to e.g. show a Facebook-style facepile of images of people who’d retweeted your content.
But then Twitter removed that endpoint and required that computers log in to Twitter, so a clever developer made
a service that fetched avatars for you if you went to e.g. twivatar.glitch.com/that-username.
You want to that image? Well you’ll need a Twitter account, a developer account, an OAuth token set, a stack of code…
Recently, I needed a one-off program to get the avatars associated with a few dozen Twitter usernames.
First, I tried the easy way: find a service that does the work for me. I’d used avatars.io before but it’s died, presumably because (as I soon discovered) Twitter had made
things unnecessarily hard for them.
Second, I started looking at the Twitter API
documentation but it took me in the region of 30-60 seconds before I said “fuck that noise” and decided that the set-up overhead in doing things the official way simply wasn’t
justified for my simple use case.
So I decided to just screen-scrape around the problem. If a human can just go to the web page and see the
image, a computer pretending to be a human can do exactly the same. Let’s do this:
The code is ludicrously simple. It took less time, energy, and code to write this than to follow Twitter’s “approved” procedure. You can download the code via Gist.
Given that I only needed to run it once, on a finite list of accounts, I maintain that my approach was probably kinder on their servers than just manually going to every page
and saving the avatar from it. But if you set up a service that uses this approach then you’ll certainly piss off somebody at Twitter and history shows that they’ll take their displeasure out on you without warning.
This output shows the avatar URLs of a half a dozen Twitter accounts. It took minutes to write the code and takes seconds
to run, but if I’d have done it the “right” way I’d still be unnecessarily wading through Twitter’s sprawling documentation.
But it works. It was fast and easy and I got what I was looking for.
And the moral of the story is: if you make an API and it’s terrible, don’t be surprised if people screen-scape your
service instead. (You can’t spell “scraping” without “API”, amirite?)
This weekend, while investigating a bug in some code that generates iCalendar (ICS) feeds, I learned about a weird quirk in the Republic of Ireland’s timezone. It’s such a strange thing (and has so little impact on
everyday life) that I imagine that even most Irish people don’t even know about it, but it’s important enough that it can easily introduce bugs into the way that computer calendars
communicate:
Most of Europe put their clocks forward in Summer, but the Republic of Ireland instead put their clocks backward in Winter.
If that sounds to you like the same thing said two different ways – or the set-up to a joke! – read on:
The timezones of Europe look pretty simple compared to some parts of the world, but the illustration of the British Isles hides an interesting eccentricity.
A Brief History of Time (in Ireland)
Spring forward, fall back… just a little bit back, though. Not too much.
After high-speed (rail) travel made mean solar timekeeping problematic, Great Britain in 1880 standardised on Greenwich Mean Time (UTC+0) as the time throughout the island, and Ireland
standardised on Dublin Mean Time (UTC-00:25:21). If you took a ferry from Liverpool to Dublin towards the end of the
19th century you’d have to put your watch back by about 25 minutes. With air travel not yet being a thing, countries didn’t yet feel the need to fixate on nice round offsets in the
region of one-hour (today, only a handful of regions retain UTC-offsets of half or quarter hours).
That’s all fine in peacetime, but by the First World War and especially following the Easter Rising, the British government decided that it was getting too tricky for their telegraph
operators (many of whom operated out of Ireland, which provided an important junction for transatlantic traffic) to be on a different time to London.
It’s widely believed that the world’s first “U UP? [STOP]” message never got a response as a direct result of Anglo-Irish timezone confusion.
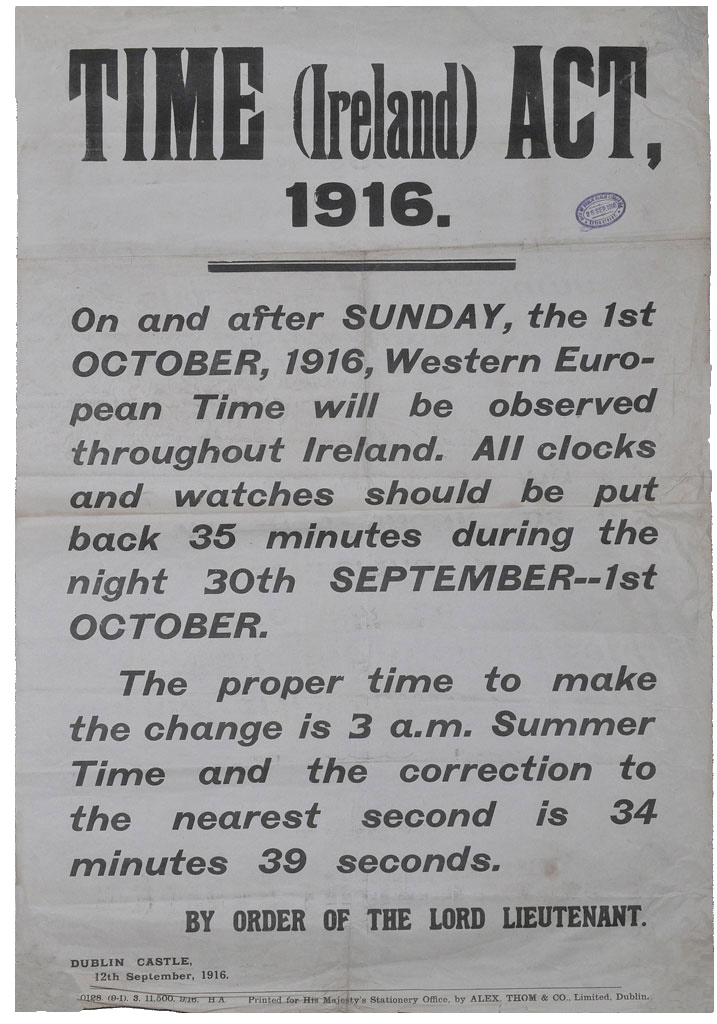
So the Time (Ireland) Act 1916 was passed, putting Ireland on Greenwich Mean Time. Ireland put her clocks back by 35 minutes and synched-up with the rest of the British Isles.
And from then on, everything was simple and because nothing ever went wrong in Ireland as a result of the way it was governed by by Britain, nobody ever had to think about the question of
timezones on the island again.
Ah. Hmm.
“Those Irish people want to govern their own country, do they? After we so kindly shared our king with them? Right-ho: let’s set fire to their cities and see how
they feel then.”
Following Irish independence, the keeping of time carried on in much the same way for a long while, which will doubtless have been convenient for families spread across the Northern
Irish border. But then came the Second World War.
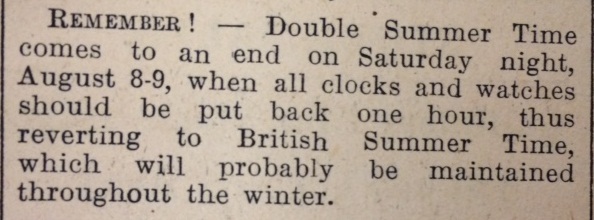
Summers in the 1940s saw Churchill introduce Double Summer Time which he believed
would give the UK more daylight, saving energy that might otherwise be used for lighting and increasing production of war materiel.
Ireland considered using the emergency powers they’d put in place to do the same, as a fuel saving measure… but ultimately didn’t. This was possibly
because aligning her time with Britain might be seen as undermining her neutrality, but was more likely because the government saw that such a measure wouldn’t actually have much impact
on fuel use (it certainly didn’t in Britain). Whatever the reason, though, Britain and Northern Ireland were again out-of-sync with one another until the war ended.
I like to imagine that the development of powerful computers by the folks at Bletchley Park was a result of needing to keep track of timezones across the British Isles.
From 1968 to 1971 Britain experimented with “British Standard Time” – putting the clocks forward in
Summer once, to UTC+1, and then leaving them there for three years. This worked pretty well except if you were Scottish in which case you’ll have found winter mornings to be even
gloomier than you were used to, which was already pretty gloomy. Conveniently: during much of this period Ireland was also on UTC+1, but in their case it was part of a
different experiment. Ireland were working on joining the European Economic Community, and aligning themselves with “Paris time” year-round was an unnecessary concession but an
interesting idea.
But here’s where the quirk appears: the Standard Time Act 1968, which made UTC+1 the “standard” timezone
for the Republic of Ireland, was not repealed and is still in effect. Ireland could have started over in 1971 with a new rule that made UTC+0 the standard and added a “Summer
Time” alternative during which the clocks are put forward… but instead the Standard Time (Amendment) Act
1971 left UTC+1 as Ireland’s standard timezone and added a “Winter Time” alternative during which the clocks are put back.
It all seems so simple until you actually think about it.
(For a deeper look at the legal history of time in the UK and Ireland, see this timeline. Certainly don’t get all your
history lessons from me.)
So what?
You might rightly be thinking: so what! Having a standard time of UTC+0 and going forward for the Summer (like the UK), is functionally-equivalent to having a standard time of UTC+1 and
going backwards in the Winter, like Ireland, right? It’s certainly true that, at any given moment, a clock in London and a clock in Dublin should show the same time. So why would
anybody care?
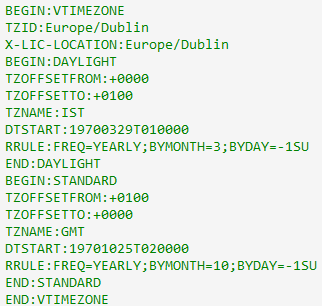
This code for Europe/Dublin, from the Perl module Data::ICal::TimeZone, is technically-incorrect
because it states that the winter time is the standard and daylight savings of +1 hour apply in the summer, rather than the opposite.
But declaring which is “standard” is important when you’re dealing with computers. If, for example, you run a volunteer rota management
system that supports a helpline charity that has branches in both the UK and Ireland, then it might really matter that the
computer systems involved know what each other mean when they talk about specific times.
The author of an iCalendar file can choose to embed timezone information to explain what, in that file, a particular timezone means. That timezone information might
say, for example, “When I say ‘Europe/Dublin’, I mean UTC+1, or UTC+0 in the winter.” Or it might say – like the code above! – “When I say ‘Europe/Dublin’, I mean UTC+0, or UTC+1 in the
summer.” Both of these declarations would be technically-valid and could be made to work, although only the first one would be strictly correct in accordance with the law.
But if you don’t include timezone information in your iCalendar file, you’re relying on the feed subscriber’s computer (e.g. their calendar software) to make a sensible
interpretation.. And that’s where you run into trouble. Because in cases like Ireland, for which the standard is one thing but is commonly-understood to be something different, there’s
a real risk that the way your system interprets and encodes time won’t necessarily be the same as the way somebody else’s does.
If I say I’ll meet you at 12:00 on 1 January, in Ireland, you rightly need to know whether I’m talking about 12:00 in Irish “standard” time (i.e. 11:00, because daylight savings are in
effect) or 12:00 in local-time-at-the-time-of-the-meeting (i.e. 12:00). Humans usually mean the latter because we think in terms of local time, but when your international computer
system needs to make sure that people are on a shift at the same time, but in different timezones, it needs to be very clear what exactly it means!
And when your daylight savings works “backwards” compared to everybody else’s… that’s sure to make a developer somewhere cry. And, possibly, blog about your weird legislation.
Max has produced a list of “naughty strings”: things you might try injecting into your systems along with any fuzz testing you’re doing to check for common errors in escaping,
processing, casting, interpreting, parsing, etc. The copy above is heavily truncated: the list is long!
It’s got a lot of the things in it that you’d expect to find: reserved keywords and filenames, unusual or invalid unicode codepoints, tests for the Scunthorpe Problem, and so on. But perhaps my favourite entry is this one, a test for “human injection”:
# Human injection


                #


                # Strings which may cause human to reinterpret worldview


                If you're reading this, you've been in a coma for almost 20 years now. We're trying a new technique. We don't know where this message will end up in your dream, but we hope it works.
                Please wake up, we miss you.
This is a basic Python shell (really, it’s a fancy wrapper over the system shell) that takes a task and asks OpenAI for what Linux bash command to run based on your description. For
safety reasons, you can look at the command and cancel before actually running it.
…
Of all the stupid uses of OpenAI’s GPT-3, this might be the most-amusing. It’s really interesting to see how close – sometimes spot-on – the algorithm comes to writing the right command
when you “say what you mean”. Also, how terribly, terribly ill-advised it would be to actually use this for real.
The most important feature of Sublime Text is that it doesn’t change. In the modern world, everything changes at a crazy pace. We get new OSes and new phones every year, Google opens and closes its products monthly, many physical devices get announced, produced, and disappear in an interval
shorter than the Sublime Text release cycle. I have two problems with that.
…
I love Sublime Text. It was the editor for which I finally broke my long, long emacs habit
(another editor that “doesn’t change”). Like emacs, Sublime is simple but powerful. Unlike Atom, it doesn’t eat all the RAM in the
universe. And unlike VS Code, I can rely on it being fundamentally the same today, tomorrow, and next year.
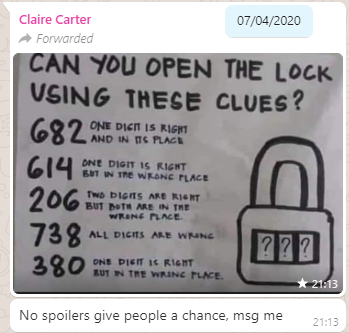
About three months ago, my friend Claire, in a WhatsApp group we both frequent, shared a brainteaser:
Was this way back at the beginning of April? Thank heavens for WhatsApp scrollback.
The puzzle was to be interpreted as follows: you have a three-digit combination lock with numbers 0-9; so 1,000 possible combinations in total. Bulls and Cows-style, a series of clues indicate how “close” each of several pre-established “guesses” are. In “bulls and
cows” nomenclature, a “bull” is a correctly-guessed digit in the correct location and a “cow” is a correctly-guessed digit in the wrong location, so the puzzle’s clues are:
682 – one bull
614 – one cow
206 – two cows
738 – no bulls, no cows
380 – one cow
Feel free to stop scrolling at this point and solve it for yourself. Or carry on; there are no spoilers in this post.
By the time I’d solved her puzzle the conventional way I was already interested in the possibility of implementing a general-case computerised solver for this kind of puzzle, so I did.
My solver uses a simple “brute force” technique, as follows:
Put all possible combinations into a search space.
For each clue, remove from the search space all invalid combinations.
Whatever combination is left is the correct answer.
The first three clues of Claire’s puzzle are sufficient alone to reduce the search space to a single answer, although a human is likely to need more.
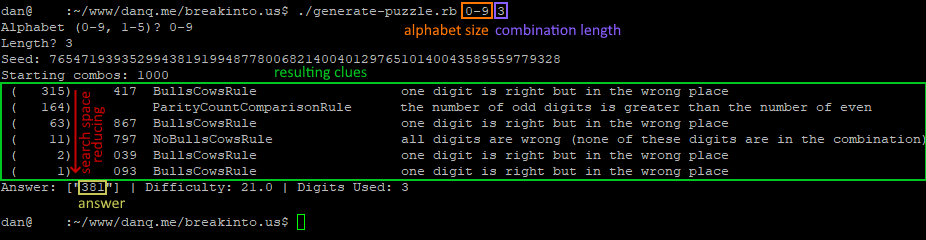
Visualising the solver as a series of bisections of a search space got me thinking about something else: wouldn’t this be a perfectly reasonable way to programatically generate
puzzles of this type, too? Something like this:
Put all possible combinations into a search space.
Randomly generate a clue such that the search space is bisected (within given parameters to ensure that neither too many nor too few clues are needed)
Repeat until only one combination is left
Interestingly, this approach is almost the opposite of what a human would probably do. A human, tasked with creating a puzzle of this sort, would probably choose the answer
first and then come up with clues that describe it. Instead, though, my solution would come up with clues, apply them, and then see what’s left-over at the end.
Sometimes it comes up with inelegant or unchallenging suggestions, but for the most part my generator produces adequate puzzles.
I expanded my generator to go beyond simple bulls-or-cows clues: it’s also capable of generating clues that make reference to the balance of odd and even digits (in a numeric lock), the
number of different digits used in the combination, the sum of the digits of the combination, and whether or not the correct combination “ascends” or “descends”. I’ve ideas for
other possible clue types too, which could be valuable to make even tougher combination locks: e.g. specifying how many numbers in the combination are adjacent to a consecutive number,
specifying the types of number that the sum of the digits adds to (e.g. “the sum of the digits is a prime number”) and so on.
Like the original puzzle, puzzles produced by my generator might have redundancies. In the picture above, the black square can be defined by the light blue, dark blue, and green
bisections only: the yellow bisection is rendered redundant by the light blue one. I’ve left this as a deliberate feature.
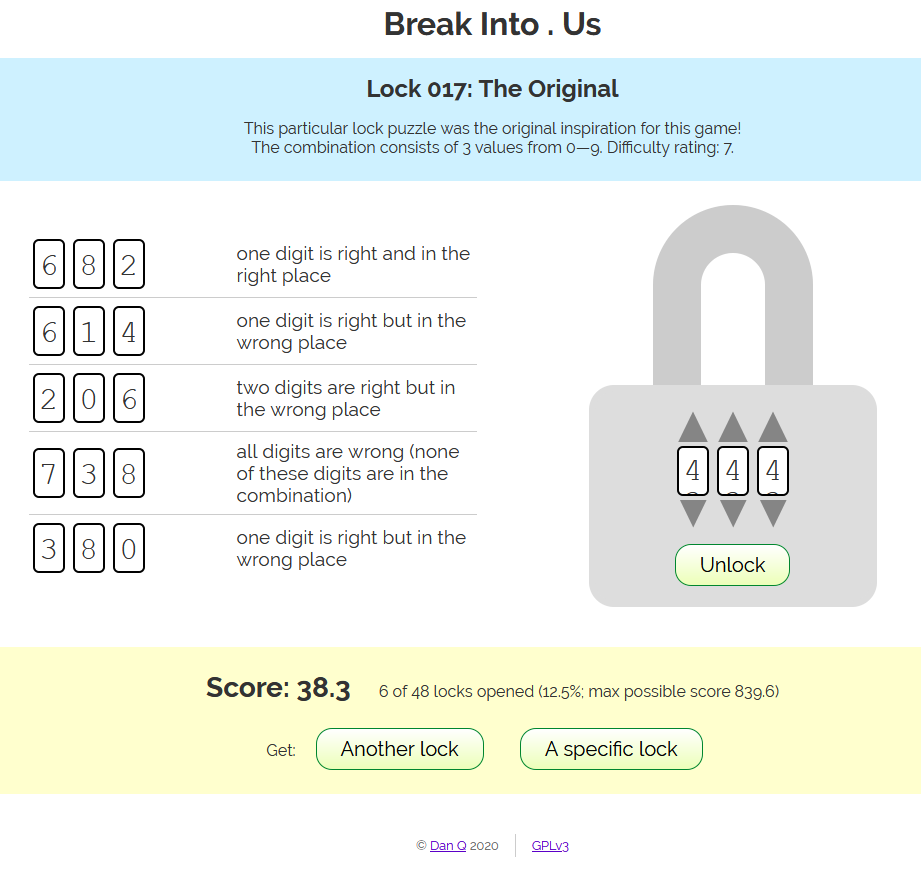
Next up, I wanted to make a based interface so that people could have a go at the puzzles in their web browser, track their progress through the levels, get a “score” based on the
number and difficulty of the locks that they’d cracked (so they can compare it to their friends), and save their progress to carry on next time.
I implemented in pure vanilla HTML, CSS, SVG and JS, with no dependencies. Compressed, it delivers to your browser and is ready-to-play in a little
under 10kB, most of which is the puzzles themselves (which are pregenerated and stored in a JSON file). Naturally, it lends itself well to running offline, so it’s PWA-enhanced with a
service worker so it can be “installed” onto your device, too, and it’ll check for bonus puzzles and other updates periodically.
Naturally, the original puzzle appears in the web-based game, too.
Honestly, the hardest bit of implementing the frontend was the “spinnable” digits: depending on your browser, these are an endless-scrolling <ul> implemented mostly in
CSS and with snap points set, and then some JS to work out “what you meant” based on
where you span to. Which feels like the right way to implement such a thing, but was a lot more work than putting together my own control, not least because of browser
inconsistencies in the implementation of snap points.
Anyway: you should go and play the game, now, and let me know what you think. Is it worth expanding and improving? Should I leave it as it is? I’m
open to ideas (and if you don’t like that I’m not implementing your suggestions, you can always fork a copy of the code and change
it yourself)!
A few folks wrote to me to mention something I missed: security.
When you use code you didn’t author, you’re taking a risk. You’re trusting that the third-party code does not have security issues, that the author has good intent.
…
Chris makes a very good point, especially for those developers of the npm install every-damn-thing persuasion: getting an enormous framework that you don’t completely
understand just because you need a small portion of its features is bad security practice. And the target is a juicy one: a bad actor who finds (or introduces) a vulnerability in
a big and widely-used library has a whole lot of power. Security concerns are a major part of why I go vanilla/stdlib where possible.
But as always with security the answer isn’t so clear-cut and simple, and I’d argue that it’s dangerous to encourage people to write their own solutions as a matter of course, for
security reasons. For a start, you should never roll your own cryptographic libraries because
you’re almost certainly going to fuck it up: an undetectable and easy-to-make mistake in your crypto implementation can lead to a catastrophic cascade and completely undermine the value
of your cryptography. If you’re smart enough about crypto to implement crypto properly, you should contribute towards one of the major libraries. And if you’re not smart enough about
crypto (and if you’re not sure, then you’re not), you should use one of those libraries. And even then you should take care to integrate and use it properly: people have been
tripped over before by badly initialised keys or the use of the wrong kind of cipher for their use-case. Crypto
is hard enough that even experts fuck it up and important enough that you can’t afford to get it wrong.
The same rule applies to a much lesser extent to other parts of your application, and especially for beginner developers. Implementing an authentication/authorisation system isn’t
hard, but it’s another thing where getting it wrong can have disastrous consequences. Beginner (and even intermediate) developers routinely make mistakes with this kind of
feature: unhashed, reversibly-encrypted, or incorrectly-hashed (wrong algorithm, no salt, etc.) passwords, badly-thought-out password reset strategies, incompletely applied access
controls, etc. I’m confident that Chris and I would be in agreement that the best approach is for a developer to learn to implement these things properly and then do so. But if
having to learn to implement them properly is a barrier to getting started, I’d rather than a beginner developer instead use a tried-and-tested off-the-shelf like Devise/Warden.
Other examples of things that beginner/intermediate developers sometimes get wrong might be XSS protection and SQL parameter escaping. And again, for languages that don’t have safety features built in, a framework can fill the gap. Rolling your own
DOM whitelisting code for a social application is possible, but using a solution like DOMPurify is almost-certainly going to be more-secure for most developers because, you guessed it, this is another area where it’s
easy to make a mess of things.
My inclination is to adapt Chris’s advice on this issue, to instead say that for the best security:
Ideally: understand what all your code does, for example because you wrote it yourself.
However: if you’re not confident in your ability to implement something securely (and especially with cryptography), use an off-the-shelf library.
If you use a library: use the usual rules (popularity, maintenance cycle, etc.) to filter the list, but be sure to use the library with the smallest possible footprint –
the best library should (a) do only the one specific task you need done, and no more, and (b) be written in a way that lends itself to you learning from it, understanding it, and
hopefully being able to maintain it yourself.