While I searched through potential hosts in this off-the-path GZ, the geopup just stood in one particular place, looking at me as if I were a fool. I should’ve listened, because clearly
her own geosense is developing: she was right next to the cache’s hiding spot!
TFTC, and thanks once more for such a brilliant loop of caches: all nicely hidden, well cared for, and appropriately sized. Really enjoyed our walk this morning
After a brief hunt in a couple of candidate places a hit the hint, which was reassuringly clear on which host I should be searching. Soon the cache was in hand. TFTC.
After fashioning the requisite tool it still took me a solid 5+ attempts to retrieve the cache – it felt a bit like playing those wiggle-wire fairground games that I suck at so much!
Once retrieved, the dog was very disappointed that start I was holding wasn’t a plaything for her. TFTC, FP awarded for the right container, right hiding place, right difficulty.
A helpful geotrail led me right to this one, though I had to wait until a slow-moving jogger, talking on their phone, had passed before I could retrieve it. TFTC.
Great container in an excellent spot (have another FP!) but retrieval of this one was a bit of a stretch for my old bones! Amazing route you’ve picked out here, too, CO. TFTC!
QEF at the one obvious hiding place within the GZ. Got pickled retrieving the cache, but that was nothing compared to how difficult it was to extract the log from its inner container.
What a challenge! TFTC.
My geosense tingled and I found this cache straightaway, even while the geohound excitedly ran out into the open field ahead and exhorted me to follow. SL, TFTC!
After initially following what I mistook for a geotrail but which turned out to be on entirely the wrong side of the path, I soon saw my mistake, crossed over, and had the cache in
hand. TFTC.
Searched high and low around the obvious hiding place before sitting down to have a think and immediately spotting another even better hiding place she the cache in pain sight: d’oh!
The geopup didn’t want to come all the all the way to it so she waited at the first obvious hiding spot.
Great to see a good sized cache for the environment and in such good condition. FP awarded. Took 4×4 travel bug.
TFTC!
Briefly overshot this one and then failed to get a good GPS fix, but the hint set us right. Gorgeous sun this morning on the poppies peeking up over the corn.
A morning walk for the geohound and I kicked off at this cache, near which we’d parked the car. Long been meaning to explore this loop: let’s see how far we get before the pooch’s tiny
legs give her cause to protest! SL as DQ to save space at this QEF. TFTC!
I was updating my CV earlier this week in anticipation of applying for a handful of interesting-looking roles1
and I was considering quite how many different tech stacks I claim significant experience in, nowadays.
There are languages I’ve been writing in every single week for the last 15+ years, of course, like PHP, Ruby, and JavaScript. And my underlying fundamentals are solid.
But is it really fair for me to be able to claim that I can code in Java, Go, or Python: languages that I’ve not used commercially within the last 5-10 years?
What kind of developer writes the same program six times… for a tech test they haven’t even been asked to do? If you guessed “Dan”, you’d be correct!
Obviously, I couldn’t just let that question lie2.
Let’s find out!
I fished around on Glassdoor for a bit to find a medium-sized single-sitting tech test, and found a couple of different briefs that I mashed together to create this:
In an object-oriented manner, implement an LRU (Least-Recently Used) cache:
The size of the cache is specified at instantiation.
Arbitrary objects can be put into the cache, along with a retrieval key in the form of a string. Using the same string, you can get the objects back.
If a put operation would increase the number of objects in the cache beyond the size limit, the cached object that was least-recently accessed (by either a
put or get operation) is removed to make room for it.
putting a duplicate key into the cache should update the associated object (and make this item most-recently accessed).
Both the get and put operations should resolve within constant (O(1)) time.
Add automated tests to support the functionality.
My plan was to implement a solution to this challenge, in as many of the languages mentioned on my CV as possible in a single sitting.
But first, a little Data Structures & Algorithms theory:
The Theory
Simple case with O(n) complexity
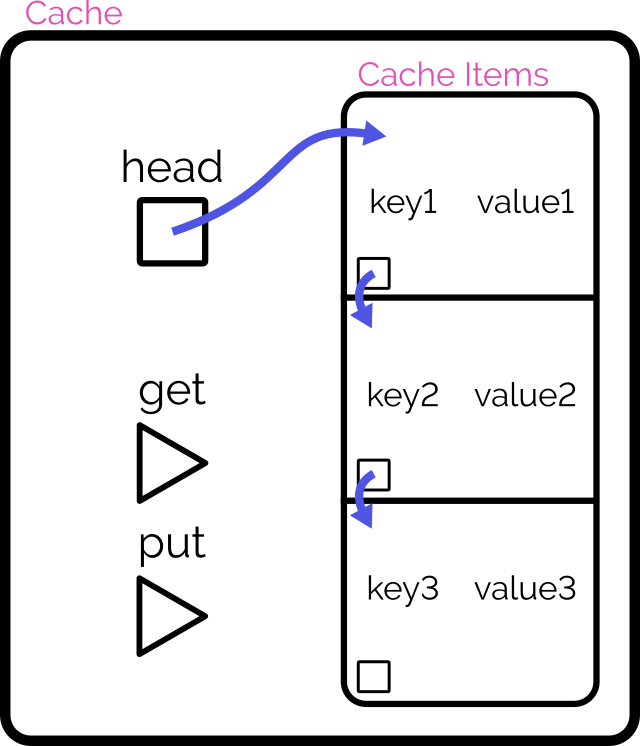
The simplest way to implement such a cache might be as follows:
Use a linear data structure like an array or linked list to store cached items.
On get, iterate through the list to try to find the matching item.
If found: move it to the head of the list, then return it.
On put, first check if it already exists in the list as with get:
If it already exists, update it and move it to the head of the list.
Otherwise, insert it as a new item at the head of the list.
If this would increase the size of the list beyond the permitted limit, pop and discard the item at the tail of the list.
It’s simple, elegant and totally the kind of thing I’d accept if I were recruiting for a junior or graduate developer. But we can do better.
The problem with this approach is that it fails the requirement that the methods “should resolve within constant (O(1)) time”3.
Of particular concern is the fact that any operation which might need to re-sort the list to put the just-accessed item at the top
4. Let’s try another design:
Achieving O(1) time complexity
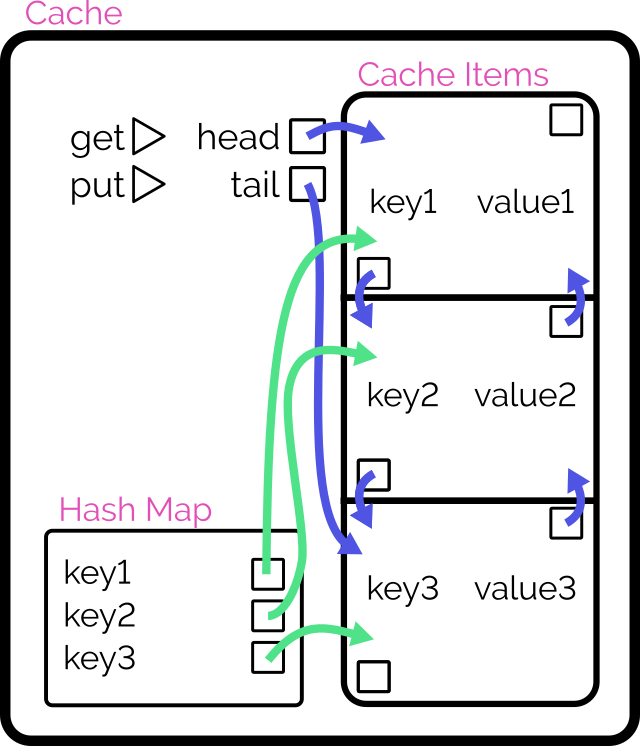
Here’s another way to implement the cache:
Retain cache items in a doubly-linked list, with a pointer to both the head and tail
Add a hash map (or similar language-specific structure) for fast lookups by cache key
On get, check the hash map to see if the item exists.
If so, return it and promote it to the head (as described below).
On put, check the hash map to see if the item exists.
If so, promote it to the head (as described below).
If not, insert it at the head by:
Updating the prev of the current head item and then pointing the head to the new item (which will have the old head item as its
next), and
Adding it to the hash map.
If the number of items in the hash map would exceed the limit, remove the tail item from the hash map, point the tail at the tail item’s prev, and
unlink the expired tail item from the new tail item’s next.
To promote an item to the head of the list:
Follow the item’s prev and next to find its siblings and link them to one another (removes the item from the list).
Point the promoted item’s next to the current head, and the current head‘s prev to the promoted item.
Point the head of the list at the promoted item.
Looking at a plate of pointer-spaghetti makes me strangely hungry.
It’s important to realise that this alternative implementation isn’t better. It’s just different: the “right” solution depends on the use-case5.
The Implementation
That’s enough analysis and design. Time to write some code.
Turns out that if you use enough different languages in your project, GitHub begins to look like itwants to draw a rainbow.
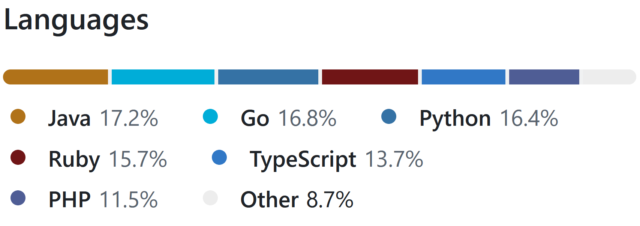
Picking a handful of the more-useful languages on my CV6,
I opted to implement in:
Ruby (with RSpec for testing and Rubocop for linting)
PHP (with PHPUnit for testing)
TypeScript (running on Node, with Jest for testing)
Java (with JUnit for testing)
Go (which isn’t really an object-oriented language but acts a bit like one, amirite?)
Python (probably my weakest language in this set, but which actually ended up with quite a tidy solution)
Naturally, I open-sourced everything if you’d like to see for yourself. It all works, although if you’re actually in need of such a
cache for your project you’ll probably find an alternative that’s at least as good (and more-likely to be maintained!) in a third-party library somewhere!
What did I learn?
This was actually pretty fun! I might continue to expand my repo by doing the same challenge with a few of the other languages I’ve used professionally at some point or
another7.
And there’s a few takeaways I got from this experience –
Lesson #1: programming more languages can make you better at all of them
As I went along, one language at a time, I ended up realising improvements that I could make to earlier iterations.
For example, when I came to the TypeScript implementation, I decided to use generics so that the developer can specify what kind of objects they want to store in the cache,
rather than just a generic Object, and better benefit type-safety. That’s when I remembered that Java supports generics, too, so I went back and used them there as well.
In the same way as speaking multiple (human) languages or studying linguistics can help unlock new ways of thinking about your communication, being able to think in terms of multiple
different programming languages helps you spot new opportunities. When in 2020 PHP 8 added nullsafe operators, union types, and
named arguments, I remember feeling confident using them from day one because those features were already familiar to me from Ruby8, TypeScript9, and Python10,
respectively.
Lesson #2: even when I’m rusty, I can rely on my fundamentals
I’ve applied for a handful of jobs now, but if one of them had invited me to a pairing session on a language I’m rusty on (like Java!) I might’ve felt intimidated.
But it turns out I shouldn’t need to be! With my solid fundamentals and a handful of other languages under my belt, I understand when I need to step away from the code editor and hit
the API documentation. Turns out, I’m in a good position to demo any of my language skills.
I remember when I was first learning Go, I wanted to make use of a particular language feature that I didn’t know whether it had. But because I’d used that feature in Ruby, I knew what
to search for in Go’s documentation to see if it was supported (it wasn’t) and if so, what the syntax was11.
Lesson #3: structural rules are harder to gearshift than syntactic ones
Switching between six different languages while writing the same application was occasionally challenging, but not in the ways I expected.
I’ve had plenty of experience switching programming languages mid-train-of-thought before. Sometimes you just have to flit between the frontend and backend of your application!
But this time around I discovered: changes in structure are apparently harder for my brain than changes in syntax. E.g.:
Switching in and out of Python’s indentation caught me out at least once (might’ve been better if I took the time to install the language’s tools into my text editor first!).
Switching from a language without enforced semicolon line ends (e.g. Ruby, Go) to one with them (e.g. Java, PHP) had me make the compiler sad several times.
This gets even tougher when not writing the language but writing about the language: my first pass at the documentation for the Go version somehow ended up with
Ruby/Python-style #-comments instead of Go/Java/TypeScript-style //-comments; whoops!
I’m guessing that the part of my memory that looks after a language’s keywords, how a method header is structured, and which equals sign to use for assignment versus comparison… are
stored in a different part of my brain than the bit that keeps track of how a language is laid-out?12
Okay, time for a new job
I reckon it’s time I got back into work, so I’m going to have a look around and see if there’s any roles out there that look exciting to me.
If you know anybody who’s looking for a UK-based, remote-first, senior+, full-stack web developer with 25+ years experience and more languages than you can shake a stick at… point them at my CV, would you?
Footnotes
1 I suspect that when most software engineers look for a new job, they filter to the
languages, frameworks, they feel they’re strongest at. I do a little of that, I suppose, but I’m far more-motivated by culture, sector, product and environment than I am by the shape
of your stack, and I’m versatile enough that technology specifics can almost come second. So long as you’re not asking me to write VB.NET.
2 It’s sort-of a parallel to how I decided to check
the other week that my Gutenberg experience was sufficiently strong that I could write standard ReactJS, too.
3 I was pleased to find a tech test that actually called for an understanding of algorithm
growth/scaling rates, so I could steal this requirement for my own experiment! I fear that sometimes, in their drive to be pragmatic and representative of “real work”, the value of a
comprehension of computer science fundamentals is overlooked by recruiters.
4 Even if an algorithm takes the approach of creating a new list with the
inserted/modified item at the top, that’s still just a very-specific case of insertion sort when you think about it, right?
5 The second design will be slower at writing but faster at
reading, and will scale better as the cache gets larger. That sounds great for a read-often/write-rarely cache, but your situation may differ.
6 Okay, my language selection was pretty arbitrary. But if I’d have also come up with
implementations in Perl, and C#, and Elixir, and whatever else… I’d have been writing code all day!
7 So long as I’m willing to be flexible about the “object-oriented” requirement, there are
even more options available to me. Probably the language that I last wrote longest ago would be Pascal: I wonder how much of that I remember?
8 Ruby’s safe navigation/”lonely” operator did the same thing as PHP’s nullsafe operator
since 2015.
9 TypeScript got union types back in 2015, and apart from them being more-strictly-enforced they’re basically identical to
PHP’s.
10 Did you know that Python had keyword arguments since its very first public release
way back in 1994! How did it take so many other interpreted languages so long to catch up?
11 The feature was the three-way comparison or “spaceship operator”, in case you were wondering.
12 I wonder if anybody’s ever laid a programmer in an MRI machine while they code? I’d
be really interested to see if different bits of the brain light up when coding in functional programming languages than in procedural ones, for example!