I made a massively multiplayer snake game that’s accessible over ssh. Play by running ssh snakes.run in your terminal…
I’d been speculating for the last month or so what Nolen Royalty had been working on recently that had required
such high-performance out of the SSH protocol, but now we know: it’s massively multiplayer snake.
My personal best length is in the region of 180, but I wouldn’t dare risking taking a shortcut when I’m at those lofty heights.
There’s a philosophical thing here that makes it feel different from probably any other Snake game you’ve ever played: it’s a thin client. All of the program
runs on the server.
Even slither.io is a split-client. The server is responsible for game state, but rendering the graphics based upon that state runs in JavaScript code in the browser. Not so
with snakes.run. The entire output is delivered as terminal rendering instructions.
It’s a reminder of how computing used to be. Dumb terminals sharing a mainframe that would do all of the processing, with only basic I/O being delegated to the terminals,
was the dominant way to use computers in the 1960s through 1970s, until the growth of microcomputer technologies made it cost-efficient to make “thick” clients: powerful computers that
would sit right on your desk.
It took decades until long-distance networks came to the scale and performance that we see today: fast enough that worldwide thin-client architectures are once again
possible. Nowadays, the closest thing most people use to a thin client… is their Web browser, passing messages back and forth. If you’re playing a real-time multiplayer game, though,
you expect the processing to be shared between your computer (for low latency graphical output) and the server (for state management and prevention of cheating).
snakes.run tips your expectation on its head. And that’s pretty cool.
As I’ll demonstrate, it’s surprisingly easy to spin up your own VPN provider on a virtual machine hosted by your choice of the cloud providers. You pay for the hours you need
it2,
and then throw it away afterwards.
If you’d prefer to use GCP, AWS Azure, or whomever else you like: all you need is a Debian 13 VM with a public IP address (the cheapest one available is usually plenty!)
and this bash script.
If you prefer the command-line, Linode’s got an API. But we’re going for ‘easy’ today, so it’ll all be clicking buttons and things.
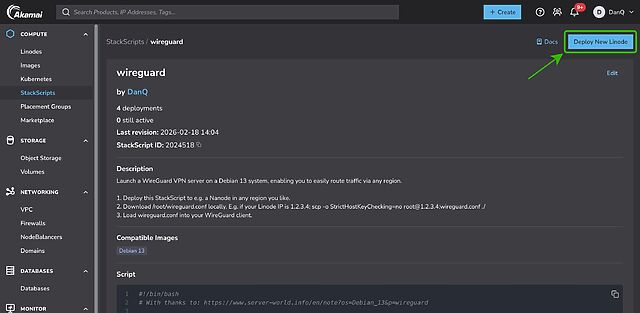
First, spin up a VM and run my script3.
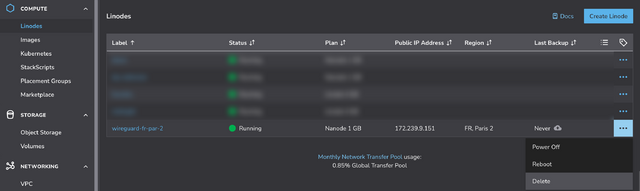
If you’re using Linode, you can do this by going to my StackScript and clicking ‘Deploy New Linode’.
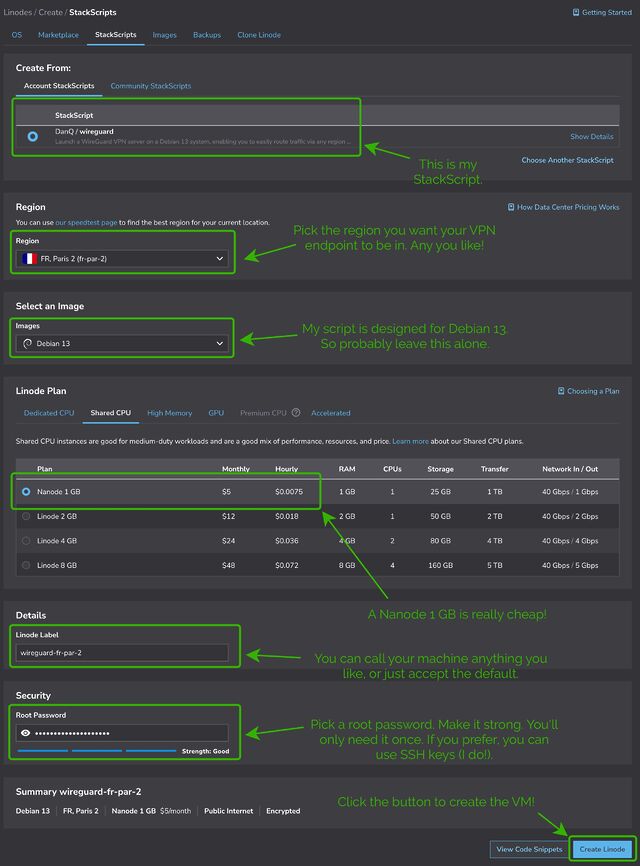
You might see more configuration options than this, but you can ignore them.
Choose any region you like (I’m putting this one in Paris!), select the cheapest “Shared CPU” option – Nanode 1GB – and enter a (strong!) root password, then click Create Linode.
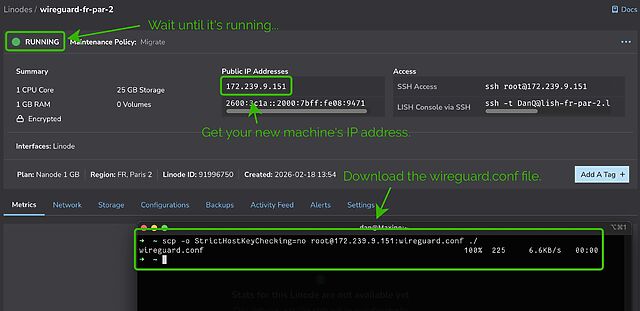
It’ll take a few seconds to come up. Watch until it’s running.
Don’t like SCP? You can SSH in and ‘cat’ the configuration or whatever else you like.
My script automatically generates configuration for your local system. Once it’s up and running you can use the machine’s IP address to download wireguard.conf locally. For
example, if your machine has the IP address 172.239.9.151, you might type scp -o StrictHostKeyChecking=no root@172.239.9.151:wireguard.conf ./ – note that I
disable StrictHostKeyChecking so that my computer doesn’t cache the server’s SSH key (which feels a bit pointless for a “throwaway” VM that I’ll never connect to a second time!).
If you’re on Windows and don’t have SSH/SCP, install one. PuTTY remains a solid choice.
File doesn’t exist? Give it a minute and try again; maybe my script didn’t finish running yet! Still nothing? SSH into your new VM and inspect
stackscript.log for a complete log of all the output from my script to see what went wrong.
Not got WireGuard installed on your computer yet? Better fix that.
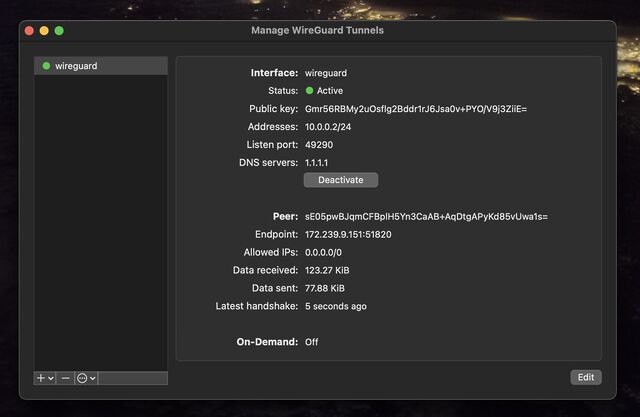
Open up WireGuard on your computer, click the “Import tunnel(s) from file” button, and give it the file you just downloaded.
You can optionally rename the new connection. Or just click “Activate” to connect to your VPN!
If you see the ‘data received’ and ‘data sent’ values changing, everything’s probably working properly!
You can test your Internet connection is being correctly routed by your VPN by going to e.g. icanhazip.com or ipleak.net: you should see the IP address of your new virtual machine and/or geolocation data that indicates that you’re in your selected region.
When you’re done with your VPN, just delete the virtual machine. Many providers use per-minute or even per-second fractional billing, so you can easily end up spending only a handful of
cents in order to use a VPN for a reasonable browsing session.
Again, you can script this from your command-line if you’re the kind of person who wants a dozen different locations/IPs in a single day. (I’m not going to ask why.)
When you’re done, just disconnect and – if you’re not going to use it again immediately – delete the virtual machine so you don’t have to pay for it for a minute longer than you
intend4.
I stopped actively paying for VPN subscriptions about a decade ago and, when I “need” the benefits of a VPN, I’ve just done things like what I’ve described above. Compared to a
commercial VPN subscription it’s cheap, (potentially even-more) private, doesn’t readily get “detected” as a VPN by the rare folks who try to detect such things, and I can enjoy my
choice of either reusable or throwaway IP addresses from wherever I like around the globe.
And if the government starts to try to age-gate commercial VPNs… well then that’s just one more thing going for my approach, isn’t it?
Footnotes
1 If you’re a heavy, “always-on” VPN user, you might still be best-served by one of the
big commercial providers, but if you’re “only” using a VPN for 18 hours a day or less then running your own on-demand is probably cheaper, and gives you some fascinating
benefits.
2 Many providers have coupons equivalent to hundreds of hours of free provision, so as
long as you’re willing to shuffle between cloud providers you can probably have a great and safe VPN completely for free; just sayin’.
3 Obviously, you shouldn’t just run code that strangers give you on the Internet unless
you understand it. I’ve tried to make my code self-explanatory and full of comments so you can understand what it does – or at least understand that it’s harmless! – but if you don’t
know and trust me personally, you should probably use this as an excuse to learn what you’re doing. In fact, you should do that anyway. Learning is fun.
4 Although even if you forget and it runs for an entire month before your billing cycle
comes up, you’re out, what… $5 USD? Plenty of commercial VPN providers would have charged you more than that!
It’s the year 2101. Corporations have taken over the world. The only way to be free is to join a pirate crew and start plundering the galaxy. The only means of survival is to play
basketball.
Now it’s your turn to go out there and make a name for yourself. Create your crew and start wandering the galaxy in search of worthy basketball opponents.
The game is under heavy development and breaking changes are often introduced. If you can’t continue an old game because the save file is invalid, you probably need to start a new
one or open an issue to check if the save file can be migrated.
…
Just try it out!
Connect via SSH to try the game.
ssh rebels.frittura.org -p 3788
Save files are deleted after 2 days of inactivity.
…
I feel like I’m reading a lot about SSH lately and how it can be used for exotic and unusual tasks. Tarpitting‘s fun, of course, but really what inspires me is all these dinky projects like ssh tiny.christmas that subvert the usual authentication-then-terminal flow that you expect when you connect to an SSH server.
These kinds of projects feel more like connecting to a BBS. And that’s pretty retro (and cool!).
Anyway: Rebels in the Sky is a networked multiplayer terminal-based game about exploring the galaxy with a team of basketball-loving space pirates. I met the main
developer on a forum and they seem cool; I’m interested to see where this quirky little project ends up going!
Further analysis on a smaller pcap pointed to these mysterious packets arriving ~20ms apart.
This was baffling to me (and to Claude Code). We kicked around several ideas like:
SSH flow control messages
PTY size polling or other status checks
Some quirk of bubbletea or wish
One thing stood out – these exchanges were initiated by my ssh client (stock ssh installed on MacOS) – not by my server.
…
In 2023, ssh added keystroke timing obfuscation. The idea is that the speed at
which you type different letters betrays some information about which letters you’re typing. So ssh sends lots of “chaff” packets along with your keystrokes to make it hard for an
attacker to determine when you’re actually entering keys.
That makes a lot of sense for regular ssh sessions, where privacy is critical. But it’s a lot of overhead for an open-to-the-whole-internet game where latency is critical.
…
Keystroke timing obfuscation: I could’ve told you that! Although I wouldn’t necessarily have leapt to the possibility of mitigating it server-side by patching-out support for (or at
least: the telegraphing of support for!) it; that’s pretty clever.
Altogether this is a wonderful piece demonstrating the whole “engineer mindset”. Detecting a problem, identifying it, understanding it, fixing it, all tied-up in an engaging narrative.
And after playing with his earlier work, ssh tiny.christmas – which itself inspired me to learn a little Bubble Tea/Wish (I’ve got Some Ideas™️) – I’m quite excited to see where this new
ssh-based project of Royalty’s is headed!
I had a smug moment when I saw security researcher Rob Ricci and friends’ paper empirically analysing brute-force attacks against SSH “in the wild”.1 It turns out that putting all your SSH servers on “weird” port
numbers – which I’ve routinely done for over a decade – remains a pretty-effective way to stop all that unwanted traffic2,
whether or not you decide to enhance that with some fail2ban magic.
I was just setting up a new Debian 12 server when I learned about this. I’d already moved the SSH server port away from the default 224, so I figured
I’d launch Endlessh on port 22 to slow down and annoy scanners.
Installation wasn’t as easy as I’d hoped considering there’s a package. Here’s what I needed to do:
Move any existing SSH server to a different port, if you haven’t already, e.g. as shown in the footnotes.
change InaccessiblePaths=/run /var into InaccessiblePaths=/var
Reload the modified service: sudo systemctl daemon-reload
Configure Endlessh to run on port 22 rather than its default of 2222: echo "Port 22" | sudo tee /etc/endlessh/config
Start Endlessh: sudo service endlessh start
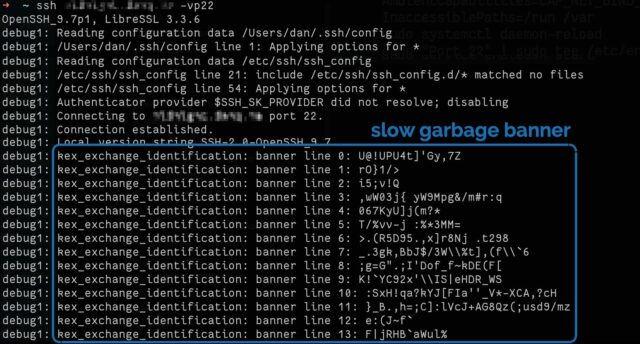
To test if it’s working, connect to your SSH server on port 22 with your client in verbose mode, e.g. ssh -vp22 example.com and look for banner lines full of random garbage
appearing at 10 second intervals.
It doesn’t provide a significant security, but you get to enjoy the self-satisfied feeling that you’re trolling dozens of opportunistic script kiddies a day.
Footnotes
1 It’s a good paper in general, if that’s your jam.
2 Obviously you gain very little security by moving to an unusual port number, given that
you’re already running your servers in “keys-only” (PasswordAuthentication no) configuration mode already, right? Right!? But it’s nice to avoid all the unnecessary
logging that wave after wave of brute-force attempts produce.
3 Which I can only assume is pronounced endle-S-S-H, but regardless of how it’s said out
loud I appreciate the wordplay of its name.
4 To move your SSH port, you might run something like echo "Port 12345" | sudo tee
/etc/ssh/sshd_config.d/unusual-port.conf and restart the service, of course.
[this post has been partially damaged during a server failure on 11 July 2004; with the exception of the images, it was recovered on 13 October 2018]
Paul has been stuck with a problem of late – he’s now living in
university accomodation, and he’s found that he can’t connect through the university firewall to his external mail server. I advised him that it’s possible to set up an ‘SSH Tunnel’
(through central.aber.ac.uk) to fix this problem, but he hasn’t met with much success (see his blog entry for more details). In any case, here’s my investigation (and solution) to the
problem.
How To Use SSH Tunnelling To Allow Services To Pass Through A Firewall
In my example, I’m going to try the opposite to what Paul is trying to achieve. I’m going to try to allow my POP3 e-mail client to get access to the university e-mail server
(pophost.aber.ac.uk). As things stand, this server is on the other side of the university firewall, and is inaccessible from outside. The server central.aber.ac.uk, however, is
accessible from both sides of the firewall. So what I’ve got is this (yes, I know that this is a gross oversimplification):
As you can see, connecting from my home PC is futile:
C:\Documents and Settings\Dan>telnet pophost.aber.ac.uk 110
Connecting To pophost.aber.ac.uk...Could not open connection to the host, on por
t 110: Connect failed
But if I SSH-in to central.aber.ac.uk…
central:~ $ telnet pophost.aber.ac.uk 110
Trying 144.124.16.40...
Connected to pophost.aber.ac.uk.
Escape character is '^]'.
+OK mailsplit Oct 2000 ready
So, what I need to do is to tell my SSH client to connect to central.aber.ac.uk, and forward specific traffic through the firewall to the mail server. Here’s what I
needed to know:
(a) A free TCP port number on my own computer from which I can virtually ‘pipe’ the connection. Most numbers over 1024 are fine. I chose ‘9110’.
(b) The name of the mail server – ‘pophost.aber.ac.uk’.
(c) The TCP port to which I wanted to connect – the standard port for a POP3 mail server is ‘110’.
(d) My user name on a server which: (1) I can connect to; (2) can connect to the server specified in (b). It happens to be ‘dlh9’.
(e) The name of the server specified in (d) (i.e. ‘central.aber.ac.uk’).
(f) My password on the server. Like I’m going to tell you that.
At this point, I’m ready to go. Look what happens when I connect to port 9110 on my own computer, now…
C:\Documents and Settings\Dan>telnet localhost 9110
+OK mailsplit Oct 2000 ready
I could simply point my e-mail program at the ‘mail server’ at localhost:9110, and I’d be able to collect my university e-mail (so long as my SSH connection remained open).
Hopefully this guide will help some folks out there who are struggling with this kind of thing, and in particular, help Paul.