Building a Secret Cabinet

We’ve recently had the attics of our house converted, and I moved my bedroom up to one of the newly-constructed rooms.

To make the space my own, I did a little light carpentry up there: starting with a necessary reshaping of the doors, then moving on to shelving and eventually… a secret cabinet!

I’d love to tell you about how I built it: but first, a disclaimer! I am a software engineer, and with good reason. Letting me near a soldering iron is ill-advised. Letting me use a table saw is tempting fate.

Letting me teach you anything about how you should use a soldering iron or a table saw is, frankly, asking for trouble.

A spirit level on an unfinished shelf, under a window and beneath an uncarpeted floor.
Knowing that I’d been short on shelf space in my old bedroom, I started work on fitting shelves for my new bedroom before the carpet had even arrived.

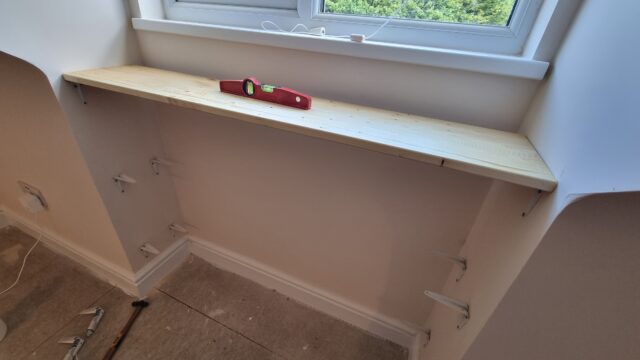
Building a secret cabinet wasn’t part of my plan, but came about naturally after I got started. I’d bought a stack of pine planks and – making use of Ruth’s table saw – cut them to squarely fit beneath each of the two dormer windows1. While sanding and oiling the wood I realised that I had quite a selection of similarly-sized offcuts and found myself wondering if I could find a use for them.

Dan drinks a 0% alcohol beer in front of three upright planks of wood.
The hardest part of sanding and oiling wood on the hottest day of the year is all the beer breaks you have to take. Such a drag.

I figured I had enough lumber to insert a small cabinet into one of the bookshelves, and that got me thinking… what about if it were a secret cabinet, disguised as books unless you knew where to look. Or to go one step further: what if it had some kind of electronic locking mechanism that could be triggered from somewhere else in the room2.

Magpie decal 'perched' on a light switch.
There are other ways in which I’ve made my new room distinctly-“mine” – like the pair of magpies – but probably the secret cabinet is the most-distinctive.

Not wanting to destroy a stack of real books, which is the traditional way to get a collection of book spines for the purpose of decorating a “fake bookshelf” panel3, I looked online and discovered the company that made the fake book spines used at the shop of my former employer. They looked ideal: carefully shaped and painted panels with either an old-school or contemporary look.

Buuut, they don’t seem to be well-equipped for short runs and are doubtless pricey, so I looked elsewhere and found the eBay presence of Beatty Lockey Antiques in Loewstof. They’d acquired a stack of them second-hand from the set of Netflix’s The School for Good and Evil.4

(By the way: at time of writing they’ve still got a few panels left, if you want to make your own…)

I absolutely must sing the praises of Brad at Beatty Lockey Antiques who, after the first delivery of fake book fronts was partially-damaged in transit, was super quick about helping me find the closest-available equivalent (I’d already measured-up based on the one I’d thought I was getting) and sent a replacement.

The cabinet is just a few bits of wood glued together and reinforced with L-shaped corner braces, with a trio of thin strips – made from leftover architrave board – attached using small brass hinges. The fake book fronts are stuck to the strips using double-sided mounting tape left over from installing a bathroom mirror. A simple magnetic clasp holds the door shut when pushed closed5, and the hinges are inclined to “want” the door to stand half-open, which means it only needs a gentle push away from the magnetic catch to swing it open.

Circuit diagram showing a Raspberry Pi Zero W connected to two relays, each connecting 12V DC to a latch solenoid.
The wiring is uncomplicated enough that even I – a self-confessed software engineer – could manage it. Note the separate power supply: those solenoids can draw a full 1 amp in a “surge” that’s enough to give a little Raspberry Pi Zero a Bad Day if you try to power it directly from the computer (there might be some capacitor-based black magic that I don’t understand that could have made this easier, I suppose)!

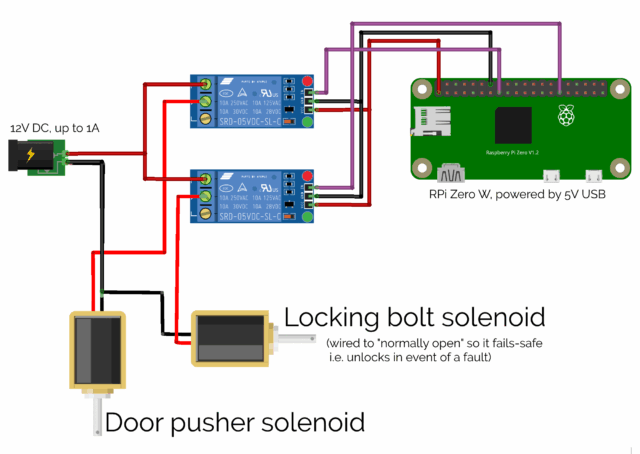
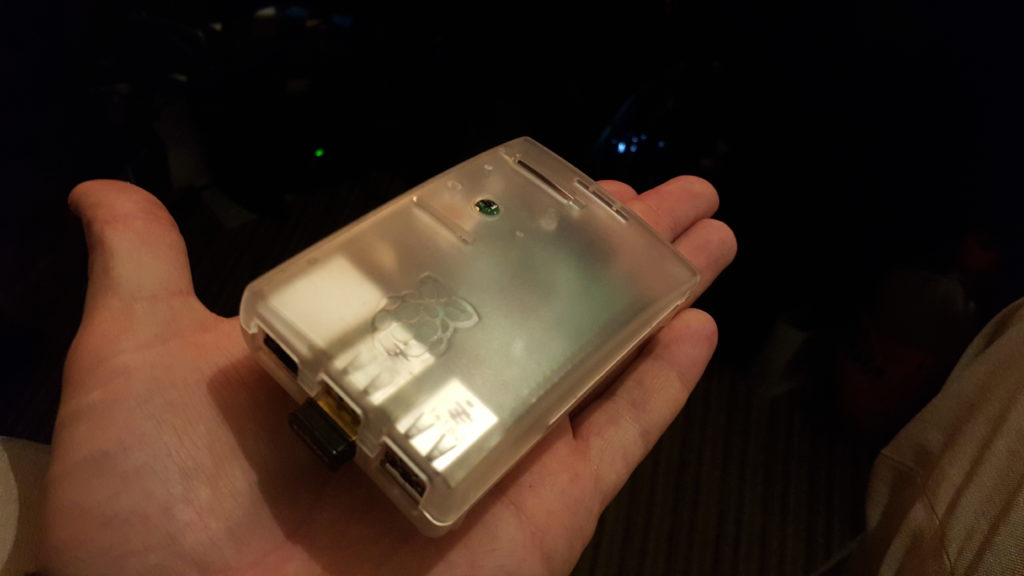
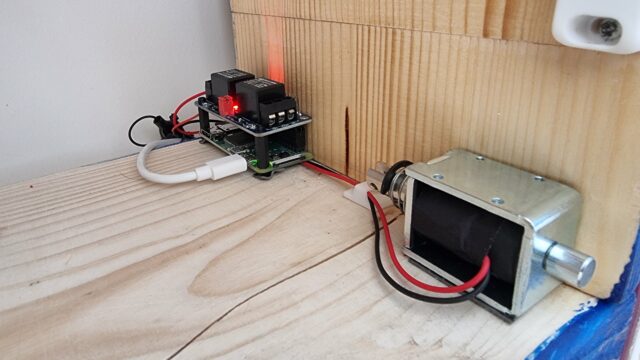
I mounted a Raspberry Pi Zero W into a rear corner inside the cabinet6, and wired it up via a relay to what was sold to me as a “large push-pull solenoid”, then began experimenting with the position in which I’d need to mount it to allow it to “kick” open the door, against the force of the magnetic clasp7.

This was, amazingly, the hardest part of the whole project! Putting the solenoid too close to the door didn’t work: it couldn’t “push” it from a standing start. Too far away, and the natural give of the door took the strain without pushing it open. Just the right distance, and the latch had picked up enough momentum that its weight “kicked” the door away from the magnet and followed-through to ensure that it kept moving.

A second solenoid, mounted inside the top of the cabinet, slides into the “loop” part of a large bolt fitting, allowing the cabinet to be electronically “locked”.

A Raspberry Pi Zero, relay, and solenoid assembly on the bottom outside edge of the inside of the cabinet.
I seriously must’ve spent about an hour getting the position of that little “kicker” in the bottom right just right.

Next up came the software. I started with a very simple Python program8 that would run a webserver and, on particular requests, open the lock solenoid and push with the “kicker” solenoid.

#!/usr/bin/python
#
# a basic sample implementation of a web interface for a secret cabinet
#
# setup:
#   sudo apt install -y python3-flask
#   wget https://github.com/sbcshop/Zero-Relay/blob/master/pizero_2relay.py
#
# running:
#   sudo flask --app web run --host=0.0.0.0 --port 80

from flask import Flask, redirect, url_for
import pizero_2relay as pizero
from time import sleep

# set up pizero_2relay with the two relays attached to this Pi Zero:
r1 = pizero.relay("R1") # The "kicker" relay
r2 = pizero.relay("R2") # The "locking bolt" relay

app = Flask(__name__)

# GET / - nothing here
@app.route("/")
def index():
  return "Nothing to see here."

# GET /relay - show a page with "open" and "lock" links
@app.route("/relay")
def relay():
  return "<html><head><meta name='viewport' content='width=device-width, initial-scale=1'></head><body><ul><li><a href='/relay/open'>Open</a></li><li><a href='/relay/lock'>Lock</a></li></ul>"

# GET /relay/open - open the secret cabinet then return to /relay
# This ought to be a POST request in your implementation, and you probably
# want to add some security e.g. a 
@app.route("/relay/open")
def open():
  # Retract the lock:
  r2.off()
  sleep(0.5)
  # Fire the kicker twice:
  r1.on()
  sleep(0.25)
  r1.off()
  sleep(0.25)
  r1.on()
  sleep(0.25)
  r1.off()
  # Redirect back:
  return redirect(url_for('relay'))

@app.route("/relay/lock")
def lock():
  # Engage the lock:
  r2.on()
  return redirect(url_for('relay'))
Don’t use this code as-is on any kind of open network, obviously. Follow the comments for some tips on what you’ll need to change.

Once I had something I could trigger from a web browser or with curl, I could start experimenting with trigger mechanisms. I had a few ideas (and prototyped a couple of them), including:

  • A mercury tilt switch behind a different book, so you pull it to release the cabinet in the style of a classic movie secret door.
  • A microphone that listens for a specific pattern of knocks on a nearby surface.
I had far too much fun playing about with crappy prototypes.
  • An RFID reader mounted underneath another surface, and a tag on the underside of an ornament: moving the ornament to the “right” place on the surface triggers the cabinet (elsewhere in the room).
  • The current design, shown in the video above, where a code9 is transmitted to the cabinet for verification.

I think I’m happy with what I’ve got going on with it now. And it’s been a good opportunity to improve my carpentry, electronics, and Python.

Footnotes

1 The two dormer windows, wouldn’t you guarantee it, were significantly different widths despite each housing a window of the same width. Such are the quirks of extending a building that the previous occupier had previously half-heartedly tried to extend, I guess.

2 Why yes, I am a big fan of escape rooms. Why do you ask?

3 For one thing, I live with JTA, and I’m confident that he’d somehow be able to hear the silent screams of whatever trashy novels I opted to sacrifice for the good of the project.

4 As a bonus, my 10-year-old is a big fan of the book series that inspired the film (and a more-muted fan of the film itself) and she was ever-so excited at my project using real-life parts of the set of the movie… that she’s asked me to make a similar secret cabinet for her, when we get around to redecorating her room later in the year!

5 If I did it again, I might consider using a low-powered electromagnetic lock to hold the door shut. In this design, I used a permanent magnet and a pair of latch solenoids: one to operate a bolt, the second to “kick” the door open against the pull of the magnet, and… it feels a little clumsier than a magnetic lock might’ve.

6 That double-sided mounting tape really came in handy for this project!

7 Props to vlogger Technology Connections, one of whose excellent videos on the functionality of 1970s pinball tables – maybe this one? – taught me what a latch solenoid was in the first place, last year, which probably saved me from the embarrassment of trying to do this kind of thing with, I don’t know, a stepper motor or something.

8 I’m not a big fan of Python normally, but the people who made my relays had some up with a convenience library for them that was written in it, so I figured it would do.

9 Obviously the code isn’t A-B; I changed it temporarily for the video.

× × × × ×

Raspberry Pi VPN Hotspot (or How To Infuriate Theresa May For Under £40)

As you’re no-doubt aware, Home Secretary Theresa May is probably going to get her way with her “snooper’s charter” by capitalising on events in Paris (even though that makes no sense), and before long, people working for law enforcement will be able to read your Internet usage history without so much as a warrant (or, to put it as the UN’s privacy chief put it, it’s “worse than scary”).

John Oliver on Last Week Tonight discusses the bill.
Or as John Oliver put it, “This bill could write into law a huge invasion of privacy.” Click to see a clip.

In a revelation that we should be thankful of as much as we’re terrified by, our government does not understand how the Internet works. And that’s why it’s really easy for somebody with only a modicum of geekery to almost-completely hide their online activities from observation by their government and simultaneously from hackers. Here’s a device that I built the other weekend, and below I’ll tell you how to do it yourself (and how it keeps you safe online from a variety of threats, as well as potentially giving you certain other advantages online):

"Iceland", one of my Raspberry Pi VPN hotspots
It’s small, it’s cute, and it goes a long way to protecting my privacy online.

I call it “Iceland”, for reasons that will become clear later. But a more-descriptive name would be a “Raspberry Pi VPN Hotspot”. Here’s what you’ll need if you want to build one:

  • A Raspberry Pi Model B (or later) – you can get these from less than £30 online and it’ll come with an SD card that’ll let it boot Raspbian, which is the Linux distribution I’ve used in my example: there’s no reason you couldn’t use another one if you’re familiar with it
  • A USB WiFi dongle that supports “access point” mode – I’m using an Edimax one that cost me under a fiver – but it took a little hacking to make it work – I’ve heard that Panda and RALink dongles are easier
  • A subscription to a VPN with OpenVPN support and at least one endpoint outside of the UK – I’m using VyprVPN because I have a special offer, but there are lots of cheaper options: here’s a great article about choosing one
  • A basic familiarity with a *nix command line, an elementary understanding of IP networking, and a spare 20 minutes.

From here on, this post gets pretty geeky. Unless you plan on building your own little box to encrypt all of your home’s WiFi traffic until it’s well out of the UK and close-to-impossible to link to you personally (which you should!), then you probably ought to come back to it another time.

Here’s how it’s done:

1. Plug in, boot, and install some prerequisites

Plug the WiFi dongle into a USB port and connect the Ethernet port to your Internet router.  Boot your Raspberry Pi into Raspbian (as described in the helpsheet that comes with it), and run:

sudo apt-get install bridge-utils hostapd udhcpd bind9 openvpn

2. Make HostAPD support your Edimax dongle

If, like me, you’re using an Edimax dongle, you need to do an extra couple of steps to make it work as an access point. Skip this bit if you’re using one of the other dongles I listed or if you know better.

wget http://dl.dropbox.com/u/1663660/hostapd/hostapd.zip
unzip hostapd.zip
sudo mv /usr/sbin/hostapd /usr/sbin/hostapd.original
sudo mv hostapd /usr/sbin/hostapd.edimax
sudo ln -sf /usr/sbin/hostapd.edimax /usr/sbin/hostapd
sudo chown root.root /usr/sbin/hostapd
sudo chmod 755 /usr/sbin/hostapd

3. Set up OpenVPN

Get OpenVPN configuration files from your VPN provider: often these will be available under the iOS downloads. There’ll probably be one for each available endpoint. I chose the one for Reyjkavik, because Iceland’s got moderately sensible privacy laws and I’m pretty confident that it would take judicial oversight for British law enforcement to collaborate with Icelandic authorities on getting a wiretap in place, which is the kind of level of privacy I’m happy with. Copy your file to /etc/openvpn/openvpn.conf and edit it: you may find that you need to put your VPN username and password into it to make it work.

sudo service openvpn start

You can now test your VPN’s working, if you like. I suggest connecting to the awesome icanhazip.com and asking it where you are (you can use your favourite GeoIP website to tell you what country it thinks you’re in, based on that):

curl -4 icanhazip.com

Another option would be to check with a GeoIP service directly:

curl freegeoip.net/json/

4. Set up your firewall and restart the VPN connection

Unless your VPN provider gives you DNAT (and even if they do, if you’re paranoid), you should set up a firewall to allow only outgoing connections to be established, and then restart your VPN connection:

sudo iptables -A INPUT -i tun0 -m conntrack --ctstate RELATED,ESTABLISHED -j ACCEPT
sudo iptables -A INPUT -i tun0 -j DROP
sudo sh -c "iptables-save > /etc/iptables.nat.vpn.secure"
sudo sh -c "echo 'up iptables-restore < /etc/iptables.nat.vpn.secure' >> /etc/network/interfaces"
sudo service openvpn restart

5. Configure your WiFi hotspot

Configure bind as your DNS server, caching responses on behalf of Google’s DNS servers, or another DNS server that you trust. Alternatively, you can just configure your DHCP clients to use Google’s DNS servers directly, but caching will probably improve your performance overall. To do this, add a forwarder to /etc/bind/named.conf.options:

forwarders {
  8.8.8.8;
  8.8.4.4;
};

Restart bind, and make sure it loads on boot:

sudo service bind9 restart
sudo update-rc.d bind9 enable

Edit /etc/udhcpd.conf. As a minimum, you should have a configuration along these lines (you might need to tweak your IP address assignments to fit with your local network – the “router” and “dns” settings should be set to the IP address you’ll give to your Raspberry Pi):

start 192.168.0.2
end 192.168.0.254
interface wlan0
remaining yes
opt dns 192.168.0.1
option subnet 255.255.255.0
opt router 192.168.0.1
option lease 864000 # 10 days

Enable DHCP by uncommenting (remove the hash!) the following line in /etc/default/udhcpd:

#DHCPD_ENABLED="yes"

Set a static IP address on your Raspberry Pi in the same subnet as you configured above (but not between the start and end of the DHCP list):

sudo ifconfig wlan0 192.168.0.1

And edit your /etc/network/interfaces file to configure it to retain this on reboot (you’ll need to use tabs, not spaces, for indentation):

iface wlan0 inet static
  address 192.168.0.1
  netmask 255.255.255.0

And comment out the lines relating to hot-plugging of WiFi adapters/network hopping:

#allow-hotplug wlan0
#wpa-roam /etc/wpa_supplicant/wpa_supplicant.conf
#iface default inet manual

Right – onto hostapd, the fiddliest of the tools you’ll have to configure. Create or edit /etc/hostapd/hostapd.conf as follows, but substitute in your own SSID, hotspot password, and channel (to minimise interference, which can slow your network down, I recommend using WiFi scanner tool on your mobile to find which channels your neighbours aren’t using, and use one of those – you should probably avoid the channel your normal WiFi uses, too, so you don’t slow your own connection down with crosstalk):

interface=wlan0
driver=nl80211
ssid=your network name
hw_mode=g
channel=6
macaddr_acl=0
auth_algs=1
ignore_broadcast_ssid=0
wpa=2
wpa_passphrase=your network password
wpa_key_mgmt=WPA-PSK
wpa_pairwise=TKIP
rsn_pairwise=CCMP

Hook up this configuration by editing /etc/default/hostapd:

DAEMON_CONF="/etc/hostapd/hostapd.conf"

Fire up the hotspot, and make sure it runs on reboot:

sudo service hostapd start
sudo service udhcpd start
sudo update-rc.d hostapd enable
sudo update-rc.d udhcpd enable

Finally, set up NAT so that people connecting to your new hotspot are fowarded through the IP tunnel of your VPN connection:

sudo sh -c "echo 1 > /proc/sys/net/ipv4/ip_forward"
sudo sh -c "echo net.ipv4.ip_forward=1 >> /etc/sysctl.conf"
sudo iptables -t nat -A POSTROUTING -o tun0 -j MASQUERADE
sudo sh -c "iptables-save > /etc/iptables.nat.vpn.secure"

6. Give it a go!

Connect to your new WiFi hotspot, and go to your favourite GeoIP service. Or, if your VPN endpoint gives you access to geographically-limited services, give those a go (you’d be amazed how different the Netflix catalogues are in different parts of the world). And give me a shout if you need any help or if you have any clever ideas about how this magic little box can be improved.

Further reading:

×