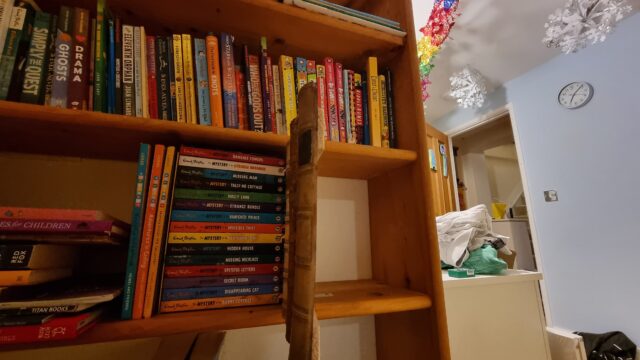
Some of these titles perhaps don’t look like they belong, but she doesn’t seem to mind.
My initial order of fake book fronts was damaged in transit but the excellent eBay seller I’d been dealing with immediately sent a comparable replacement. This had left me with a
spare-but-damaged set of fake book fronts, but with a little gluing, sawing and filing I was able to turn them into a second usable fake cabinet front.
My 10-year-old’s fake cabinet isn’t quite as sophisticated as mine (no Raspberry Pi Zero, solenoids, or electronic locks) – you just have to know where it is and pull on the correct
corner of it to release it – but she still thinks it’s pretty magical2.
I’ve no idea what she’ll store in here, and given that she’s on the cusp of becoming a teenager it’s possible I don’t want to know. But at least I know the secret to opening
it, should I have to.
A cut-down plank of plyboard stained the right colour, some offcuts of skirting board, a couple of butt hinges, some L-brackets, some bathroom mirror mounting tape, the fake book
fronts, and an hour and a half’s work seems totally worth it to give a child the magical experience of a secret compartment in their bedroom. My carpentry’s improved since my one, too:
this time I measured twice before cutting3 and it paid-off with a cleaner, straighter finish.
Footnotes
1 She was pretty impressed already at the secret cabinet, but perhaps more-so when she
discovered that the fake book fronts I’d used were part of the set of The School for Good and Evil, the apparently-disappointing film version of one of her favourite series’
of books.
2 Which, frankly, it is. I wish I’d had a secret compartment in my bedroom
bookshelves when I was her age!
We’ve recently had the attics of our house converted, and I moved my bedroom up to one of the newly-constructed rooms.
To make the space my own, I did a little light carpentry up there: starting with a necessary reshaping of the doors, then moving on to shelving
and eventually… a secret cabinet!
I’d love to tell you about how I built it: but first, a disclaimer! I am a software engineer, and with good reason. Letting me near a soldering iron is ill-advised. Letting me
use a table saw is tempting fate.
Letting me teach you anything about how you should use a soldering iron or a table saw is, frankly, asking for trouble.
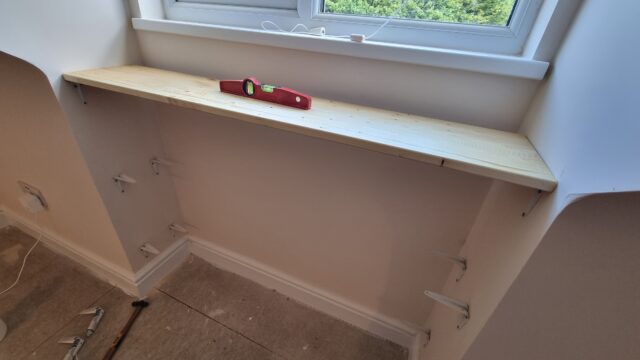
Knowing that I’d been short on shelf space in my old bedroom, I started work on fitting shelves for my new bedroom before the carpet had even arrived.
Building a secret cabinet wasn’t part of my plan, but came about naturally after I got started. I’d bought a stack of pine planks and – making use of Ruth’s table saw – cut them to squarely fit beneath each of the two dormer windows1.
While sanding and oiling the wood I realised that I had quite a selection of similarly-sized offcuts and found myself wondering if I could find a use for them.
The hardest part of sanding and oiling wood on the hottest day of the year is all the beer breaks you have to take. Such a drag.
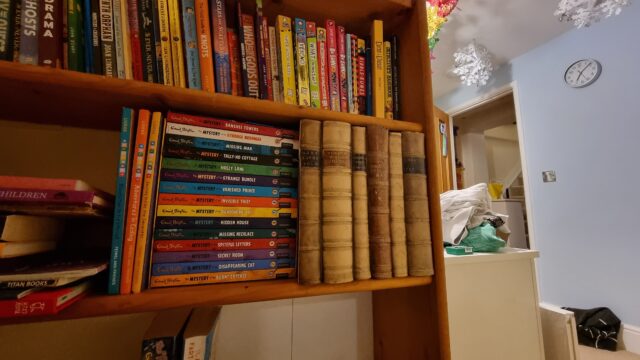
I figured I had enough lumber to insert a small cabinet into one of the bookshelves, and that got me thinking… what about if it were a secret cabinet, disguised as books unless
you knew where to look. Or to go one step further: what if it had some kind of electronic locking mechanism that could be triggered from somewhere else in the room2.
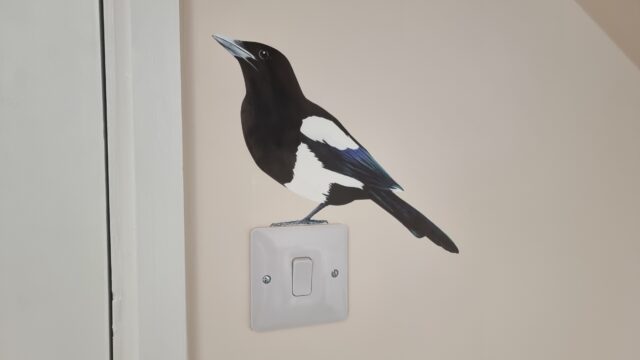
There are other ways in which I’ve made my new room distinctly-“mine” – like the pair of magpies – but probably the secret cabinet is the most-distinctive.
Not wanting to destroy a stack of real books, which is the traditional way to get a collection of book spines for the purpose of decorating a “fake bookshelf” panel3,
I looked online and discovered the company that made the fake book spines used at the shop of my former
employer. They looked ideal: carefully shaped and painted panels with either an old-school or contemporary look.
Buuut, they don’t seem to be well-equipped for short runs and are doubtless pricey, so I looked elsewhere and found the eBay
presence of Beatty Lockey Antiques in Lowestoft. They’d acquired a stack of them second-hand from the set of Netflix’s
The School for Good and Evil.4
(By the way: at time of writing they’ve still got a few panels left, if you want to make your own…)
I absolutely must sing the praises of Brad at Beatty Lockey Antiques who, after the first delivery of fake book fronts was partially-damaged in transit, was super quick about helping
me find the closest-available equivalent (I’d already measured-up based on the one I’d thought I was getting) and sent a replacement.
The cabinet is just a few bits of wood glued together and reinforced with L-shaped corner braces, with a trio of thin strips – made from leftover architrave board – attached using small
brass hinges. The fake book fronts are stuck to the strips using double-sided mounting tape left over from installing a bathroom mirror. A simple magnetic clasp holds the door shut when
pushed closed5,
and the hinges are inclined to “want” the door to stand half-open, which means it only needs a gentle push away from the magnetic catch to swing it open.
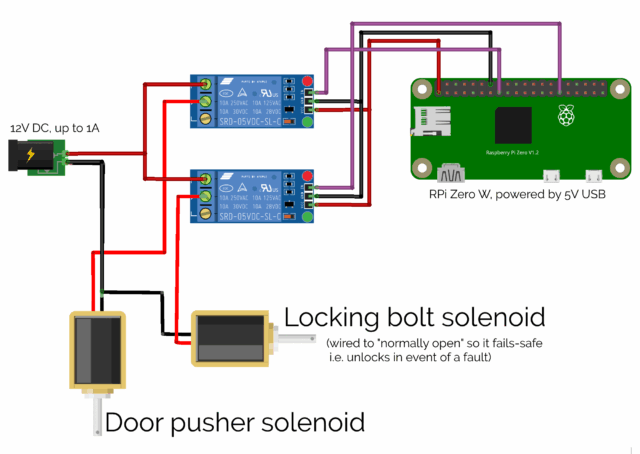
The wiring is uncomplicated enough that even I – a self-confessed software engineer – could manage it. Note the separate power supply: those solenoids can draw a full 1 amp in a
“surge” that’s enough to give a little Raspberry Pi Zero a Bad Day if you try to power it directly from the computer (there might be some capacitor-based black magic that I don’t
understand that could have made this easier, I suppose)!
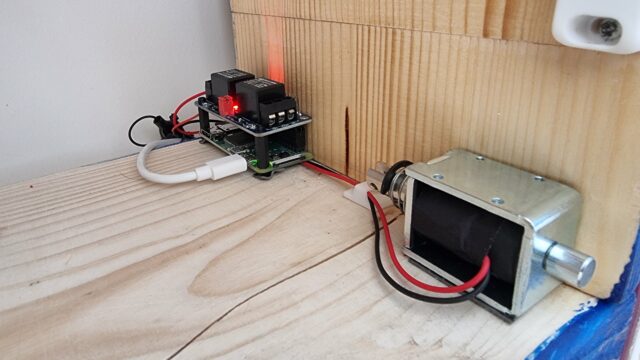
I mounted a Raspberry Pi Zero W into a rear corner inside the cabinet6, and wired it up via a relay to what was sold to me as a “large push-pull solenoid”, then
began experimenting with the position in which I’d need to mount it to allow it to “kick” open the door, against the force of the magnetic clasp7.
This was, amazingly, the hardest part of the whole project! Putting the solenoid too close to the door didn’t work: it couldn’t “push” it from a standing start. Too far away, and the
natural give of the door took the strain without pushing it open. Just the right distance, and the latch had picked up enough momentum that its weight “kicked” the door away from the
magnet and followed-through to ensure that it kept moving.
A second solenoid, mounted inside the top of the cabinet, slides into the “loop” part of a large bolt fitting, allowing the cabinet to be electronically “locked”.
I seriously must’ve spent about an hour getting the position of that little “kicker” in the bottom right just right.
Next up came the software. I started with a very simple Python program8
that would run a webserver and, on particular requests, open the lock solenoid and push with the “kicker” solenoid.
#!/usr/bin/python## a basic sample implementation of a web interface for a secret cabinet## setup:# sudo apt install -y python3-flask# wget https://github.com/sbcshop/Zero-Relay/blob/master/pizero_2relay.py## running:# sudo flask --app web run --host=0.0.0.0 --port 80fromflaskimport Flask, redirect, url_for
importpizero_2relayaspizerofromtimeimport sleep
# set up pizero_2relay with the two relays attached to this Pi Zero:
r1 = pizero.relay("R1") # The "kicker" relay
r2 = pizero.relay("R2") # The "locking bolt" relay
app = Flask(__name__)
# GET / - nothing here@app.route("/")
defindex():
return"Nothing to see here."# GET /relay - show a page with "open" and "lock" links@app.route("/relay")
defrelay():
return"<html><head><meta name='viewport' content='width=device-width, initial-scale=1'></head><body><ul><li><a href='/relay/open'>Open</a></li><li><a href='/relay/lock'>Lock</a></li></ul>"# GET /relay/open - open the secret cabinet then return to /relay# This ought to be a POST request in your implementation, and you probably# want to add some security e.g. a @app.route("/relay/open")
defopen():
# Retract the lock:
r2.off()
sleep(0.5)
# Fire the kicker twice:
r1.on()
sleep(0.25)
r1.off()
sleep(0.25)
r1.on()
sleep(0.25)
r1.off()
# Redirect back:return redirect(url_for('relay'))
@app.route("/relay/lock")
deflock():
# Engage the lock:
r2.on()
return redirect(url_for('relay'))
Don’t use this code as-is on any kind of open network, obviously. Follow the comments for some tips on what you’ll need to change.
Once I had something I could trigger from a web browser or with curl, I could start experimenting with trigger mechanisms. I had a few ideas (and prototyped a couple of
them), including:
A mercury tilt switch behind a different book, so you pull it to release the cabinet in the style of a classic movie secret door.
A microphone that listens for a specific pattern of knocks on a nearby surface.
I had far too much fun playing about with crappy prototypes.
An RFID reader mounted underneath another surface, and a tag on the underside of an ornament: moving the ornament to the “right” place on the surface triggers the cabinet (elsewhere
in the room).
The current design, shown in the video above, where a code9 is transmitted to the cabinet for verification.
I think I’m happy with what I’ve got going on with it now. And it’s been a good opportunity to improve my carpentry, electronics, and Python.
Footnotes
1 The two dormer windows, wouldn’t you guarantee it, were significantly different
widths despite each housing a window of the same width. Such are the quirks of extending a building that the previous occupier had previously half-heartedly tried to
extend, I guess.
2 Why yes, I am a big fan of escape rooms. Why do you ask?
3 For one thing, I live with JTA, and
I’m confident that he’d somehow be able to hear the silent screams of whatever trashy novels I opted to sacrifice for the good of the project.
4 As a bonus, my 10-year-old is a big fan of the book series that inspired the film (and a
more-muted fan of the film itself) and she was ever-so excited at my project using real-life parts of the set of the movie… that she’s asked me to make a similar secret cabinet for
her, when we get around to redecorating her room later in the year!
5 If I did it again, I might consider using a low-powered electromagnetic lock to hold the
door shut. In this design, I used a permanent magnet and a pair of latch solenoids: one to operate a bolt, the second to “kick” the door open against the pull of the magnet, and… it
feels a little clumsier than a magnetic lock might’ve.
6 That double-sided mounting tape really came in handy for this project!
7 Props to vlogger Technology Connections, one of whose excellent videos on the
functionality of 1970s pinball tables – maybe this one? – taught me what a latch solenoid was in the first place, last year,
which probably saved me from the embarrassment of trying to do this kind of thing with, I don’t know, a stepper motor or something.
8 I’m not a big fan of Python normally, but the people who made my relays had some up with
a convenience library for them that was written in it, so I figured it would do.
9 Obviously the code isn’t A-B; I changed it temporarily for the video.
As our house rennovations/attic conversions come to a close, I found myself up in what
will soon become my en suite, fitting a mirror, towel rail, and other accessories.
Wanting to minimise how much my power tool usage disturbed the rest of the house, I went to close the door separating my new bedroom from my rest of my house, only to find that it
didn’t properly fit its frame and instead jammed part-way-closed.
“Oh,” I said, as the door clearly failed to shut, “Damn.”
Somehow we’d never tested that this door closed properly before we paid the final instalment to the fitters. And while I’m sure they’d have come back to repair the problem if I asked, I
figured that it’d be faster and more-satisfying to fix it for myself.
Homes
As a result of an extension – constructed long before we moved in – the house in Preston in which spent much of my childhood had not just a front and a back door but what we called the
“side door”, which connected the kitchen to the driveway.
Unfortunately the door that was installed as the “side door” was really designed for interior use and it suffered for every winter it faced the biting wet North wind.
The side door isn’t visible in this picture: it’s concealed behind the corner of the house, to the left of the car.
My father’s DIY skills could be rated as somewhere between mediocre and catastrophic, but his desire to not spend money “frivolously”
was strong, and so he never repaired nor replaced the troublesome door. Over the course of each year the wood would invariably absorb more and more water and swell until it became stiff
and hard to open and close.
The solution: every time my grandfather would visit us, each Christmas, my dad would have his dad take down the door, plane an eighth of an inch or so off the bottom, and
re-hang it.
Sometimes, as a child, I’d help him do so.
My paternal grandfather was a practical and hand-on engineer and a reasonable carpenter.
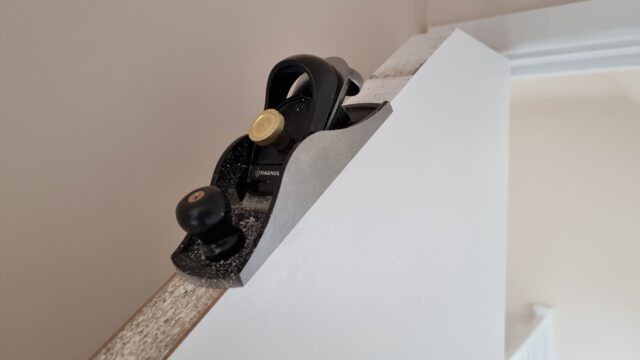
Planes
The first thing to do when repairing a badly-fitting door is work out exactly where it’s sticking. I borrowed a wax crayon from the kids’ art supplies, coloured the edge of the door,
and opened and closed it a few times (as far as possible) to spot where the marks had smudged.
Fortunately my new bedroom door was only sticking along the top edge, so I could get by without unmounting it so long as I could brace it in place. I lugged a heavy fence post rammer
from the garage and used it to brace the door in place, then climbed a stepladder to comfortably reach the top.
I figured I’d only need to remove a few millimetres, so I didn’t mind doing it from atop a stepladder. Hey: here’s a fun thing – when I think about planing a door with my grandfather,
I think in inches; when I think about doing it myself, I think in metric!
Loss
After my paternal grandfather died, there was nobody left who would attend to the side door of our house. Each year, it became a little stiffer, until one day it wouldn’t open at all.
Surely this would be the point at which he’d pry open his wallet and pay for it to be replaced?
I’m not sure there’s a more apt metaphor for my dad’s ability to be stubborn than this photo of him dragging a tyre around Gateshead as a training activity for an Arctic expedition.
Nope. Instead, he inexpertly screwed a skirting board to it and declared that it was now no-longer a door, but a wall.
I suppose from a functionalist perspective he was correct, but it still takes a special level of boldness to simply say “That door? It’s a wall now.”
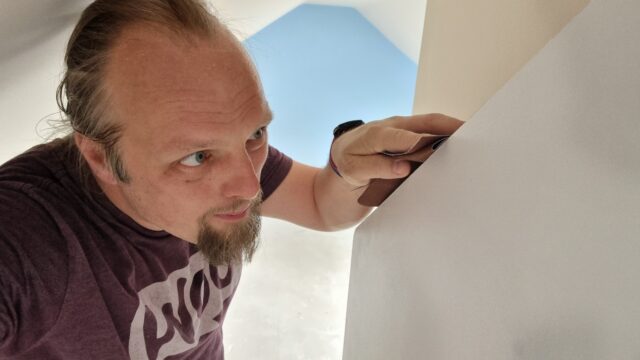
Sand
Of all the important tasks a carpenter (or in this case, DIY-er) must undertake, hand sanding must surely be the least-satisfying.
You wear your fingers out rubbing a piece of wood smooth, and your only reward is getting to do it again with a slightly finer grade of paper.
But reaching the end of the process, the feel of a freshly-planed, carefully-sanded piece of wood is fantastic. This surface represented chaos, and now it represents
order. Order that you yourself have brought about.
Often, you’ll be the only one to know. When my grandfather would plane and sand the bottom edge of our house’s side door, he’d give it a treatment of oil (in a doomed-to-fail attempt to
keep the moisture out) and then hang it again. Nobody can see its underside once it’s hung, and so his handiwork was invisible to anybody who hadn’t spent the last couple of months
swearing at the stiffness of the door.
Swish, swish. Now I’m glad I sanded.
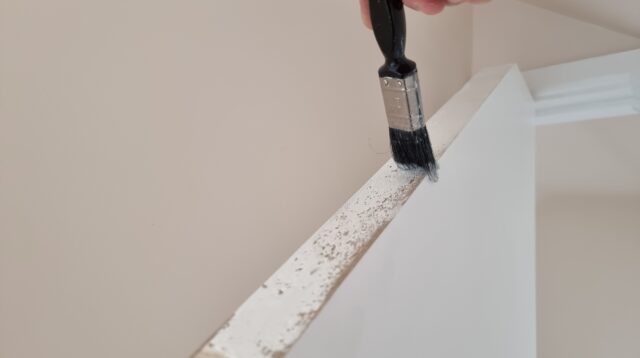
Even though the top of my door is visible – particularly visible, given its sloping face – nobody sees the result of the sanding because it’s hidden beneath a layer of paint.
A few brush strokes provide the final touch to a spot of DIY… that in provided a framing device for me to share a moment of nostalgia
with you.
I’m not sure which is the most-hypnotic in this video: the graceful click-clack motion of the finished product or the careful and methodical production steps that precede it. Either
way, this perpetual calendar is brilliant, but if I owned it I’d absolutely spend the entire time playing with it rather than using it for its intended purpose.